Transistor Power: Night Light Challenge
Sponsored Lesson by KEYSIGHT Technologies

This lesson plan explores the power of the transistor. Students learn the necessity of transistors and their functionality while engaging in a hands-on project to design a night light.
Students will be able to:
- Apply a transistor and photoresistor to their circuit
- Iterate their solution using Tinkercad Circuits
- Design a simple housing to finalize the night light
Age Levels: 10-17
Materials & Preparation
- Tinkercad Circuits & Computers

- LEDs (10 mm or 5 mm) – any colors
- Photoresistor
- Transistor (NPN)- We used PN2222
- Resistors: 2K Ohm resistor and 100 Ohm resistor (you can play with others as well)
- AA Batteries (4 per team) & Holder
- PlayDough (conductive material) & Clay (non-conductive)- optional
- Table of Possibilities: Creative items are for creating the night light.
(pipe cleaners, cups, cardboard, cardstock colored paper, googly eyes, feathers, binder clips, paper clips, Tape/Glue, Scissors, Markers, etc). Also play with:- Paper circuit material (copper tape, 3V coin cell batteries & holders)
Design Challenge
Design and construct a functioning night light. When the light goes out in your room your night light goes on. Students design both the circuit and the housing.
Criteria & Constraints
- Use simulation tool (Tinkercad Circuit) to iterate on circuit design
- Transistor & photoresistor must be included in the circuit
- Housing for the night light must include only the material provided
- Introducing the design challenge!
- Introduce what a Transistor is and it’s history using the PPT Deck
- Discuss the Essential Question: Why a Transistor?
- Prepare students for the design challenge with Tinkercad Circuits.
– Demo the tool – Orient them to the tool and show how to use it.
– Pull up all the required parts for the night light
– Discuss each parts role and features
– In teams of two, have them pull up each part and then play
– Test out how to assemble the part to creating a circuit that as the LED light up when it is dark (a night light)
– Walk around to help teams stuck and answer questions.
– When teams had had about 20-30 minutes to play, end the play time.
– If any teams were successful, choose one to come up and demo their night light
- Demo the creation of a night light. Have students tell you what they think and where things should go.
- Have students work in teams of two to replicate the Tinkercad circuit they made
– Give out the required material for the playdough circuit
– Have students iterate to build the physical night light.
– Test the Circuit: Cover the photoresistor with your hand or place it in a dark area. The LED should light up when it’s dark.

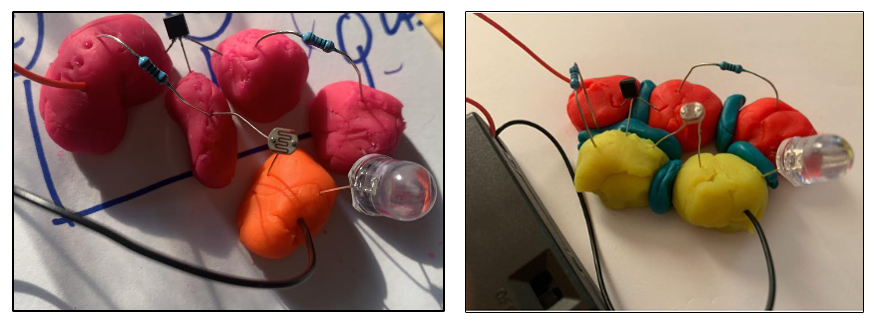
See Sample Photoresistor Circuit (or Night Light Circuit) with the photoresistor, NPN transistor, LED and two resistors (2K Ohm resistor and 100 Ohm resistor). Students can play with various resistance and see how it impacts the circuit. See the light bar for the photoresistor. In this setup the LED lights up when it is dark (a Night Light) and turns off when it is light out.
See Sample Playdough Circuit. The black and red wires that close the circuit are connected to the battery holder. To keep the dough from touching and shorting the circuit, you could provide the students with clay which is non-conductive to go in-between. Students will need to be mindful of the polarity and for the transistor which side is the emitter, etc.
Discuss with students how the circuit works (or have student write up how they think it works):
- In the dark, the photoresistor has high resistance, which allows the transistor to turn on and let current flow through the LED, lighting it up.
- In the light, the photoresistor has low resistance, which prevents the transistor from turning on, keeping the LED off.

Night Light Housing Design
Next, have students design a housing for the night light. Consider turning the playdough circuit into a paper circuit with copper tape. Consider adding a switch to not drain the battery. Provide students access to a table of possibilities with various materials (see materials list).
Close the lesson with a class discussion:
- Why is the transistor important?
- What gadgets do you own that have transistors?
So what is a Transistor?
Transistors are the superhero of electronic parts! They are made of semiconductor material that can either act as a conductor or an insulator giving it its superpower. Imagine a transistor as a magic switch that can turn things on and off, but with a twist. A transistor helps control and amplify electricity, making it super important in all the gadgets we use, like phones, computers, and even toys.
Why Use a Transistor?
(1) Amplify Sound: It can take a small sound (or signal) and makes it bigger.
(2) Automate Things: Imagine you want to turn something on and off really fast, like blinking lights on a toy. A transistor can do this quickly and many times without getting tired.
(3) Conditional Switches: Think of a transistor like a smart switch. It can turn things on or off based on certain conditions, like turning on a night light when it gets dark. So, transistors help make things work automatically and smartly!
To summarize, the transistor is needed if you want to amplify sound/signal, automate things, or conditional switches (turn on when lights go out). They can act like very fast switches.
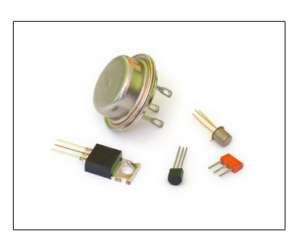
They come in all shapes and sizes (See image) but their function remains the same. Here’s a simple way to understand it:
A transistor has three parts: the Base, Collector, and Emitter (see images of the transistor and the transistor symbol). Think of them as different doors:
![]()
- Collector (C): Think of the Collector as the door where electricity comes in. It’s not the amplifier itself, but it’s part of the path that helps amplify the signal.
- Emitter (E): The Emitter is where the electricity goes out. It’s not the switch, but it works with the Base to control the flow of electricity.
- Base (B): The Base is the magic door that controls everything. When you give it a small push (a tiny electric signal), it can open the other two doors (Collector and Emitter) allowing a bigger flow of electricity to pass from the Collector to the Emitter. Together, they make the transistor turn things on and off and make small signals bigger or amplify them.
There are many different types of transistors. For example, there are N-type (NPN) and P-type transistors (PNP). The main difference is that N-type transistors have negative energy (extra electrons) and P-type transistors have positive energy (holes where electrons can move around).
To dive deeper into how the electrons can move in a semiconductor (like our transistor), play the PhET Semiconductor Simulation. Silicon is the most common semiconductor. By adding different atoms to silicon, we can change its behavior.
To learn more about transistors, watch this video: Transistors: Teeny Tech that Changed the World by Abby Kent (Project for Science and Natural History Filmmaking from Montana State University).
- Transistor: is a switch that can turn things on and off, but with a twist. It can control and amplify electricity. It is made of 3 parts: Base (door that controls the electricity flow), Collector (door electricity comes in through) and Emitter (door electricity goes out)
- Photoresister: is a special kind of electronic part that can “see” light, like a magic eye. It can tell when it’s light or dark. When it’s bright, the magic eye opens wide and lets a lot of electricity flow through. When it’s dark, the magic eye closes and only lets a little bit of electricity flow.
- P-type Transistor: (PNP) have positive energy (holes where electrons can move around).
- N-type Transistor: (NPN) have negative energy (extra electrons)
- Amplify: make a small sound (small signal) into a big sound (big signal). So, if you whisper into it an amplifier, it can make your whisper loud enough for everyone to hear.
- Automate: machines/computers do a task instead of people.
- Conditional Switches: are like a special box that does different things based on the switch you flip. If you flip the red switch, it plays music. If you flip the blue switch, it shows a movie. If you flip the green switch, it tells a joke. The box uses a “conditional switch” to decide what to do based on the button you press.
- Resistance: is like a roadblock for electricity. In an electrical circuit, resistance makes it harder for the electric current to flow smoothly. This can happen in things like wires or special parts called resistors.
- Semiconductor: is a special material that a transistor is made of that is both conductor and insulator of electricity. Sometimes it conducts, sometimes doesn’t.
- Silicon: is an example of semiconductor material.
- Microchip: (also known as: semiconductor chip, semi, and chip) – is an integrated circuit (IC) that is etched on the wafers.
- Nanoscale: is incredibly small – a billion times smaller than what we can see with our eyes. (For example, chips are made on a nanoscale). There are billions of transistors on a microchip.
- Moore’s Law: is like a growth spurt for computers! Gordon Moore, the co-founder of Fairchild Semiconductor and Intel, predicted, in 1975, that the number of transistors (tiny switches) on a microchip would double about every two years.
Dig Deeper
 History: The Transistor Revolution
In 1947, scientists at Bell Labs invented the transistor, a tiny electronic component made from semiconductors. Transistors replaced bulky vacuum tubes and revolutionized electronics (Image Source: BigStock). They’re the building blocks of modern devices like computers, phones, and televisions.
In the early 1960s, the invention of the integrated circuit (commonly known as a microchip) extended the capabilities of the single transistor. To compile an integrated circuit, many transistors are manufactured at once and permanently connected within a single silicon chip. In the past 50 years, the number of transistors on a chip has grown to more than one-million on a single chip. These chips are on a nanoscale. Nanoscale is incredibly small – a billion times smaller than what we can see with our eyes!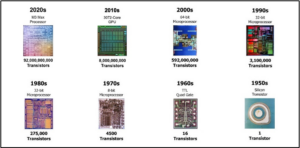
Gordon Moore, the co-founder of Fairchild Semiconductor and Intel, predicted, in 1975, that the number of transistors on a microchip would double about every two years (Moore’s Law).. That means the chips get smaller and smaller. Imagine it’s like your room getting twice as big every two years. This growth helps make computers faster and more powerful. Amazingly, Moore’s Law has shown to be true for the last 50 years. (Image Source: https://www.computerhistory.org/siliconengine/)
How much smaller can a transistor be? How many might fit on the tip of an eraser in 10 years? Is there a limit to how small a transistor can be? Will Moore’s Law last forever?
Source:
https://kids.britannica.com/students/article/integrated-circuit/603797 and
https://kids.britannica.com/students/article/transistor/277411
Extension Activities
- Dive deeper Into Semiconductors. Visit the TryEngineering Semiconductor page (with three videos and ebook) and also he Making of a MIcrochip
More Resources
- How a Transistor Works EASY! – Electronics Basics 22 (Updated) by Simple Electronics (Video)
- How To Use Transistors In YOUR Projects! || Transistors Explained || Transistors As A Switch by Simple Electronics (Video)
- NPN vs PNP Transistors: Symbol & Working Principle by JAKElectronics (Webpage)
Alignment to Curriculum Frameworks
The “Notes” column explains how the lesson connects to STEM topics and a “X” indicates at what level (beginner, intermediate, advanced). Please note a large “X” indicates a strong connection and a small “x” indicates a weaker connection or opportunity to make a connection.
| Science Topics | Notes | |||
|---|---|---|---|---|
| Materials & Properties | Use of unique materials: Creative use of material for night light | x | ||
| Energy | Could discuss energy conversion within the battery (chemical to electrical) | x | ||
| Electricity/Magnetism | Intermediate circuits (transistor and photoresist) | x | ||
|
Physics (light, sounds, heat)
|
Gaining understanding of how LEDs work
|
x |
| Technology Topic | Notes | |||
|---|---|---|---|---|
| Systems |
Open and closed circuit
|
X | ||
| Design & Innovation |
Engineering Design Process (EDP)
|
X |
Sustainable Development Goals (SDGs) Alignment – Lessons are aligned based on if the lesson could be used to address any of the SDGs (https://sdgs.un.org/goals).
|
SDG 7: Affordable and Clean Energy Ensure access to affordable, reliable, sustainable and modern energy for all
|
X |
There are many different types of engineering fields that are involved with communication methods and equipment. And as is true with most industries, engineers of different disciplines often work together in teams to create or improve a product or process. Some of the prominent degrees leading to a career in artificial intelligence include:


 Power and Nuclear Engineering
Details on some fields are below and other fields and degrees are available at www.tryengineering.org.
Download the Engineering Fields Infographic: How will YOU change the world?
Design Challenge
Design and construct a functioning night light. When the light goes out in your room your night light goes on. Design both the circuit and the housing.
Criteria & Constraints
- Use simulation tool (Tinkercad Circuit) to iterate on circuit design
- Transistor & photoresistor must be included in the circuit
- Housing for the night light must include only the material provided
Reflect on your Design
- What problems did your team have to troubleshoot?
- What role each of your team members take?
- What materials did you wish you had?
Prepare for a whole class discussion:
- Why is the transistor important?
- What gadgets do you own that have transistors?
- What items do you own that you think could benefit from the addition of a transistor?
Lesson Plan Translation
Downloadable Student Certificate of Completion