



This four‑part early childhood STEM unit invites young learners (ages 4–6) to explore how shapes help structures stay strong and how engineers test strength by adding weight. Students investigate which shapes support the most weight, then design, build, and test a tower made from index cards and tape. Through testing, they discover that every structure has a critical load—the maximum weight it can withstand before it collapses.
Through guided discussions, exploration activities, hands-on building, and iteration, students practice foundational engineering practices such as asking questions, observing closely, planning before building, testing ideas, and making improvements based on what they notice.
TryEngineering believes that families play an essential role in shaping the next generation of innovators. Please send this family letter home so caregivers can stay connected to the STEM learning happening in your classroom. The letter includes a brief overview of the unit and simple at‑home extension activities that help families reinforce the engineering concepts their children are exploring in class.
The Engineering Design Challenge
Critical Load Challenge
Can we build a structure that holds a lot of weight without falling down? We’re going to be engineers who build strong towers! Our challenge is to make a tower using index cards and tape that can hold as much weight as possible without collapsing.
Criteria: (1) The tower must stand up on its own. (2) The tower must hold weight (blocks, books, coins, marbles, Legos, sand, etc.).
Constraints: (1) Use only the materials provided. (2) Do not cut or tear the cards.
Part 1: Let’s Learn about Strong Structures
Lesson Plan Presentation (Slides 1-9)
Learning Objective
Students will begin thinking like engineers by exploring what a chair lift is and connecting it to familiar experiences.
Materials & Preparation
- Lesson Plan Presentation (Slides 1-9): Critical Load – Early Childhood
- Family Letter (At-Home Extensions): Critical Load- Family Letter
- Poster, chart paper, whiteboard, or digital screen to create a KWL Chart
- Markers or a digital annotation tool
Activity Instructions & Procedures
Critical Load Early Childhood- Part 1Step 1Hook (Slide 3)

This lesson is conducted as a whole group. Gather students in a common area.
Show students a picture of a strong structure – a building and a bridge (slide 3).
Discuss:
- “What do you notice about these structures?”
- “Are these structures strong? Why?”
- “How do these structures hold weight?”
- “What shapes do you see?”
Explain: “These are examples of strong structures. Buildings, bridges, and towers all need to be strong so they don’t collapse. Engineers test structures to see how much weight they can hold.”
Step 2Introduce the Design Challenge (Slide 4)
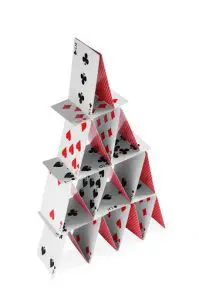
Ask students: “Can we build a structure that holds a lot of weight without falling down?”
Explain the design challenge to students:
“We’re going to be engineers who build strong structures! Our challenge is to make a tower using index cards and tape that can hold as much weight as possible without collapsing.”
Introduce engineering thinking:
“To build our towers, we must become engineers. Engineers ask questions and observe before they build.”
Step 3What Do We Know? What Do We Want to Know? (Slides 5-6)
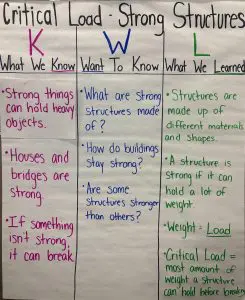
Create a KWL chart using poster/chart paper, a whiteboard, or a digital screen.
Note: A KWL chart is a three-column graphic organizer used to organize learning. It tracks what a student knows (K), wants to know (W), and has learned (L) about a topic. It can be used before, during, and after a lesson to activate students’ background knowledge, develop a purpose for learning, and summarize what has been learned.
TryEngineering suggests using poster/chart paper so that the KWL chart can be displayed in the classroom and referenced by students throughout the unit.
Explain to students that they are going to make a list of everything they already know about strong structures (slide 5).
Record students’ responses on the KWL chart. Examples may include:
- Houses and bridges are strong.
- Strong things can hold heavy objects.
- If something isn’t strong, it can break.
Next, support students in generating questions about things they want to know about strong structures (slide 6).
Explain: “Engineers ask questions to understand a problem. Let’s think like engineers!”
Ask: “What are things we want to know about strong structures so that we can build our own?”
Examples may include:
- What are strong structures made of?
- How do buildings stay strong?
- Are some structures stronger than others?
- Who makes buildings strong?
Step 4Watch “What Makes A Structure Strong?” by The Digital Classroom Experience.
After the video, ask students:
- “What makes a structure strong?” – It’s materials and shapes.
- “How do we classify whether a structure is strong or not?” – By its load, or how much weight it can hold.
- “Where have you seen a strong structure?”
Step 5What is Critical Load? (Slide 8)
Introduce students to critical load.
Explain: “A structure is strong if it can hold a lot of weight without breaking or falling. The weight at which a building or structure fails (breaks or falls) is called the critical load.”
Use the building block example on slide 8 to explain critical load: The block tower can hold 5 blocks without falling. When one more block is added, the tower falls! The critical load of the tower is 5 blocks.
Note: For early childhood, use quantities when discussing critical load (i.e., 5 blocks, 100 cars) unless students are ready to use units of weight (kilograms or pounds).
Step 6What Did We Learn? (Slide 9)
Ask students to share what they learned about strong structures. Examples include:
- Structures are made up of different materials and shapes.
- A structure is strong if it can hold a lot of weight.
- Weight is called the load.
- The critical load is the maximum amount of weight a structure can hold before it breaks.
- Structures break when they have too much weight.
- Structures have different critical loads.
Record responses in the “Learned” section of the KWL chart.
Note: Keep the KWL chart in a safe location. It will be referenced in the next lesson.
Vocabulary
- Critical Load – the weight at which a building or structure fails
- Load – the weight a structure can hold
- Strong – able to hold weight without breaking or falling
- Structure – something we build and can stand on its own (like a building, tower, or bridge)
- Weight – how heavy something is
Part 2: Strong Shapes – How Structures Support Weight
Lesson Plan Presentation (Slides 10-17)
Learning Objective
Students will explore how different shapes affect a structure’s strength and ability to support weight (increase its critical load).
Materials & Preparation
Reference Tools
- Lesson Plan Presentation: Critical Load Challenge (Slides 10-17)
- KWL Chart (from Part 1- for students to reference)
- Markers or a digital annotation tool
Material/Shape Exploration
- Index Cards (one per team)
- Weight to test structure: blocks, coins, marbles, Legos, sand, etc. (a few per team)
- Paper (4 sheets per team)
- Tape
- Books (1 per team)
Activity Instructions & Procedures
Critical Load Early Childhood Part 2Step 1Review the KWL Chart (Slide 11)
Display the KWL chart from Part 1.
Ask:
- “What do you remember about strong structures?”
- “What is critical load?”
- “What makes structures strong?”
Optional: Add new ideas to the “Learned” column.
Transition: “Today, we’re going to explore how different shapes can affect the strength of a structure.”
Step 2Engineering Design Challenge (Slide 12)
Reintroduce the design challenge:
“Can we build a structure that can hold a lot of weight without falling down?”
Explain: “We’re going to be engineers who build strong towers! Our challenge is to build a tower from index cards and tape that can support as much weight as possible without collapsing.”
Criteria:
- The tower must stand up on its own.
- The tower must hold weight (blocks, books, coins, marbles, Legos, sand, etc)
Constraints:
- Use only the materials provided.
- Do not cut or tear the cards.
Step 3Material Exploration (Slide 13)
Place students in their design teams (3-4 students). Give each team:
- One index card
- A sample of classroom weights (blocks, books, marbles, Legos, etc.)
Invite students to touch and explore the materials. Encourage them to talk to their team about how the materials feel.
Ask: “Do you think an index card is strong enough to hold your classroom weights?”
Students will likely say, “No!” Explain: “We’re going to test this using paper and books.”
Step 4How Do Shapes Affect Structures? (Slides 14-15)
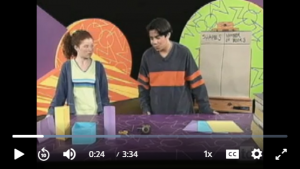
Hold up a piece of paper. Ask: “Do you think paper is strong enough to hold a book up off a table?”
After students share thoughts, play the PBS Learning Media video: Columns: Finding the Strongest Shape (linked on slide 14).
Pause the video at 0:24 (slide 15).
Ask: “What do you think will happen?” Prompt students to describe the different shapes and why they believe they will or won’t support a book. Students should make predictions; no correct answers are needed.
Optional: Record student predictions on slide 15.
Optional: Create and display the paper shapes so students can see them clearly.
Continue the video. Pause at 0:45 before the students test the shapes.
Ask: “Did the students in the video have the same predictions as you?”
Step 5Testing Shape Structures (Slide 16)

Give each team:
- 4 pieces of paper
- Tape
Instruct students to create a tent, a triangle, a box, and a cylinder.
Note: You may pre-make shapes, model creating them as a class, or let students build independently.
Ask: “Which shape do you think will be able to hold a book?”
Provide each team with a book and allow them to test each shape’s strength.
Note: Advise students to gently place the book on top of the paper.
Discuss the testing results with students:
- “Did the results match your predictions?”
- “Which shape had the highest critical load – the tent, triangle, box, or cylinder?”
Explain that shape, not just material, affects how much load something can support.
Step 6Reflection & Closure (Slide 17)
Finish watching the video and discuss:
- “Do you think we could use the same shapes with index cards?”
- “Why is it helpful to test ideas instead of only thinking about them?”
- “How might you design your structure so that it is strong enough to hold our classroom weights (coins, marbles, Legos, etc)?”
- “How can shapes increase a structure’s critical load?”
Say: “In our next lesson, you will design, build, and test your own structure using index cards and tape, making sure it’s strong enough to support weight.”
Vocabulary
- Critical Load – the weight at which a building or structure fails
- Load – the weight a structure can hold
- Shape – the form something has (triangle, box, cylinder, tent)
- Strong – able to hold weight without breaking or falling
- Structure – something we build and can stand on its own (like a building, tower, or bridge)
- Weight – how heavy something is
Part 3: Design, Build, and Test A Strong Structure
Lesson Plan Presentation (Slides 18-23)
Learning Objective
Students will explore what makes a structure strong and learn that every structure has a critical load–the point at which too much weight causes it to collapse.
Materials & Preparation
Reference Tools
- Lesson Plan Presentation: Chair Lift: Early Childhood (Slides 18-13)
- Poster, chart paper, whiteboard, or digital screen to create a KWL Chart
- Markers or a digital annotation tool
Activity Instructions & Procedures
Critical Load Early Childhood Part 3Step 1Engineering Design Challenge (Slide 19)
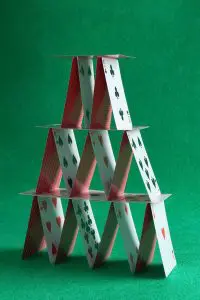
Say: “Today, we will design, build, and test our own structures and determine their critical load. Remember that shapes play a key role in the strength of a structure!”
Reintroduce the design challenge and the criteria and constraints:
Can we build a structure that holds a lot of weight without falling down?
We’re going to be engineers who build strong towers! Your goal is to build a structure with a high critical load.
Criteria:
- The tower must stand up on its own.
- The tower must hold weight (blocks, books, coins, marbles, Legos, sand, etc)
Constraints:
- Use only the materials provided.
- Do not cut or tear the cards.
Step 2Brainstorming (Slide 20)
Have students discuss within their teams:
- “What shapes will help your structure hold more weight?”
- “Which part of your structure needs to hold the most weight?”
- “How will you make the top large enough to hold something?”
Provide each student with a piece of paper and instruct them to draw their structure. Circulate the room and support students as needed.
Step 3Build Your Structure (Slide 21)
Students will use the materials provided to build their structures (one structure per team).
Remind students of the criteria and constraints:
Criteria:
- The tower must stand up on its own.
- The tower must hold weight (blocks, books, or other classroom weights)
Constraints:
- Use only the materials provided.
- Do not cut or tear the cards.
Step 4Test Your Structures (Slide 22)
Each team will predict the critical load of their structure. Record predictions and results on chart paper, a whiteboard, or a digital screen, “Critical Load Chart.”
Note: For early childhood, use quantities when discussing critical load (i.e., 5 blocks, 100 cars) unless students are ready to use units of weight (kilograms or pounds).
Testing Procedure:
- Place each structure on a flat surface.
- Add weight slowly, one unit at a time.
- Stop just before the structure reaches its critical load.
- Record the critical load for each team.
- If the structure collapses, record the last amount of weight or quantity it held.
Optional: Take photos or short videos of each team’s design. These can be used during students’ presentations in Part 4.
Note: Save the Critical Load Chart for Part 4.
Step 5Reflection (Slide 23)

As a class, discuss the strengths and weaknesses of the designs:
- “What was your structure’s critical load?”
- “How close were you to your prediction?”
- “What aspects of your design do you think helped its ability to hold more weight?”
- “What shapes did you use?”
- “How would you improve your structure to make it stronger?”
Close with the engineering mindset:
“Engineers don’t stop trying after the first try–they redesign to make their ideas even better. In our next lesson, we’ll redesign our structures to make them even stronger!”
Vocabulary
- Critical Load – the weight at which a building or structure fails
- Load – the weight a structure can hold
- Shape – the form something has (triangle, box, cylinder, tent)
- Strong – able to hold weight without breaking or falling
- Structure – something we build and can stand on its own (like a building, tower, or bridge)
- Weight – how heavy something is
Part 4: Redesign & Share
Lesson Plan Presentation (Slides 24-30)
Learning Objective
Students will redesign their structure to increase its critical load and present their results.
Materials & Preparation
Reference Tools
- Lesson Plan Presentation: Critical Load: Early Childhood (Slides 24-30)
- Optional: KWL Chart (from Part 1)
- Critical Load Chart (from Part 3)
Brainstorm Materials
- Paper
- Pencil, pens, markers
Building Materials
- 12 index cards (per team)
- Alternative: Game cards (i.e., Uno, playing cards, or pieces of cardstock)
- 1 roll of tape (per team)
Testing Materials
- A plastic container to put the weight in
- Weight to test structure: coins, marbles, Legos, sand, etc.
- Poster, chart paper, whiteboard, or digital screen to track critical load
- Markers or a digital annotation tool
Activity Instructions & Procedures
Critical Load Early Childhood Part 4Step 1Engineering Design Challenge (Slide 25)
Say: “Today, we will redesign our structures to increase their critical load. Remember–shapes play a key role in the strength of a structure!”
Reintroduce the design challenge:
Can we build a structure that holds a lot of weight without falling down?
Say: “We’re going to be engineers who build strong towers! Our challenge is to make a tower using index cards and tape that can hold as much weight as possible without collapsing.”
Criteria:
- The tower must stand up on its own.
- The tower must hold weight (blocks, books, coins, marbles, Legos, sand, etc)
Constraints:
- Use only the materials provided.
- Do not cut or tear the cards.
Step 2Redesign: Make it Better! (Slide 26)

Display the Critical Load Chart from Part 3.
Ask teams to reflect on their first design:
- “What was the critical load of our first structure?”
- “What shapes did we use?”
- “How can we make our structure stronger?”
Provide each student with paper to draw their new design.
Step 3Build the Redesigned Structure (Slide 27)

In their teams, students will build their redesigned structures.
Say: “Engineers learn, build, test, and redesign. Your second design should be stronger than your first.”
If students need support, ask:
- “What did you change from your first design?”
- “How will this change help your structure hold more weight (increase the critical load)?”
Step 4Test Your Redesigned Structure (Slide 28)
Each team will predict the critical load of their new structure. Record predictions and results on chart paper, a whiteboard, or a digital screen.
Note: For early childhood, use quantities when discussing critical load (i.e., 5 blocks, 100 cars) unless students are ready to use units of weight (kilograms or pounds).
Testing Procedure:
- Place each structure on a flat surface.
- Add weight slowly, one unit at a time.
- Stop just before the structure reaches its critical load.
- Record the critical load for each team.
- If the structure collapses, record the last amount of weight or quantity it held.
Optional: Take photos or short videos of each team’s design. These can be used during students’ presentations.
Note: Save the Critical Load Chart for students’ presentations.
Step 5Share Your Results (Slide 29)
Each team will present their structure’s results to the class.
Note: Structures will be damaged from testing–photos help students explain their design.
Students will share:
- The critical load of their first design
- The critical load of their second design
- Which design was better and why
- What shapes did they use in each
- Why is the critical load important
Invite the audience to notice the similarities and differences between the teams’ designs.
Step 6Reflection & Closure (Slide 30)

After each team presents, discuss with students:
- “What was the hardest part of building today?”
- “What did you learn from watching other teams test their structures?”
- “How did you help your teammates?”
- “What would you change if you could build again?”
- “Why do real buildings need to hold a lot of weight?”
- “Where do you see strong shapes—like triangles or cylinders—in real buildings?”
Vocabulary
- Critical Load – the weight at which a building or structure fails
- Load – the weight a structure can hold
- Shape – the form something has (triangle, box, cylinder, tent)
- Strong – able to hold weight without breaking or falling
- Structure – something we build and can stand on its own (like a building, tower, or bridge)
- Weight – how heavy something is