This lesson focuses on trebuchet design. Teams of students construct trebuchets from everyday materials. They then test their trebuchets to determine the farthest distance they can hit a target with a marshmallow projectile.
- Design and build a trebuchet
- Test and refine their designs
- Communicate their design process and results
Age Levels: 12-18
Lesson Plan Presentation
Materials & Preparation
Build Materials (For each team)
Required Materials
-
Counterweight (metal washers, rocks, coins, marbles)
Materials Optional for Build/Trading/Table of Possibilities
-
Plastic drinking straws
-
Pencils/popsicle sticks/wooden dowels
-
Cardboard sheets
-
Rubber bands
-
Toothpicks
-
Paperclips or craft wire
-
String
-
Small pieces of cloth or sheets of paper
Testing Materials
-
Meter stick or measuring tape
-
Mini marshmallows
-
Pie tin or Paper plate
-
Testing Materials & Process
Materials
- Meter stick or measuring tape
- Mini marshmallows
- Pie tin or Paper plate
Process
- Each team tests their trebuchet by launching a marshmallow toward a pie tin placed several feet away. The goal is to launch the marshmallow as far a distance as possible to land on the pie tin target.
- Each team should record the distance their marshmallow travels and how far it lands from the target (accuracy).
Real World Applications
Did you ever wonder how a trebuchet works? A high school student and a mechanical engineer tell you how. (Video 2:35)
Source: National Geographic Kids YouTube Channel
Trebuchets are “gravity powered” throwing devices made up of several simple machines. In fact, all six simple machines (lever, pulley, wheel and axle, inclined plane, screw, and wedge) can be used in trebuchet design. Learn more about simple machines. (Video 4:08)
Source: Design Squad Global YouTube Channel
Watch as the largest trebuchet in continental Europe launches for the first time. (Video 6:17)
Source: Discovery Canada YouTube Channel
Engineering Design Challenge
Design Challenge
You’re a team of engineers who have been given the challenge to design your own trebuchet out of everyday items. The trebuchet should be designed to launch a marshmallow so it can land on a pie tin from as far a distance as possible.
Criteria
- Must launch a marshmallow to land on a pie tin from as far a distance as possible
Constraints
- Can only use the materials provided
- Teams may trade materials to develop their ideal parts list.
- Rubber bands may not be used to power the arm or slingshot the marshmallow
Activity Instructions & Procedures
- Break class into teams of 2-4.
- Hand out the Design Your Own Trebuchet worksheet, as well as some sheets of paper for sketching designs.
- Discuss the topics in the Background Concepts Section.
- Review the Engineering Design Process, Design Challenge, Criteria, Constraints and Materials. If time allows, review “Real World Applications” prior to conducting the design challenge.
- Before instructing students to start brainstorming and sketching their designs, ask them to consider the following:
● Two basic types of trebuchets
● Parts of a trebuchet – arm, base, sling
● Weight of your projectile in comparison to your counterweight
● Which simple machines you will use
● How a lever works
● Importance of force/torque - Provide each team with their materials.
- Explain that students must develop a trebuchet out of common materials. The trebuchet must launch a marshmallow to land on a pie tin from as far a distance as possible
- Announce the amount of time they have to design and build (1 hour recommended).
- Use a timer or an on-line stopwatch (count down feature) to ensure you keep on time. (www.online-stopwatch.com/full-screen-stopwatch). Give students regular “time checks” so they stay on task. If they are struggling, ask questions that will lead them to a solution quicker.
- Students meet and develop a plan for their trebuchet. They agree on materials they will need, write/draw their plan, and present their plan to the class. Teams may trade unlimited materials with other teams to develop their ideal parts list.
- Teams build their designs.
- Each team tests their trebuchet by launching a marshmallow toward a pie tin placed several feet away. The goal is to launch the marshmallow as far a distance as possible to land on the pie tin target.
- Each team should record the distance their marshmallow travels and how far it lands from the target (accuracy).
- As a class, discuss the student reflection questions.
- For more content on the topic, see the “Real World Applications” and “Digging Deeper” sections.
Variations
- Try building a wall of paper cups and designing a trebuchet that can launch a marshmallow over it.
- Next, try designing a trebuchet that can launch a marshmallow through the wall of cups with the goal of knocking down the greatest number of cups.
Student Reflection (engineering notebook)
- Did you succeed in creating a trebuchet that could launch a marshmallow to accurately land on a pie tin? If so, what was the maximum distance achieved? If not, why did it fail?
- Did you decide to revise your original design or request additional materials while in the construction phase? Why?
- Did you negotiate any material trades with other teams? How did that process work for you?
- If you could have had access to materials that were different than those provided, what would your team have requested? Why?
- Do you think that engineers have to adapt their original plans during the construction of systems or products? Why might they?
- If you had to do it all over again, how would your planned design change? Why?
- What designs or methods did you see other teams try that you thought worked well?
- Do you think you would have been able to complete this project easier if you were working alone? Explain…
- How might you measure the maximum height your trebuchet could launch a marshmallow? Try it!
- What drawback and advantages does the trebuchet have in battle?
Time Modification
The lesson can be done in as little as 1 class period for older students. However, to help students from feeling rushed and to ensure student success (especially for younger students), split the lesson into two periods giving students more time to brainstorm, test ideas and finalize their design. Conduct the testing and debrief in the next class period.
Engineering Design Process
Background Concepts
History of the Trebuchet
grynold-bigstock.com
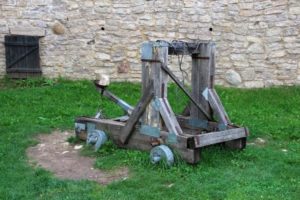
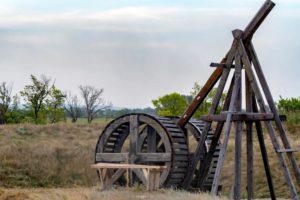
A trebuchet is a type of catapult that was used during the Middle Ages to launch projectiles during battle. Trebuchets can be distinguished from other types of catapults in that they do not use stored tension (such as in twisted ropes or flexed wood) to launch objects. Projectiles launched by trebuchets included rocks for smashing through castle walls, venomous snakes, beehives, and even dead animals to spread disease. Since trebuchets required aiming, they were typically used to hit stationary targets such as buildings, walls, and even other trebuchets. A trebuchet has much better accuracy than other types of catapults. Trebuchets were effective during battle because they could be set up a safe distance away from a castle, and the archers guarding it, while still causing significant amounts of damage. Many castles also had trebuchets inside their walls to launch projectiles at their enemies. Since trebuchets had the ability to launch objects very far into the air they could do so from behind castle walls without being seen. A sturdy trebuchet could launch a projectile weighing 300 pounds over 300 yards!
During the Second Punic War in 213 BC Archimedes developed several powerful, accurate catapults to defend Syracuse against the Romans. According to legend, he also developed a trebuchet-like war-machine known as the Archimedes Claw. Although the exact design is not known, it is believed that the claw was a large trebuchet-like or crane-like machine that dropped a hook or anchor onto enemy ships from above, either capsizing or sinking them. Early forms of the trebuchet were observed in China as early as 4 BC and in Europe in 6 BC. Once gunpowder was invented, the trebuchet became obsolete somewhere around the 16th Century.
What are the parts of the Trebuchet?
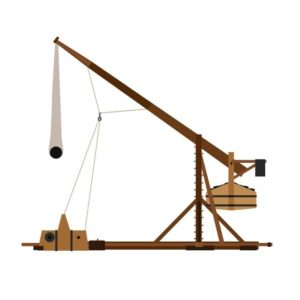
There are two basic types of trebuchets: a traction trebuchet and a counterweight trebuchet. Both the traction trebuchet and the counterweight trebuchet consist of a base, an arm and a sling. The base of the trebuchet is what provides the support to the device. Oftentimes, the base of the trebuchet is on wheels for mobility. The arm of the trebuchet is essentially a long beam on a pivot that acts as a lever to fling the projectile. A sling holds the projectile in place at the long end of the arm (farther away from the pivot). The sling could be a pouch that holds the projectile in place. The sling could also consist of a rope which is attached to the projectile and then loosely tied to a release pin at the end of the arm. The rope is designed to slide off the release pin when the arm swings around. In a counterweight trebuchet, a counterweight is attached to the short end of the arm, closer to the pivot. The traction trebuchet on the other hand relies on people pulling down on the short end of the arm with ropes.
The following are some science concepts to keep in mind when you are designing and testing your trebuchets.
Levers
Oskanov-bigstock.com
In addition to his numerous accomplishments, Archimedes is considered to be the first person to explain the principles behind levers. Based on his findings he was quoted saying “Give me a place to stand, and I will move the Earth.” Levers are one of the six types of simple machines. A lever is a rigid object that is used with a fulcrum or pivot point to increase the amount of mechanical force applied to an object. A trebuchet is considered a class 1 lever. In a class 1 lever the force is applied to one end of the arm, the load on the other end, and a pivot point or fulcrum is in the middle. A playground see-saw is also a class 1 lever.
In a trebuchet the force (counterweight) is much greater than the load (projectile). The fulcrum or pivot point on a trebuchet is not directly in the middle as it is in a see-saw. Here, the pivot point is closer to the counterweight, or the end where the force is being applied.
Mechanical advantage is the factor by which the force or torque put into a mechanism is multiplied. We can calculate the mechanical advantage of any simple machine by dividing the output force by the input force. Another way to calculate the mechanical advantage of a lever is by dividing the length of the effort arm (distance between the fulcrum and the force) by the length of the resistance arm (distance between the fulcrum and the load or projectile).
Work is how much energy is transferred by a force acting over a distance. The formula for work is W = F x D. The greater the mechanical advantage the less force required, but it must be applied over a greater distance. The amount of work does not change.
Vocabulary
- Arm: Essentially a long beam on a pivot that acts as a lever to fling the projectile.
- Base: Provides the support for the device. Often on wheels for mobility.
- Constraints: Limitations with material, time, size of team, etc.
- Counterweight: A weight that provides a balance against something of equal weight. It is the “force” for a trebuchet.
- Counterweight Trebuchet: A counterweight is attached to the short end of the arm, closer to the pivot.
- Criteria: Conditions that the design must satisfy like its overall size, etc.
- Engineers: Inventors and problem-solvers of the world. Twenty-five major specialties are recognized in engineering (see infographic).
- Engineering Design Process: Process engineers use to solve problems.
- Engineering Habits of Mind (EHM): Six unique ways that engineers think.
- Force: A push or pull on an object. It can cause an object to accelerate, slow down, remain in place, or change shape. In a trebuchet the force (counterweight) is much greater than the load (projectile).
- Fulcrum/Pivot Point: The point on which a lever rests or is supported and on which it pivots. On a trebuchet, the fulcrum is not directly in the middle, as it is on a see-saw.
- Iteration: Test & redesign is one iteration. Repeat (multiple iterations).
- Lever: One of the six types of simple machines. A lever is a rigid object that is used with a fulcrum or pivot point to increase the amount of mechanical force applied to an object.
- Mechanical Advantage: The amount of help you can get by using a simple machine.
- Pivot: A shaft or pin with a pointed end on which something turns.
- Projectile: Something (as a bullet or rocket) thrown or shot especially from a weapon. It is the “load” for a trebuchet.
- Prototype: A working model of the solution to be tested.
- Simple Machine: A trebuchet is a “gravity powered” throwing device made up of several simple machines.
- Sling: Holds the projectile in place at the long end of the arm.
- Torque: The tendency of a force to turn or twist.
- Traction Trebuchet: Relies on people pulling down on the short end of the arm with ropes.
- Trebuchet: Type of catapult that was used during the Middle Ages to launch projectiles during battle.
Dig Deeper
Internet Connections
- Trebuchets Wikipedia: https://en.wikipedia.org/wiki/Trebuchet
Recommended Reading
- Catapult Design, Construction and Competition with the Projectile Throwing Engines of the Ancients (ISBN: 978-0977649709)
- Engineering in the Ancient World, Revised Edition (ISBN: 978-0520227828)
Writing Activity
Compare and contrast the trebuchet and the catapult.
Curriculum Alignment
Alignment to Curriculum Frameworks
Note: Lesson plans in this series are aligned to one or more of the following sets of standards:
- U.S. Science Education Standards (http://www.nap.edu/catalog.php?record_id=4962)
- U.S. Next Generation Science Standards (http://www.nextgenscience.org/)
- International Technology Education Association’s Standards for Technological Literacy (http://www.iteea.org/TAA/PDFs/xstnd.pdf)
- U.S. National Council of Teachers of Mathematics’ Principles and Standards for School Mathematics (http://www.nctm.org/standards/content.aspx?id=16909)
- U.S. Common Core State Standards for Mathematics (http://www.corestandards.org/Math)
- Computer Science Teachers Association K-12 Computer Science Standards (http://csta.acm.org/Curriculum/sub/K12Standards.html)
National Science Education Standards Grades K-4 (ages 4 – 9)
CONTENT STANDARD A: Science as Inquiry
As a result of activities, all students should develop
- Abilities necessary to do scientific inquiry
CONTENT STANDARD B: Physical Science
As a result of the activities, all students should develop an understanding of
- Properties of objects and materials
CONTENT STANDARD G: History and Nature of Science
As a result of activities, all students should develop understanding of
- Science as a human endeavor
National Science Education Standards Grades 5-8 (ages 10 – 14)
CONTENT STANDARD A: Science as Inquiry
As a result of activities, all students should develop
- Abilities necessary to do scientific inquiry
CONTENT STANDARD B: Physical Science
As a result of their activities, all students should develop an understanding of
- Motions and forces
CONTENT STANDARD G: History and Nature of Science
As a result of activities, all students should develop understanding of
- History of science
National Science Education Standards Grades 9-12 (ages 14-18)
CONTENT STANDARD A: Science as Inquiry
As a result of activities, all students should develop
- Abilities necessary to do scientific inquiry
CONTENT STANDARD B: Physical Science
As a result of their activities, all students should develop understanding of
- Motions and forces
CONTENT STANDARD G: History and Nature of Science
As a result of activities, all students should develop understanding of
- Historical perspectives
Next Generation Science Standards Grades 3-5 (Ages 8-11)
Motion and Stability: Forces and Interactions
Students who demonstrate understanding can:
- 3-PS2-1. Plan and conduct an investigation to provide evidence of the effects of balanced and unbalanced forces on the motion of an object.
Engineering Design
Students who demonstrate understanding can:
- 3-5-ETS1-1.Define a simple design problem reflecting a need or a want that includes specified criteria for success and constraints on materials, time, or cost.
- 3-5-ETS1-2.Generate and compare multiple possible solutions to a problem based on how well each is likely to meet the criteria and constraints of the problem.
- 3-5-ETS1-3.Plan and carry out fair tests in which variables are controlled and failure points are considered to identify aspects of a model or prototype that can be improved.
Next Generation Science Standards Grades 6-8 (Ages 11-14)
Engineering Design
Students who demonstrate understanding can:
- MS-ETS1-1 Define the criteria and constraints of a design problem with sufficient precision to ensure a successful solution, taking into account relevant scientific principles and potential impacts on people and the natural environment that may limit possible solutions.
Principles and Standards for School Mathematics (ages 11 – 14)
Measurement Standard
-Apply appropriate techniques, tools, and formulas to determine measurements.
- solve simple problems involving rates and derived measurements for such attributes as velocity and density.
Principles and Standards for School Mathematics (ages 14 – 18)
Measurement Standard
– Apply appropriate techniques, tools, and formulas to determine measurements.
- analyze precision, accuracy, and approximate error in measurement situations.
Common Core State Standards for School Mathematics Grades 2-8 (ages 7-14)
Measurement and data
- Measure and estimate lengths in standard units.
- CCSS.Math.Content.2.MD.A.1 Measure the length of an object by selecting and using appropriate tools such as rulers, yardsticks, meter sticks, and measuring tapes.
- CCSS.Math.Content.2.MD.A.3 Estimate lengths using units of inches, feet, centimeters, and meters.
Standards for Technological Literacy – All Ages
Design
- Standard 8: Students will develop an understanding of the attributes of design.
- Standard 9: Students will develop an understanding of engineering design.
- Standard 10: Students will develop an understanding of the role of troubleshooting, research and development, invention and innovation, and experimentation in problem solving.
Related Engineering Fields and Degrees
Student Worksheet
Design Your Own Trebuchet
dihard-bigstock.com
You are a team of engineers who have been given the challenge to design your own trebuchet out of everyday items. The trebuchet should be designed to launch a marshmallow so it can land on a pie tin from as far a distance as possible. The trebuchet that can accurately hit the pie tin from the greatest distance is the winner. You may use the materials which have been provided to you, but the rubber bands may not be used to power the arm or slingshot the marshmallow.
Planning Stage
Meet as a team and discuss the problem you need to solve. Then develop and agree on a design for your trebuchet. You’ll need to determine what materials you want to use.
Draw your design in the box below, and be sure to indicate the description and number of parts you plan to use. Present your design to the class.
You may choose to revise your teams’ plan after you receive feedback from class.
Construction Phase
Build your trebuchet. Tip: You may want to experiment with the weight of your counterweight, sling length, and the placement of your arm’s pivot point. During construction you may decide you need additional materials or that your design needs to change. This is ok – just make a new sketch and revise your materials list.
Testing Phase
Each team will test their trebuchet. Your object is to launch a marshmallow as far a distance as possible and land on the pie tin target. Be sure to watch the tests of the other teams and observe how their different designs worked.
Trebuchet Test Results
Projectile Distance
Distance from Landed Target
Test 1
Test 2
Test 3
Average
Evaluation Phase
Evaluate your teams’ results, complete the evaluation worksheet, and present your findings to the class.
Use this worksheet to evaluate your team’s results in the Trebuchet Toss Lesson:
1. Did you succeed in creating a trebuchet that could launch a marshmallow to accurately land on a pie tin? If so, what was the maximum distance achieved? If not, why did it fail?
2. Did you decide to revise your original design or request additional materials while in the construction phase? Why?
3. Did you negotiate any material trades with other teams? How did that process work for you?
4. If you could have had access to materials that were different than those provided, what would your team have requested? Why?
5. Do you think that engineers have to adapt their original plans during the construction of systems or products? Why might they?
6. If you had to do it all over again, how would your planned design change? Why?
7. What designs or methods did you see other teams try that you thought worked well?
8. Do you think you would have been able to complete this project easier if you were working alone? Explain…
9. How might you measure the maximum height your trebuchet could launch a marshmallow? Try it!
10. What drawback and advantages does the trebuchet have in battle?
Translations