
This lesson focuses on the engineering behind the design of musical instruments. Students explore how mass manufacturing impacted the recorder, and then work in teams to design their own musical instrument using easy to find materials.
- Learn about engineering design.
- Learn about planning and construction.
- Learn about teamwork and working in groups.
Age Levels: 8-18
Materials & Preparation
Build Materials (For each team)
Required Materials
- String
- Paperclips
- Paper
- Cardboard
- Cardboard tubes (paper towel or toilet paper rolls)
- Rubber bands
- Wire or pipe cleaners
- Aluminum foil
- Plastic wrap
- Empty juice boxes
- Wooden dowels
- Non-toxic glue
Testing Materials & Process
Materials
- Instrument designs
Process
Teams test their instrument designs by playing a pattern of three different sounds, three times. Team members may take turns demonstrating the instrument. If the team has designed an instrument that requires the instrument be put in or near their mouth, one team member should be selected to play in the instrument. Students should document how unique their design is.
Engineering Design Challenge
Design Challenge
You are a team of engineers who have been given the challenge of building a new musical instrument that can repeat a pattern of three different sounds , three times. The new instrument must be “tunable” and must also be unique from other instruments.
Criteria
- Repeat a pattern of three different sounds, three times
- Must be “tunable”
- Must be unique from other instruments
Constraints
- Use only the materials provided
- Teams may trade unlimited materials
Activity Instructions & Procedures
- Break class into teams of 2-3.
- Hand out the Engineered Music worksheet, as well as some sheets of paper for sketching designs.
- Discuss the topics in the Background Concepts Section.
- Review the Engineering Design Process, Design Challenge, Criteria, Constraints and Materials.
- Instruct students to start brainstorming and sketching their designs.
- Provide each team with their materials.
- Explain that students must develop a musical instrument that can repeat a pattern of three different sounds , three times. The new instrument must be “tunable” and must also be unique from other instruments.
- Announce the amount of time they have to design and build (1 hour recommended).
- Use a timer or an on-line stopwatch (count down feature) to ensure you keep on time. (www.online-stopwatch.com/full-screen-stopwatch). Give students regular “time checks” so they stay on task. If they are struggling, ask questions that will lead them to a solution quicker.
- Students meet and develop a plan for their instrument. They agree on materials they will need, write/draw their plan, and present their plan to the class. Teams may trade unlimited materials with other teams to develop their ideal parts list.
- Teams build their designs.
- Test the instrument designs by each team playing a pattern of three different sounds, three times. Team members may take turns demonstrating the instrument. If the team has designed an instrument that requires the instrument be put in or near their mouth, one team member should be selected to play in the instrument.
- Teams should document how unique their instrument is.
- As a class, discuss the student reflection questions.
- For more content on the topic, see the “Digging Deeper” section.
Tip: For younger students, consider focusing on instruments such as drums, guitars, or xylophones, which do not require students to put the instrument in or near their mouth.
Optional Extension Activity
Purchase two or three clear plastic recorders for the class and disassemble so students can see the different parts that have been engineered.
Student Reflection (engineering notebook)
- Did you succeed in creating an instrument that could repeat a pattern of three different sounds three times? If not, why did it fail?
- Did you need to request additional materials while building your instrument?
- Did you negotiate any material trades with other teams? How did that process work for you?
- Do you think that engineers have to adapt their original plans during the manufacturing process of instruments or other products? Why might they?
- If you had to do it all over again, how would your planned design change? Why?
- What designs or methods did you see other teams try that you thought worked well?
- Do you think you would have been able to complete this project easier if you were working alone? Explain…
- How do you think the engineering designs for musical instruments have changed over time? What impact has the development of new materials had on the engineering plans for musical instruments?
- What impact has the development of electronics had on the engineering plans for musical instruments?
- What engineering considerations are needed in musical instrument design to accommodate physically challenged musicians?
Time Modification
The lesson can be done in as little as 1 class period for older students. However, to help students from feeling rushed and to ensure student success (especially for younger students), split the lesson into two periods giving students more time to brainstorm, test ideas and finalize their design. Conduct the testing and debrief in the next class period.
Engineering Design Process
Background Concepts
Sample Instrument – The Recorder
History and Engineering Advances
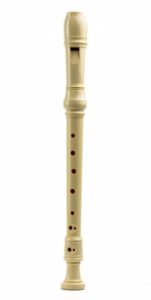
engineered-music_Fahroni-bigstock.com
The recorder is a woodwind musical instrument and is a whistle-like instrument similar to the tin whistle. It has holes for seven fingers and one thumb. The body of the recorder is usually tapered from the mouthpiece end. It was very popular in medieval times but declined in popularity in the 1700’s when orchestral woodwind instruments (oboe, flute, and clarinet) came into favor because of their greater range.
While engineers are often involved in adapting new designs to musical instruments, either to improve durability, design, or performance, they also have impacted musical instrument mass production.In the mid 20th century, engineers were able to design facilities to manufacture recorders out of plastic. This made them very inexpensive as so popularized the instrument in schools. Without the plastic manufacturing process, recorders would likely not be used much today. Now, they are one of the cheapest instruments to buy in bulk, and as they are reasonably easy to learn to play, it is an ideal instrument for teaching basic music performance, especially to young children.
How the Recorder Works
The recorder is held straight out from the player’s lips (rather than to the side, as with a flute). The breath of the player is constrained by a block (A) that limits how much air can enter the instrument. The air travels down a channel (B) that is called the “windway.”
As it leaves the windway, the player’s breath hit the “labium” (C) which causes the column of air to oscillate. The length of the column of air is adjusted by finger holes in the front and a thumb hole at the back of the instrument. Adjusting how the fingers cover the holes will adjust the note produced by the air, and adjusting how hard the breath is blown will adjust the pitch. An instrument with fewer holes or a different length, or no block would create different sounds…or perhaps sounds that cannot be reproduced consistently.
Dig Deeper
Internet Connections
Recommended Reading
- The Physics of Musical Instruments (ISBN: 0387983740)
- Music, Physics and Engineering (ISBN: 0486217698)
- Teaching Kids Recorder (ISBN: 0595367437)
Writing Activity
Pick a country or culture at a point three hundred years ago and write an essay or a paragraph about the challenges they might face finding materials to make a specific musical instrument (trombone, piano, guitar – for example).
Curriculum Alignment
Global Math Standard Aligned Lesson Concepts Number and Operations Basic Calculations, Formulas Algebra Geometry (Shape and Space) Measurement Charting and presentation Data Handling and Analysis Evaluation of Data Results, comparison with other student results Statistical Investigation Probability and Estimation Predicting outcomes Global Science Standard Aligned Lesson Concepts ✓ Materials and Properties Conductors and Insulators, Testing Environment/Ecology Forces and Motion Energy ✓ Electricity/Magnetism Electric Circuitry Community and Health Natural Resources Earth Systems ✓ Biology/Bioengineering Wearables and Sensors Chemistry Physics (light, sound, heat) Global Technology Standard Aligned Lesson Concepts Information Technology Coding Systems Integration of parts to a whole Innovation Wearables and Sensors Data Organization Data Representation Chart Development and Presentation Overarching Skills Aligned Lesson Concepts Communication Presentation and Audience Feedback Critical Thinking Creativity Design and Implementation of Design Collaboration Teamwork Problem Solving Project Planning Organization Parts Management Scientific Thinking/Research Careers and Degrees Related Engineering Fields and Degrees
Student Worksheet
Build Your Own Instrument
You are a team of engineers who have been given the challenge of building a new musical instrument that can repeat a pattern of three different sounds three times. The new instrument must be “tunable” and must also be unique from other instruments.
Research/Preparation Phase
- Review the various Student Reference Sheets.
Planning as a Team
- Your team has been provided with some “building materials” by your teacher. You may ask for a duplicate set of materials, and may also trade materials with other student teams throughout the project.
- Start by meeting with your team and devising a design and materials plan to build your instrument. You’ll need to figure out what building materials you require, and develop a sketch of your plan for review by your teacher. You may need to ask for additional materials or negotiate a trade of materials with other teams in order to plan your instrument.
- Write or draw your instrument design in the box below or on another sheet. Include a list of materials you plan to use to build the instrument. Present your design to the class. You may choose to revise your teams’ plan after you receive feedback from class.
Materials Needed: Construction Phase
- Build your instrument! If you used glue, you may need to let glue dry overnight before testing your instrument.
Performance Phase
- Each student team will have a chance to perform their instrument for the class.
Evaluation Phase
- Evaluate your teams’ results, complete the evaluation worksheet, and present your findings to the class.
Use this worksheet to evaluate your team’s results in the Engineered Music lesson:
- Did you succeed in creating an instrument that could repeat a pattern of three different sounds three times? If not, why did it fail?
- Did you need to request additional materials while building your instrument?
- Did you negotiate any material trades with other teams? How did that process work for you?
- Do you think that engineers have to adapt their original plans during the manufacturing process of instruments or other products? Why might they?
- If you had to do it all over again, how would your planned design change? Why?
- What designs or methods did you see other teams try that you thought worked well?
- Do you think you would have been able to complete this project easier if you were working alone? Explain…
- How do you think the engineering designs for musical instruments have changed over time? What impact has the development of new materials had on the engineering plans for musical instruments?
- What impact has the development of electronics had on the engineering plans for musical instruments?
- What engineering considerations are needed in musical instrument design to accommodate physically challenged musicians?

 Industrial Engineering
 Computer Engineering