Bridges
![]()
Partner Lesson by Engineering Tomorrow: Today’s Students, Tomorrow’s Engineers.
Engineering Tomorrow’s nationwide program offers a wide-array of Virtual Labs (that simulate real-world projects) developed and delivered by engineers and available at no cost to your school. Kits are mailed to your school and a zoom call is set up for an engineer led virtual presentation. Sign-up for a FREE Virtual Lab today!
In this lesson, students will discover and learn about the scientific and real-world aspects of bridges. Students will imagine they are a civil engineer to explore and design their own bridge. They will use the engineering process to create a bridge that is able to withstand the greatest amount of stress (weight).
Students will be able to:
- Engage in the Engineering Design Process
- Analyze complex real-world problems following specific criteria in order to problem solve
- Discover and understand the variety of ways bridges can be designed as well as used in the present day
- Creatively design a bridge using materials at home
- Reflect and explain their thinking through videos
Age Levels: 14-18
Materials & Preparation
Possible Materials
- Small Dowel
- Medium Dowel
- Large Dowel
- Popsicle Stick
- Spaghetti
- Marshmallows
Required Materials
- 2-in Duct Tape
- Hot Glue
Also, be sure to reference and record answers in the Interactive Student Workbook
Real World Applications
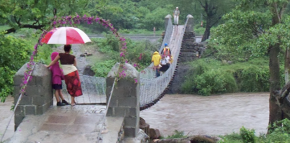
 Bridges are much more than just structures. For centuries, communities have been building bridges to make connections that increase opportunity; however, rural isolation is still a root cause of poverty today. There are still over 1 billion people who don’t have safe year-round access to education, healthcare and markets. So how important are these bridges really? In a study of communities with and without bridges, those with access to bridges earned 30% higher incomes as a result of increased access to jobs.
One engineer dedicated to solving the problem of rural isolation is Avery Bang. Avery knew she wanted to be an engineer when she was a kid playing with Legos. She went on to study civil engineering and began volunteering building bridges in rural communities when she was in college. Now she is the President & CEO of that organization, Bridges to Prosperity.
“Poverty due to rural isolation is a crisis that we can solve.”
~Avery Bang, President and CEO of Bridges to ProsperityEngineering Design Challenge
Design Challenge
Create a bridge model using the Engineering Design Process in order to answer the question: “How can I create a bridge model strong enough to hold the maximum number load?”
Criteria
- You will need two chairs or two tables to test your bridge. Set the chairs/tables up 11 inches apart
- Place your bridge model on the chairs/tables. Each end of the bridge should extend at least one inch beyond the chairs/tables.
- Test the strength of your bridge using a shopping bag. Add small items until it breaks and calculate the weight of all the items in the bag
- Use the iterative process to build a stronger structure
Constraints
- Bridge must be 12 inches or more in length
- Bridge must be 3 inches or less in width
Use materials found at home (see “materials and prep” section above)
Activity Instructions & Procedures
- Step through the following procedures below (or download teacher guide)
- This will help guide and step through the project
Virtual Lab Bridge Presentation
Teacher Notes:
- Students will work through the Bridges Interactive Student Workbook
- When assigning this lesson on Google Classroom, first make a copy of the slides to save within your personal Google Drive, then make a copy for each student.
- The slideshow is designed in order to be interactive, this way students can type directly on the slides.
- Each slide of the presentation provides an activity for students to complete (reading, watching a video, inserting images, answering questions, etc.)
- Students may work individually or within groups.
Assessment:
- Informal assessments can be completed by looking at the interactive slides within the slideshow, especially within the final reflection slide.
- An answer key for the interactive student slides can be given upon teacher request.
- Assessments outside the interactive slides are suggested below as Pre and Post Work Ideas.
Pre Work Ideas:
- Student Choice Pre Work Assignment: Introduction to bridge design by structural engineer (and author of Built) Roma Agrawal or exploration of a website about current Wash DC bridge revitalization project similar to NYC Highline. Students are introduced to bridge engineering design considerations in advance of the bridge build challenge.
- Discuss slide 3 in Bridges Interactive Student Workbook
Pre Work- Introduction to the Engineering Design Process:
- Students should complete the Engineering Design Process Introduction Activity before beginning the lab
- NOTE: This activity only needs to be completed before the student’s first ET lab, not repeated for every lab
In-Process and Post Work Ideas:
- Assign slides 15-23 of the interactive student workbook presentation as a design evaluation and reflection on the engineering design process.
(record all activity and answers for the following steps in your Interactive Student Workbook)
- Identify the Problem: What problem or challenge are you trying to solve? Research: What could you use? What materials will you need? (see “materials and preparation” section above)
- Design your Solution: Draw out a diagram of your design. NOTE: (see “criteria and constraints” section above)
- Build your first Prototype: Create your first prototype of your bridge
- Test: Fill out the chart in your student workbook in order to collect and organize your data
Analyze Your Results: Use your observations and data from step 5 to answer the questions in your student workbook
Time Modification
The lesson can be done in as little as 1 class period for older students. However, to help students from feeling rushed and to ensure student success (especially for younger students), split the lesson into two periods giving students more time to brainstorm, test ideas and finalize their design. Conduct the testing and debrief in the next class period.
Engineering Design Process

Background Concepts
(how the application works) Background Topics
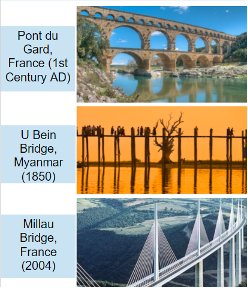
*A bridge is a structure that is built to span physical obstacles, such as a river or canyon, for the purpose of providing safe passage over the obstacle. There are many different bridge designs and the choice of which to build varies depending on the function of the bridge, the nature of the terrain where the bridge is constructed and anchored, the material used to make it, and the funds available to build it. Bridges are feats of architecture and engineering and transform the landscape where they stand. There are over 617,000 in the US! Bridges have a range in their looks and purposes


Bridges restore and improve urban infrastructure in several ways.
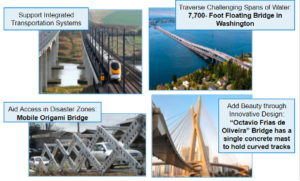
- Bridges are important components of integrated transportation systems, making individual vehicle travel, mass transit, bicycling, and walking all as easy and efficient as possible and providing reliable safe access to many social institutions.
- New materials and construction methods allow for new bridge designs that offer solutions for difficult problems including building bridges over challenging spans of water and quickly in disaster zones.
- Finally, building bridges “contribute[s] to the joy of living. . . [with bridges] regarded almost as much works of art as aids to transport . . . care in their design can contribute to a more enjoyable urban environment.”
Vocabulary
- Truss: a bridge that is held together by steel beams that are fastened (held) together in triangular shapes
- Suspension: a bridge using long cables for support
- Arch: a bridge supported in compression
- Kingpost: a single vertical member supporting in the center
- Cantilever: a bridge made of two self supporting beams, each end is connected to the ground at one end and they meet in the middle of the bridge
- Civil Engineer: a person who designs and builds bridges
- Models: small scale structures
- Aesthetic: pleasing to view
- Superstructure: the portion of the bridge ABOVE the roadbed
- Substructure: the portion of the bridge BELOW the roadbed
Dig Deeper
Related Engineering Fields and Degrees


