
This lesson plan explores an everyday situation, where either two or more buttons can ring a buzzer. Students learn how this type of circuit is structured by constructing a two button buzzer model out of wires, a battery, buttons (switches), and a buzzer.
- Learn how switches control the flow of electricity.
- Learn to draw basic wiring diagrams.
- Learn how the electric circuit in a two button buzzer operates.
- Learn about teamwork and working in groups.
Age Levels: 8-14
Materials & Preparation
Build Materials (For each team)
Required Materials
- Four smaller bins or cardboard boxes to separate recyclables
- Broken-down cardboard boxes or other sheets of cardboard
- Roll of paper (wrapping, art) or shelf liner sheets (used for conveyer belt)
- Loose netting
Optional Materials
- Fans or hair dryers
- Ladder or step stool (to allow changes in height for chutes, etc.)
- Magnetic wands or other large magnets
Testing Materials
- Variety of clean, dry recyclables (plastics, glass, metal/aluminum cans, and paper) in a large recycling bin or box
- Long table or a few short tables placed together
Testing Materials & Process
Materials
- Variety of clean, dry recyclables (plastics, glass, metal/aluminum cans, and paper) in a large recycling bin or box
- Long table or a few short tables placed together
Process
Place design on a long table (or a few short tables placed together), add recyclables to the design and document how well each design sorts the recyclables into separate bins.
Engineering Design Challenge
Design Challenge
You are a team of engineers given the challenge of drawing a schematic of developing a two button buzzer circuit that would simulate how doorbells on either a front and back door could both ring a buzzer or doorbell.
Criteria
- Must draw a schematic.
- Buzzer should simulate how a doorbell rings.
Constraints
- Use only the materials provided.
Activity Instructions & Procedures
- Break class into teams of 3-4.
- Hand out the Two Button Buzzer Circuit worksheet, as well as some sheets of paper for sketching designs.
- Discuss the topics in the Background Concepts Section. Discuss how a doorbell works. Have an example of a two-button buzzer to show to students.
- Review the Engineering Design Process, Design Challenge, Criteria, Constraints and Materials.
- Provide each team with their materials.
- Explain that students must draw a schematic diagram and build a two button buzzer.
- Announce the amount of time they have to design and build (1 hour recommended).
- Use a timer or an on-line stopwatch (count down feature) to ensure you keep on time. (www.online-stopwatch.com/full-screen-stopwatch). Give students regular “time checks” so they stay on task. If they are struggling, ask questions that will lead them to a solution quicker.
- Instruct students to draw a schematic diagram of the two button buzzer setup before they begin building.
- Teams build their designs.
- Test the buzzer designs using a D battery.
- As a class, discuss the student reflection questions.
- For more content on the topic, see the “Digging Deeper” section.
Extension Idea
Students build a two button buzzer circuit that reaches from one classroom to the next!
Student Reflection (engineering notebook)
- Would there be a limit to the number of switches you could wire together to cause the buzzer to sound? If yes, why? If no, why not?
- Would this same circuit concept work for a garage door opener with two buttons (one in the car and one in the garage)? Why? Why not?
Time Modification
The lesson can be done in as little as 1 class period for older students. However, to help students from feeling rushed and to ensure student success (especially for younger students), split the lesson into two periods giving students more time to brainstorm, test ideas and finalize their design. Conduct the testing and debrief in the next class period.
Engineering Design Process
Background Concepts
What is Simple Circuit ?
Simple Circuit A simple circuit consists of three minimum elements that are required to complete a functioning electric circuit: a source of electricity (battery), a path or conductor on which electricity flows (wire) and an electrical resistor (lamp) which is any device that requires electricity to operate. The illustration below shows a simple circuit containing one battery, two wires, a switch, and a bulb. The flow of electricity is from the high potential (+) terminal of the battery through the bulb (lighting it up), and back to the negative (-) terminal, in a continual flow when the switch is in the on position so current can flow.

yusufdemirci-Bigstock.com
Schematic Diagram of a Simple Circuit
The following is a schematic diagram of the simple circuit showing the electronic symbols for the battery, switch, and bulb.

Simulating a Switch
Simulating a Switch by Disconnecting a Wire or Adding a Pencil

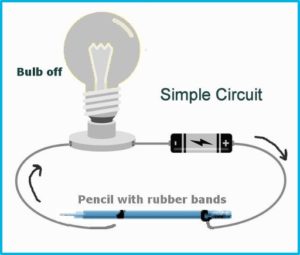
There are several ways you can simulate a switch in a simple circuit. Simply removing and replacing the wire from the bulb can serve as a switch. Another simple switch can be made by attaching the end of one of the wires to the eraser end of a pencil using a rubber band. Then attach another rubber band to the other end of the pencil, and by simply laying the other end on top of – and then off of – the connecting wire, you have created a switch. Other types of conductors can also be used in switch design, such as aluminum foil, hair clips, paperclips, paper fasteners, and some metal pens.
Dig Deeper
Recommended Reading
- Buzz Off! Build Your Own Electronic Doorbell (Troll Assoc., ISBN: 0816761965)
- DK Eyewitness Series: Electricity (ISBN: 0751361321)
- Eyewitness Electricity, by Steve Parker (DK Publishing, ISBN: 0789455773)
- How Science Works, by Judith Hann (Readers Digest, ISBN: 0762102497)
Writing Activity
Write an essay or a paragraph describing other examples of two buttons (switches) operating an electrical device (garage door, stairway light, computer plugged into a power strip). How do these circuits differ from the buzzer example?
Curriculum Alignment
Alignment to Curriculum Frameworks
Note: Lesson plans in this series are aligned to one or more of the following sets of standards:
- S. Science Education Standards (http://www.nap.edu/catalog.php?record_id=4962)
- S. Next Generation Science Standards (http://www.nextgenscience.org/)
- International Technology Education Association’s Standards for Technological Literacy (http://www.iteea.org/TAA/PDFs/xstnd.pdf)
- S. National Council of Teachers of Mathematics’ Principles and Standards for School Mathematics (http://www.nctm.org/standards/content.aspx?id=16909)
- S. Common Core State Standards for Mathematics (http://www.corestandards.org/Math)
- Computer Science Teachers Association K-12 Computer Science Standards (http://csta.acm.org/Curriculum/sub/K12Standards.html)
National Science Education Standards Grades K-4 (ages 4 – 9)
CONTENT STANDARD A: Science as Inquiry
As a result of activities, all students should develop
- Abilities necessary to do scientific inquiry
- Understanding about scientific inquiry
CONTENT STANDARD B: Physical Science
As a result of the activities, all students should develop an understanding of
- Light, heat, electricity, and magnetism
CONTENT STANDARD E: Science and Technology
As a result of activities, all students should develop
- Understanding about science and technology
National Science Education Standards Grades 5-8 (ages 10 – 14)
CONTENT STANDARD A: Science as Inquiry
As a result of activities, all students should develop
- Abilities necessary to do scientific inquiry
- Understandings about scientific inquiry
CONTENT STANDARD B: Physical Science
As a result of their activities, all students should develop an understanding of
- Transfer of energy
CONTENT STANDARD E: Science and Technology
As a result of activities, all students should develop
- Understandings about science and technology
Next Generation Science Standards Grades 3-5 (Ages 8-11)
Students who demonstrate understanding can:
- 4-PS3-4. Apply scientific ideas to design, test, and refine a device that converts energy from one form to another.
Next Generation Science Standards Grades 3-5 (Ages 8-11)
Engineering Design
Students who demonstrate understanding can:
- 3-5-ETS1-1.Define a simple design problem reflecting a need or a want that includes specified criteria for success and constraints on materials, time, or cost.
- 3-5-ETS1-2.Generate and compare multiple possible solutions to a problem based on how well each is likely to meet the criteria and constraints of the problem.
Next Generation Science Standards Grades 6-8 (Ages 11-14)
Engineering Design
Students who demonstrate understanding can:
- MS-ETS1-2 Evaluate competing design solutions using a systematic process to determine how well they meet the criteria and constraints of the problem.
Standards for Technological Literacy – All Ages
Design
- Standard 8: Students will develop an understanding of the attributes of design.
- Standard 9: Students will develop an understanding of engineering design.
Standard 10: Students will develop an understanding of the role of troubleshooting, research and development, invention and innovation, and experimentation in problem solving.
Related Engineering Fields and Degrees
Student Worksheet
Working as a team, you need to develop a two button buzzer circuit that would simulate how doorbells on either a front and back door could both ring a buzzer or doorbell.
- Read the Student Reference sheets provided to your team.
- Draw a schematic diagram of the two button buzzer setup below.
- Once your team has a viable diagram, construct your circuit with the parts provided by your teacher (wire, battery, two buttons (switches), and buzzer).
- Answer the questions which follow on this student worksheet.
- Presents your group’s design to the class after construction.
Draw a schematic of the two button buzzer circuit design in the box below.
Would there be a limit to the number of switches you could wire together to cause the buzzer to sound? If yes, why? If no, why not?
Would this same circuit concept work for a garage door opener with two buttons (one in the car and one in the garage)? Why? Why not?
Advanced idea — build a two button buzzer circuit that reaches from one classroom to the next!

 Industrial Engineering
 Computer Engineering