Electric Dough
Sponsored Lesson by KEYSIGHT Technologies

In this lesson, students will learn about electricity and circuits by using conductive and insulating dough to build creative electric creations. This activity is based on the work of Dr. AnnMarie Thomas and her team at the University of St. Thomas.
- The basic concepts of electricity and electrical circuits.
- Concepts of electrical insulation and conduction.
- How to build circuits and how short circuits occur.
Age Levels: 8 – 14
Required Materials
- Conductive dough (see recipe below)
- Non-Conductive/Insulating dough (see recipe below)
- AA batteries
- Battery packs with terminals
- LEDs (10mm size recommended)
- Wire with alligator clips
Optional Materials (Table of Possibilities)
- Mini DC electric hobby motors
- Fans, buzzers, and other components
Conductive Dough Recipe
Ingredients:
- 1 cup water
- 1 1⁄2 cup flour
- 1⁄4 cup salt
- 3 Tbsp. cream of tartar
- 1 Tbsp. vegetable oil
- Food coloring
- Mix water with 1 cup of flour, salt, cream of tartar, vegetable oil, and food coloring in a medium-sized pot.
- Cook the mixture over medium heat while stirring continuously.
- Continue to stir until the mixture forms a ball in the center of the pot.
- Place the ball on a lightly floured surface. The dough will be very hot. Allow it to cool for a few minutes before handling.
- Knead the remaining 1⁄2 cup of flour into the ball until it’s reached a desired consistency.
- Store the dough in an airtight container.
Non-Conductive/Insulating Dough Recipe
Ingredients:
- 1 1⁄2 cup flour
- 1⁄2 cup sugar
- 3 Tbsp. vegetable oil
- 1⁄2 cup water (deionized or distilled is best, but tap water can be used)
- Mix 1 cup of flour, sugar, and oil in a bowl.
- Stir in a small amount of water. Continue to add water and stir until most of the water is absorbed.
- Once the mixture is the consistency of small, separated clumps, knead the mixture with your hands until it forms a single lump.
- Add water to the dough and continue to knead until it has a sticky, dough-like texture.
- Add some of the remaining flour and knead it into the dough until it has reached desired texture.
- Store dough in an airtight container.
Materials
- Use items from the build kit
Process
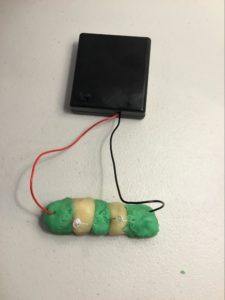
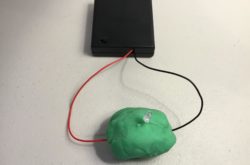
- Start with a ball of the conductive dough. Insert the battery pack wires into opposite sides of the dough. Insert a LED into the dough. Watch what happens.
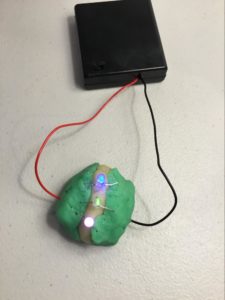
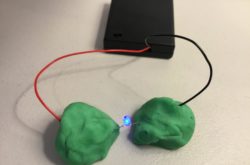
- Next, separate the conductive dough into two pieces. Insert one battery pack wire into one piece of dough and the other into the other piece of dough. Now, insert the LED with one lead in one piece of the dough and the other lead in the second piece of dough. Watch what happens.
- Next, remove the LED and turn it around, with the leads in the opposite direction. Watch what happens. Document why do you think this happened.
- With the LED in the lighted position, touch the two pieces of dough together. Watch what happens. Document why do you think this happened.
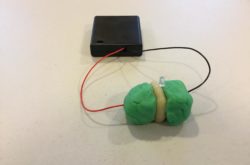
- Add a piece of insulating dough in between the two pieces of conductive dough and attach them so they are touching. With the LED straddling the insulating dough and inserted in the two sections of conductive dough. Is the LED lighting up?
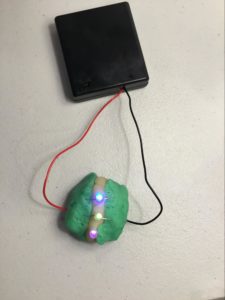
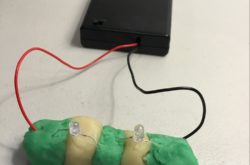
- Use the conductive and insulating dough to create a series circuit with two or more LEDs. What do you notice about the lights? Document why you think this happened.
- Use the conductive and insulating dough to create a parallel circuit with three LEDs. What do you notice about the lights? How are they different from the lights in the series circuit? Document why you think this happened.
TED Talk: AnnMarie Thomas
Source: TED YouTube Channel
Squishy Circuit Sculpture of AnnMarie Thomas
Source: University of St. Thomas YouTube Channel
Design Challenge
You are an engineer working to design and build electricity conducting creations out of dough.
Criteria
- Must use two types of dough (conductive and non-conductive)
to power LED(s).
Constraints
Complete your sculpture within the given time.
- Break class into teams of 2.
- Hand out the Electric Dough worksheet and recipes for the conductive and non-conductive dough.
- Discuss the topics in the Background Concepts Section.
- Review the Engineering Design Process, Design Challenge, Criteria, Constraints and Materials. If time allows, review “Real World Applications” prior to conducting the design challenge.
- Before instructing students to start brainstorming and sketching their designs, ask them to consider the following
● How series and parallel circuits work
● The differences between conductive and insulating materials
● What is a short circuit?
● What is polarity? - Provide each team with their materials.
- Explain that students must make conductive and non-conductive (insulating) dough. They will test the dough by making different circuits using LED lights.
- Announce the amount of time they have to design and build (1 hour recommended).
- Use a timer or an on-line stopwatch (count down feature) to ensure you keep on time. (www.online-stopwatch.com/full-screen-stopwatch). Give students regular “time checks” so they stay on task. If they are struggling, ask questions that will lead them to a solution quicker.
- Teams make their dough.
- Test the dough using the testing steps in the Testing Materials and Process Section.
- Teams should document the results of each testing step.
- As a class, discuss the student reflection questions.
Variations
Use LED lights, motors, buzzers, fans, or any other materials to get creative!
Circuits
The loop that electricity flows through is called a circuit. A circuit begins at a power source, such as a battery, and flows through wires and electrical components (such as lights, motors, etc.). There are two kinds of circuits – series circuits and parallel circuits.
Series Circuits
Series circuits only allow one path for electricity to flow through. In a series circuit with LEDs, the LEDs further from the power source will appear dimmer, because less electricity is available to power them. If a LED were to burn out or be removed in a series circuit, all the lights following it would go out as well, because the one path to the remaining lights would be disconnected.
Parallel Circuits
Parallel circuits allow multiple paths for electricity to flow through. In a parallel circuit with LEDs, each LED has electricity flowing directly to it along its own path. Each LED can shine brightly no matter
where it is, because the electricity is reaching each LED directly. Also, in a parallel circuit, if one light burns out or is removed, the others will continue to shine.
Conductive and Insulating Materials
Conductive Materials: allow electricity to flow through them. Can you think of some materials that conduct electricity?
Insulating Materials: don’t allow electricity to flow through them. Can you think of some insulating materials? Insulation is measured in resistance. The more insulating a material, the more resistance it has. The insulating dough you will be working with is resistive, meaning little electricity can flow through it. Insulators act as a wall which blocks electricity.
Short Circuit
A short circuit happens when wires that are not supposed to come in contact with each other touch. This is why an LED will not light up when it is inserted into a single piece of conductive dough or into
two pieces of conductive dough that then touch one another.
Polarity
The direction of current flow in a circuit is called polarity. In this activity, the red wire from the battery pack is the positive pole and the black wire is the negative pole. Some electronic components also have a positive and negative side and must be attached in the correct direction in order to work.
The LEDs in this activity each have two leads, one short, and one long. The longer lead goes to the positive side and the shorter lead goes to the negative side.
Student Reflection (engineering notebook)
- Electricity always takes the path of least resistance. In step 1, why do you think the LED didn’t light up when it was inserted in one piece of conductive dough? In step 4, why do you think the LED turned off when the two pieces of conductive dough touched one another?
- The conductive dough is made of water, flour, salt, cream of tartar, and vegetable oil. The insulating dough is made of water, flour, sugar, and vegetable oil. What do you think makes one dough conduct electricity and the other not?
- What other materials do you think are conductive?
- What other materials do you think are insulating?
Time Modification
The lesson can be done in as little as 1 class period for older students. However, to help students from feeling rushed and to ensure student success (especially for younger students), split the lesson into two periods giving students more time to brainstorm, test ideas and finalize their design. Conduct the testing and debrief in the next class period.
Circuits
A circuit is a loop through which electricity flows. A circuit begins at a power source, such as a battery, and flows through wires and electrical components (such as lights, motors, etc.). There are two kinds of circuits—series circuits and parallel circuits.
Series circuits only allow one path for electricity to flow through. In a series circuit with LEDs, the LEDs farther from the power source will appear dimmer, because less electricity is available to power them. If a LED were to burn out or be removed in a series circuit, all the lights following it would go out as well, because the one path to the remaining lights would be disconnected.
Parallel circuits allow multiple paths for electricity to flow through. In a parallel circuit with LEDs, each LED has electricity flowing directly to it along its own path. Each LED can shine brightly no matter where it is, because the electricity is reaching each LED directly. Also, in a parallel circuit, if one light burns out or is removed, the others will continue to shine.
Conductivity and Insulation
Materials that conduct electricity—allowing electricity to flow through them—are called conductive. Conductive materi
als can be used to create circuits. That can mean using metal wire or more unusual things like fruit, potatoes, and even dough. In the conductive dough you’ll be using, the salt in the dough helps move the electricity through it by dissociating into Na+ and Cl- ions.
Materials that don’t allow electricity to flow through them are called insulating. Insulation is measured in resistance. The more insulating a material, the more resistance it has. The insulating dough you will be working with is resistive, meaning little electricity can flow through it.
Insulators act as a wall to electricity. Electricity is either stopped by an insulator or has to find a way around it. Since the insulating dough doesn’t conduct electricity, it can be used to separate the conductive dough and to force the electricity to flow through other electrical components, such as LEDs and motors.
Resistance is also important in helping to slow the flow of electricity to a certain component. Fo
r instance, the conductive dough allows electricity to flow through it, but also offers some resistance. This helps to slow the flow of electricity from the battery pack to the LEDs. If the LED were to be connected directly to the battery pack, the LED would burn out.
Short Circuit
Electricity always takes the path of least resistance. Rather than slowly flow through a resistant material, electricity will take a path through something more conductive, like a LED, motor, wire, or other more conductive material. This is how insulating materials can be used to make electricity change course and move through the components you want it to flow through.
If there is a path around an electrical component, such as a LED, that offers less resistance, the electricity will bypass the LED, taking the path of least resistance. This is called a short circuit. This is why an LED inserted into a single piece of conductive dough or
- Conductor: Material that allows electricity to flow through it.
- Insulator: Material that does not allow electricity to flow through it.
- Resistance: Insulation is measured in resistance. The more insulating a material, the more resistance it has.
- Circuit: The loop that electricity flows through. A circuit begins at a power source, such as a battery, and flows through wires and electrical components (such as lights, motors, etc.).
- Series Circuit: Allows one path for electricity to flow through.
- Parallel Circuit: Allows multiple paths for electricity to flow through.
- Short Circuit: When wires that are not supposed to come in contact with each other touch.
Internet Connections
- Squishy Circuits
- Makerspaces.com: Squishy Circuits
- AnnMarie Thomas: Hands-on science with squishy circuits
Recommended Reading
- Electronics for Kids: Play with Simple Circuits and Experiment with Electricity! (ISBN: 978-1593277253)
- A Beginner’s Guide to Circuits: Nine Simple Projects with Lights, Sounds, and More! (ISBN: 978-1593279042)
- Building Squishy Circuits (ISBN: 978-1634727235)
- The Big Book of Makerspace Projects: Inspiring Makers to Experiment, Create, and Learn (ISBN: 978-1259644252)
Writing Activity
In this activity, you will be building objects using a material that can conduct electricity. This will allow you to add lights, motors, fans, and other electrical elements to your creation. Chris Tuan, a civil engineer at the University of Nebraska, Lincoln developed a formula to make conductive concrete that can be used to make roads and sidewalks that can melt ice and snow. If you could construct a building with conductive materials, how would you use its electrical properties?
Alignment to Curriculum Frameworks
Note: All lesson plans in this series are aligned to the Computer Science Teachers Association K-12 Computer Science Standards, the U.S. Common Core State Standards for Mathematics, and if applicable also to the National Council of Teachers of Mathematics’ Principles and Standards for School Mathematics, the International Technology Education Association’s Standards for Technological Literacy, and the U.S. National Science Education Standards which were produced by the National Research Council.
Next Generation Science Standards
Students who demonstrate understanding can
- 3-5-ETS1-1. Define a simple design problem reflecting a need or a want that includes specified criteria for success and constraints on materials, time, or cost.
- 3-5-ETS1-2. Generate and compare multiple possible solutions to a problem based on how well each is likely to meet the criteria and constraints of the problem.
- 3-5-ETS1-3. Plan and carry out fair tests in which variables are controlled and failure points are considered to identify aspects of a model or prototype that can be
improved. - 4-PS3-2. Make observations to provide evidence that energy can be transferred from place to place by sound, light, heat, and electric currents
- 4-PS3-4. Apply scientific ideas to design, test, and refine a device that converts
energy from one form to another. - MS-ETS1-1. Define the criteria and constraints of a design problem with sufficient
precision to ensure a successful solution, taking into account relevant scientific
principles and potential impacts on people and the natural environment that may limit possible solutions. - MS-ETS1-2. Evaluate competing design solutions using a systematic process to
determine how well they meet the criteria and constraints of the problem. - MS-ETS1-3. Analyze data from tests to determine similarities and differences among several design solutions to identify the best characteristics of each that can be combined into a new solution to better meet the criteria for success.
- MS-ETS1-4. Develop a model to generate data for iterative testing and modification of a proposed object, tool, or process such that an optimal design can be achieved.
Standards for Technological Literacy – All Ages
- Chapter 8 – The Attributes of Design
- Definitions of Design
- Requirements of Design
- Chapter 9 – Engineering Design
- Engineering Design Process
- Creativity and Considering all ideas
- Models
- Chapter 10 – The Role of Troubleshooting, Research and Development, Invention, and Experimentation in Problem Solving
- Troubleshooting
- Invention and innovation
- Experimentation
- Chapter 11 – Apply the Design Process
- Collect information
- Visualize a solution
- Test and evaluate solutions
- Improve a design
- Chapter 16 – Energy and Power Technologies
- Energy comes in different forms
- Tools, machines, products and systems


 Industrial Engineering
Circuits
A circuit is a loop through which electricity flows. A circuit begins at a power source, such as a battery, and flows through wires and electrical components (such as lights, motors, etc.). There are two kinds of circuits—series circuits and parallel circuits.
Series circuits only allow one path for electricity to flow through. In a series circuit with LEDs, the LEDs farther from the power source will appear dimmer, because less electricity is available to power them. If a LED were to burn out or be removed in a series circuit, all the lights following it would go out as well, because the one path to the remaining lights would be disconnected.
Parallel circuits allow multiple paths for electricity to flow through. In a parallel circuit with LEDs, each LED has electricity flowing directly to it along its own path. Each LED can shine brightly no matter where it is, because the electricity is reaching each LED directly. Also, in a parallel circuit, if one light burns out or is removed, the others will continue to shine.
Conductivity and Insulation
Materials that conduct electricity—allowing electricity to flow through them—are called conductive. Conductive materials can be used to create circuits. That can mean using metal wire or more unusual things like fruit, potatoes, and even dough. In the conductive dough you’ll be using, the salt in the dough helps move the electricity through it by dissociating into Na+ and Cl- ions.
Materials that don’t allow electricity to flow through them are called insulating. Insulation is measured in resistance. The more insulating a material, the more resistance it has. The insulating dough you will be working with is resistive, meaning little electricity can flow through it.
Insulators act as a wall to electricity. Electricity is either stopped by an insulator or has to find a way around it. Since the insulating dough doesn’t conduct electricity, it can be used to separate the conductive dough and to force the electricity to flow through other electrical components, such as LEDs and motors.
Resistance is also important in helping to slow the flow of electricity to a certain component. For instance, the conductive dough allows electricity to flow through it, but also offers some resistance. This helps to slow the flow of electricity from the battery pack to the LEDs. If the LED were to be connected directly to the battery pack, the LED would burn out.
Short Circuit
Electricity always takes the path of least resistance. Rather than slowly flow through a resistant material, electricity will take a path through something more conductive, like a LED, motor, wire, or other more conductive material. This is how insulating materials can be used to make electricity change course and move through the components you want it to flow through.
If there is a path around an electrical component, such as a LED, that offers less resistance, the electricity will bypass the LED, taking the path of least resistance. This is called a short circuit. This is why a LED inserted into a single piece of conductive dough or into two pieces of conductive dough that then touch one another, the LED will not light up.
Polarity
Electrical current flows from the positive pole of an energy source to the negative pole. The direction of current flow in a circuit is called polarity. In this activity, the red wire from the battery pack is the positive pole and the black wire is the negative pole. Some electronic components also have a positive and negative side and must be attached in the correct direction in order to work. The LEDs you will be working with each have two leads, one short, and one long. The longer lead goes to the positive side and the shorter lead goes to the negative side. If the LED is attached in the wrong direction, it won’t light up until it has been turned around. Motors will work when attached in either direction. However, the direction in which the electricity flows will determine the spinning direction of the motor’s shaft.
In this activity, you will be building creations out of dough, just like you did when you were younger. Only these creations can conduct electricity, allowing you to create circuits and add features such as lights, motors, and more. You will be working with two types of dough. One dough (colored) is conductive and will allow electricity to flow through it. The other (white) is insulating and does not allow electricity to through it. You will begin by exploring the two types of dough and how they work together to create circuits. Then, you can have fun getting creative.
Practice Circuits/Getting to Know Your Dough
- Start with a ball of the conductive dough. Insert the battery pack’s wires into opposite sides of the dough. Insert a LED into the dough. What happens?
robin-hegg-2019
- Next, separate the conductive dough into two pieces. Insert one battery pack wire into one piece of dough and the other into the other piece of dough. Now insert the LED with one lead in one piece of the dough and the other lead in the second piece of dough. What happens?
robin-hegg-2019
- Next, remove the LED and turn it around, then insert it back into the two pieces of dough with the leads in the opposite direction from how they were before. What happens? Why do you think it happened?
- With the LED in the lighted position, touch the two pieces of dough together. What happens? Why do you think it happened?
- Next, add a piece of insulating dough in between the two pieces of conductive dough and attach them so they are touching. With the LED straddling the insulating dough, inserted in the two sections of conductive dough, you have one solid object. The LED is lighting up, however, because there’s no short circuit happening. Since the insulating dough does not allow the electricity to flow through it, the electricity goes through the LED instead, lighting it up.
robin-hegg-2019
- Use the conductive and insulating dough to create a series circuit with two or more LEDs. What do you notice about the lights? Why do you think that is?
robin-hegg-2019
- Use the conductive and insulating dough to create a parallel circuit with three LEDs. What do you notice about the lights? How are they different from the lights in the series circuit? Why do you think that is?

robin-hegg-2019
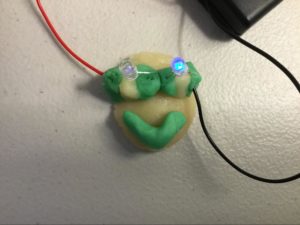
Get Creative
Now that you understand how to use the two types of dough to power a LED and run a motor try building something creative. You can use LEDs, motors, buzzers, fans, or any other materials your teacher has provided. You could make an animal with light-up eyes, a helicopter with a spinning propeller, or anything else you can imagine. Once you’ve finished, share your creation with the rest of the class and see what you classmates thought up. Here are some creations other students have made:


Thanks to Matt Francis, Ph.D., IEEE East Area Chair, Region 5 for sharing.
Lesson Plan Translation
Downloadable Student Certificate of Completion