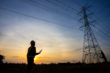
Working with Wind Energy
This lesson focuses on how wind energy can be generated on both a large and small scale. Student teams design and build a working wind turbine out of everyday materials that can lift a teabag in one minute or less.
- Learn about wind energy and wind turbines.
- Learn about engineering design.
- Learn how engineering can help solve society’s challenges.
- Learn about teamwork and problem solving.
Age Levels: 8 – 18
Build Materials (For each team)
Required Materials
- Tea bags (with string)
Optional Materials (Trading/Table of Possibilities)
- Bendable wire
- String
- Paperclips
- Rubber bands
- Toothpicks
- Aluminum foil
- Plastic sheets
- Wood dowels
- Cardboard
- Binder clips
- Paper fasteners
- Clothespins
Testing Materials
- Hair dryer or small fan
Materials
- Hair dryer or small fan
- Stopwatch or timer
Process
Hold a hair dryer or fan (set at medium speed) a minimum of 3 feet away from the turbine blade. Use a timer to time how long it takes for the weight (tea bag) to be lifted 6 inches. The goal is to lift the teabag in 1 minute or less. Document each team’s time.
Wind Turbine: How it works
Source: Learn Engineering YouTube Channel
Wind Resources in your Area?
- Do you have wind farms in your area? How many?
- What is the total operating wind capacity?
- Where is your area on the world list?
- How can you celebrate Global Wind Day?
- Check out the following sites to help you find answers:
- The Wind Power (thewindpower.net)
- National Renewable Energy Laboratory (www.nrel.gov/wind)
- Wind Europe (https://windeurope.org)
- Danish Wind Industry Association (www.windpower.org)
- Global Wind Energy Council (www.gwec.net)
Global Wind Day (www.globalwindday.org)
Design Challenge
You are a team of engineers challenged to design and build an efficient windmill. The design that meets the criteria and is least expensive will be most efficient.
Criteria
- Must have a rotor shaft around which to wind-up the given weight (tea bag)
- Must be freestanding (no human interaction)
- Weight (tea bag) to be lifted 6 in. in 1 minute or less
- Blow dryer or small fan minimum of 3 feet away from turbine and on medium speed
- Stay within your $5.00 budget
Constraints
- Maximum time to wind-up weight is 1 minute
- You must buy your materials – you can trade and return materials
- Break class into teams of 2-4.
- Hand out the Design Your Own Wind Turbine worksheet, as well as some sheets of paper for sketching designs.
- Discuss the topics in the Background Concepts Section.
- Review the Engineering Design Process, Design Challenge, Criteria, Constraints and Materials. If time allows, review “Real World Applications” prior to conducting the design challenge.
-
Before instructing students to start brainstorming and sketching their designs, ask them to consider the following:
● Number of blades
● Shape of the blades
● Strength of the blades
● Direction the windmill sits: can be vertical or horizontal
● Efficiency and not spending all your money - Provide each team with their materials.
- Explain that students must develop a wind turbine from everyday items. The turbine must have a rotor shaft around which to wind-up the given weight (tea bag) and it must be freestanding (no human interaction).
- Announce the amount of time they have to design and build (1 hour recommended).
- Use a timer or an on-line stopwatch (count down feature) to ensure you keep on time. (www.online-stopwatch.com/full-screen-stopwatch). Give students regular “time checks” so they stay on task. If they are struggling, ask questions that will lead them to a solution quicker.
- Students meet and develop a plan for their wind turbine. They agree on materials they will need, write/draw their plan, and present their plan to the class. Teams may trade unlimited materials with other teams to develop their ideal parts list.
- Teams build their designs.
- Test the wind turbine designs by holding a hair dryer or fan (set at medium speed) a minimum of 3 feet away from the turbine blade. Use a timer to time how long it takes for the weight (tea bag) to be lifted 6 inches. The goal is to lift the teabag in 1 minute or less.
- Teams should document the time it took for their turbine to lift the teabag.
- As a class, discuss the student reflection questions.
- For more content on the topic, see the “Real World Applications” and “Digging Deeper” sections.
Design Budget
Teams must purchase their materials. Each team gets $5.00 to spend.
Blade Shape & Body of Windmill
- Craft sticks: $.25
- Bendable wire $.25
- Wood dowels/sticks $.25
- Cardboard Stip$.10
- Toothpicks $.10
Cover for the blade
- Aluminum foil Sheet $.25
- Plastic sheets $.25
Connectors
- String $.10
- Paperclips $.05
- Rubber bands $.05
- Binder clips $.05
- Paper fasteners $.05
- Clothespins $.05
Remember teams can trade with other teams, if they run out of materials. Teams can also return and exchange any materials not used.
Optional: Calculate Efficiency
Efficiency of design will depend on more than cost.
- Cost of materials
- Speed (rotations per minute)
- Power (time to wind weight)
- Measure of Efficiency = (Cost of materials) /
(time [sec] to lift weight)
Engineers will be working in this field for years to come to determine the optimal shape, weight, and materials to generate energy most efficiently!
Student Reflection (engineering notebook)
- Did you succeed in creating a windmill that operated for a minute that could lift an object? If not, why did it fail?
- Did you decide to revise your original design or request additional materials while in the construction phase? Why?
- Did you negotiate any material trades with other teams? How did that process work for you?
- If you could have had access to materials that were different than those provided, what would your team have requested? Why?
- Do you think that engineers have to adapt their original plans during the construction of systems or products? Why might they?
- If you had to do it all over again, how would your planned design change? Why?
- How did the most “efficient” design (the one with the lowest cost or budget) differ from your own?
- Do you think you would have been able to complete this project easier if you were working alone? Explain…
- What drawbacks does a wind turbine have as a reliable source of energy? What technologies exist that might compensate for these drawbacks?
- What advantages does the windmill have as a renewable source of energy?
Time Modification
The lesson can be done in as little as 1 class period for older students. However, to help students from feeling rushed and to ensure student success (especially for younger students), split the lesson into two periods giving students more time to brainstorm, test ideas and finalize their design. Conduct the testing and debrief in the next class period.
Blade Options
Blade Design

Blades come in many shapes and sizes, and there is continuing research into which design is best. It turns out that the optimal design really depends on the application, or where and how the blade will be used. Designers look at the “tip speed ratio” that determines efficiency. This is the ratio between the speed of the wind and the speed of the blade tip. High efficiency 3-blade-turbines have tip speed/wind speed ratios of between 6 and 7.
How Many Blades?
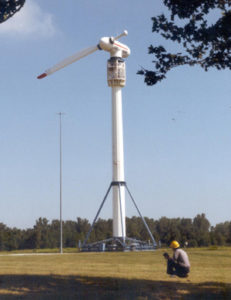
Most wind turbines use either two or three blades. Research indicates that as more blades are added there is an increase in aerodynamic efficiency, but this efficiency decreases dramatically with each added blade. For example, increasing the number of blades from one to two can yield a six percent increase in aerodynamic efficiency, but increasing the blade count from two to three yields only an extra three percent in efficiency. And, of course, there are cost implications too. Each additional blade in a design will increase the cost of the end product, so engineers have to factor in both the increased efficiency and the increased cost of manufacturing to determine a design that will be the best for an application. Aesthetics is also a consideration. A small, two or three blade design might be best for a residential area, where a homeowner just wants to pull from the wind enough energy to power their own home, and would prefer a quieter option. A giant 12 blade design would not look very nice atop their home and would perhaps generate more energy than they need, and likely more noise too! To the right you can see how NASA tested a one-bladed rotor configuration.
Materials
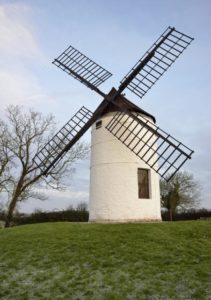
Early windmills were made of wood with canvas sails. These deteriorated over time and required care – but they represented the materials readily available! More recently, older mechanical turbine blades were made out of heavy steel…but now many are made using fiberglass and other synthetic materials that offer strength at lower weights. And, lower weight building materials can result in larger blades to catch more wind in applications where size and space are less of an issue. Manufacturers also use epoxy-based composites which may offer manufacturing advantages over other materials because the process has less impact on the environment and can result in a smoother surface finish. Carbon fibers have also been identified as a cost-effective method to further reduce weight and increase stiffness. Smaller blades can be made from light metals such as aluminum. Engineers will be working in this field for years to come to determine the optimal shape, weight, and materials to generate energy most efficiently!
- Engineers: Inventors and problem-solvers of the world. Twenty-five major specialties are recognized in engineering (see infographic).
- Engineering Habits of Mind (EHM): Six unique ways that engineers think.
- Engineering Design Process: Process engineers use to solve problems.
- Criteria: Conditions that the design must satisfy like its overall size, etc.
- Constraints: Limitations with material, time, size of team, etc.
- Prototype: A working model of your solution to be tested.
- Iteration: Test & redesign is one iteration. Repeat (multiple iterations).
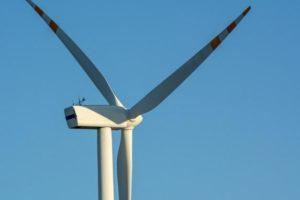
- Wind Energy: Wind power or wind energy is the use of wind to provide the mechanical power through wind turbines to turn electric generators and traditionally to do other work, like milling or pumping.
- Wind Turbine: Is a wind energy converter – a device that converts the wind’s kinetic energy into electrical energy.
- Aerodynamic Efficiency: A measure that assesses a design to generate aerodynamic forces for efficient flight parameters.
- Tip speed ratio: Is the ratio between the tangential speed of the tip of a blade and the actual speed of the wind.
- Renewable energy: Wind power or energy is the use of wind to provide the mechanical power through wind turbines to turn electric generators and to do other work, like milling or pumping.
Internet Connections
- National Renewable Energy Laboratory – Wind Research
- Wind Europe
- Danish Wind Industry Association
- Global Wind Energy Council
- Global Wind Day
Recommended Reading
- Wind Power: Renewable Energy for Home, Farm, and Business (ISBN: 1931498148)
- Wind Energy Basics: A Guide to Small and Micro Wind Systems (ISBN: 1890132071)
- The Homeowner’s Guide to Renewable Energy (ISBN: 086571536X)
Writing Activity
Write an essay about whether a wind farm — even if it would provide energy to the local area — would be a good idea to put in the center of your hometown. What about on the Thames River in London or just off of a resort beach area?
Alignment to Curriculum Frameworks
Note: Lesson plans in this series are aligned to one or more of the following sets of standards:
- U.S. Science Education Standards (http://www.nap.edu/catalog.php?record_id=4962)
- U.S. Next Generation Science Standards (http://www.nextgenscience.org/)
- International Technology Education Association’s Standards for Technological Literacy (http://www.iteea.org/TAA/PDFs/xstnd.pdf)
- U.S. National Council of Teachers of Mathematics’ Principles and Standards for School Mathematics (http://www.nctm.org/standards/content.aspx?id=16909)
- U.S. Common Core State Standards for Mathematics (http://www.corestandards.org/Math)
- Computer Science Teachers Association K-12 Computer Science Standards (http://csta.acm.org/Curriculum/sub/K12Standards.html)
National Science Education Standards Grades K-4 (ages 4 – 9)
CONTENT STANDARD A: Science as Inquiry
As a result of activities, all students should develop
- Abilities necessary to do scientific inquiry
CONTENT STANDARD B: Physical Science
As a result of the activities, all students should develop an understanding of
- Position and motion of objects
CONTENT STANDARD E: Science and Technology
As a result of activities, all students should develop
- Abilities of technological design
CONTENT STANDARD F: Science in Personal and Social Perspectives
As a result of activities, all students should develop understanding of
- Science and technology in local challenges
CONTENT STANDARD G: History and Nature of Science
As a result of activities, all students should develop understanding of
- Science as a human endeavor
National Science Education Standards Grades 5-8 (ages 10 – 14)
CONTENT STANDARD A: Science as Inquiry
As a result of activities, all students should develop
- Abilities necessary to do scientific inquiry
CONTENT STANDARD B: Physical Science
As a result of their activities, all students should develop an understanding of
- Motions and forces
- Transfer of energy
CONTENT STANDARD E: Science and Technology
As a result of activities in grades 5-8, all students should develop
- Abilities of technological design
CONTENT STANDARD F: Science in Personal and Social Perspectives
As a result of activities, all students should develop understanding of
- Science and technology in society
National Science Education Standards Grades 9-12 (ages 14-18)
CONTENT STANDARD A: Science as Inquiry
As a result of activities, all students should develop
- Abilities necessary to do scientific inquiry
CONTENT STANDARD B: Physical Science
As a result of their activities, all students should develop understanding of
- Motions and forces
- Interactions of energy and matter
CONTENT STANDARD E: Science and Technology
As a result of activities, all students should develop
- Abilities of technological design
CONTENT STANDARD F: Science in Personal and Social Perspectives
As a result of activities, all students should develop understanding of
- Natural resources
- Science and technology in local, national, and global challenges
CONTENT STANDARD G: History and Nature of Science
As a result of activities, all students should develop understanding of
- Historical perspectives
Next Generation Science Standards Grades 3-5 (Ages 8-11)
Motion and Stability: Forces and Interactions
Students who demonstrate understanding can:
- 3-PS2-1. Plan and conduct an investigation to provide evidence of the effects of balanced and unbalanced forces on the motion of an object.
Energy
- 4-PS3-1. Use evidence to construct an explanation relating the speed of an object to the energy of that object.
- 4-PS3-4. Apply scientific ideas to design, test, and refine a device that converts energy from one form to another.
Earth and Human Activity
Students who demonstrate understanding can:
- 4-ESS3-1. Obtain and combine information to describe that energy and fuels are derived from natural resources and their uses affect the environment.
Engineering Design
Students who demonstrate understanding can:
- 3-5-ETS1-1.Define a simple design problem reflecting a need or a want that includes specified criteria for success and constraints on materials, time, or cost.
- 3-5-ETS1-2.Generate and compare multiple possible solutions to a problem based on how well each is likely to meet the criteria and constraints of the problem.
- 3-5-ETS1-3.Plan and carry out fair tests in which variables are controlled and failure points are considered to identify aspects of a model or prototype that can be improved.
Next Generation Science Standards Grades 6-8 (Ages 11-14)
Energy
Students who demonstrate understanding can:
- MS-PS3-5. Construct, use, and present arguments to support the claim that when the kinetic energy of an object changes, energy is transferred to or from the object.
Engineering Design
Students who demonstrate understanding can:
- MS-ETS1-1 Define the criteria and constraints of a design problem with sufficient precision to ensure a successful solution, taking into account relevant scientific principles and potential impacts on people and the natural environment that may limit possible solutions.
- MS-ETS1-2 Evaluate competing design solutions using a systematic process to determine how well they meet the criteria and constraints of the problem.
Next Generation Science Standards Grades 9-12 (Ages 14-18)
Energy
Students who demonstrate understanding can:
- HS-PS3-3. Design, build, and refine a device that works within given constraints to convert one form of energy into another form of energy.
Engineering Design
Students who demonstrate understanding can:
- HS-ETS1-2.Design a solution to a complex real-world problem by breaking it down into smaller, more manageable problems that can be solved through engineering.
Standards for Technological Literacy – All Ages
The Nature of Technology
- Standard 2: Students will develop an understanding of the core concepts of technology.
- Standard 3: Students will develop an understanding of the relationships among technologies and the connections between technology and other fields of study.
Technology and Society
- Standard 4: Students will develop an understanding of the cultural, social, economic, and political effects of technology.
- Standard 5: Students will develop an understanding of the effects of technology on the environment.
Design
- Standard 9: Students will develop an understanding of engineering design.
- Standard 10: Students will develop an understanding of the role of troubleshooting, research and development, invention and innovation, and experimentation in problem solving.
Standards for Technological Literacy – All Ages
Abilities for a Technological World
- Standard 11: Students will develop abilities to apply the design process.
- Standard 13: Students will develop abilities to assess the impact of products and systems.
The Designed World
- Standard 16: Students will develop an understanding of and be able to select and use energy and power technologies.
- Standard 20: Students will develop an understanding of and be able to select and use construction technologies.

 Computer Engineering
Student Worksheet: Design Your Own Windmill
You are working as a team of engineers who have been given the challenge to design a windmill out of everyday items. Your windmill will need to be able to withstand wind from a fan for at least one minute while winding a string or wire to lift a light object such as a teabag. You are working on a budget and will have to “purchase” materials from your teacher to create your design. You may return materials, exchange materials with other teams, but will need to determine the “cost” of your windmill – the least expensive design that meets the challenge will be considered the most efficient design! Your windmill may be vertical (pointing upward from a table) or horizontal (pointing off the edge of a table).
Planning Stage
Meet as a team and discuss the problem you need to solve. Then develop and agree on a design for your windmill. You’ll need to determine what materials you want to use — keep in mind that your design must be strong enough to withstand wind from a fan or hairdryer and the base cannot move so it will have to be secured to a table or shelf. Draw your design in the box below, and be sure to indicate the description and number of parts you plan to use. Present your design to the class. You may choose to revise your teams’ plan after you receive feedback from class.
|
|
| Materials Needed and Budget:
|
Construction Phase

Build your windmill. During construction you may decide you need additional materials or that your design needs to change. This is ok — just make a new sketch and revise your materials list and budget.
Testing Phase
Each team will test their windmill using a classroom fan or hairdryer — each windmill will be tested using the same wind speed — medium — at a distance of three feet. You’ll need to make sure your windmill can operate for a minute at this speed while winding a light object up with a string. Be sure to watch the tests of the other teams and observe how their different designs worked.
Evaluation Phase
Evaluate your teams’ results, complete the evaluation worksheet, and present your findings to the class.
Use this worksheet to evaluate your team’s results in the “Working with Wind Energy” lesson:
1) Did you succeed in creating a windmill that operated for a minute that could lift an object? If not, why did it fail?
2) Did you decide to revise your original design or request additional materials while in the construction phase? Why?
3) Did you negotiate any material trades with other teams? How did that process work for you?
4) If you could have had access to materials that were different than those provided, what would your team have requested?Why?
5) Do you think that engineers have to adapt their original plans during the construction of systems or products? Why might they?
6) If you had to do it all over again, how would your planned design change? Why?
7) How did the most “efficient” design (the one with the lowest cost or budget) differ from your own?
8) Do you think you would have been able to complete this project easier if you were working alone?Explain…
9) What drawbacks does a wind turbine have as a reliable source of energy?What technologies exist that might compensate for these drawbacks?
10) What advantages does the windmill have as a renewable source of energy?
Downloadable Student Certificate of Completion