Light Sculpture
Sponsored Lesson by KEYSIGHT Technologies

This challenge encourages students to engage their creative side to design a light sculpture that expresses the personality of the team. They will design, program and present a light show with basic circuitry, breadboarding and microcontrollers using Tinkercad. They also design a creative display for their light design using everyday items and presents to the group.
- Explore Arudino and breadboarding basics
- Simulate with Tinkercad Electronics
- Design a light sculpture with creative light pattern and display
Age Levels: 11-18
Build Materials (For each team)
Materials
High Tech Option
- Student Worksheets
- Student Team Materials
- Computer
- Arduino Microcontroller
- Arduino IDE Software
- Breadboard (solderless)
- Multiple LEDS (min. 4)
- Multiple Jumper Wires (min 4)
- Multiple 330-ohm Resistors (min 4)
- TinkerCad & TinkerCad Circuits (free- just need to register)
- Prototyping materials (cardboard, cardstock, hot glue, tape)
Low Tech Beginner & Virtual Option (no Arudino and broadband)
- Computer
- Tinkercad & Tinkercad Circuits (free- just need to register)
- Prototyping materials (cardboard, cardstock, hot glue, tape)
- Flashlights (one for each team member)
Light Art
Creativity with Light
Light is often used as a tool in art. Consider fireworks displays you have seen which are synchronized to music…or how stained glass comes to life when illuminated from behind. With advances in technology, lighting of many types is now used to express a celebration, a thought, or an idea.

Lighting is used to add a visual layer to concerts, to add drama to theatre productions, and to add color to dinners or weddings.
Lighting designers are only limited by their imagination and the materials and resources available to them!

Read this article written by Lee Foster on Fostertravel.com about Light Art Sculptures across San Francisco. Source: https://www.fostertravel.com/light-art-sculptures-proliferate-in-san-francisco/
Light Art Sculptures Proliferate in San Francisco
By Lee Foster, December 4, 2018

A relatively new art form now proliferates in San Francisco. It is called “light art,” meaning the use of light to create art sculptures, at night. The City itself is a dark canvas. Consequently, light art emerges as a major form of artistic expression in San Francisco in recent years.
The most dramatic of these installations is Leo Villareal’s “The Bay Lights,” permanently lighting up the west section of the San Francisco Oakland Bay Bridge. This highly popular “temporary” illumination in the past emerged later as a perennial visual joy. To sum up, the City fathers and mothers wisely responded to popular demand that this art work become permanent.
Artists created many other major light-as-art installations in the City. They are compelling to view all year, but particularly in the December Holidays period. However, December is the darkest time of the year, the Winter Solstice. As a result, humans seek some message of illumination regarding their condition.
Here are several installations to consider year round, but especially in the Holiday period.
Pier 14, East of the Ferry Building
Pier 14 is the first large public pier east of the Ferry Building, only a short walk. This pier is a pedestrian walkway. It amounts to your finest and first place at which to enjoy light art in San Francisco. From the end of this pier, you can see up close the wonderful illumination of the Bay Bridge.
However, during the holiday period, stand at the end of this pier and also look back at the San Francisco skyline. In the Holiday period, the Embarcadero Center Buildings are lit up like boxy Christmas gifts.
The Bay Lights, on the San Francisco-Oakland Bay Bridge
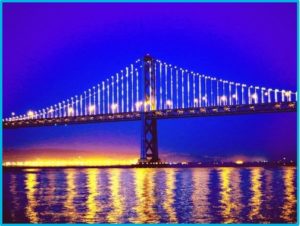
Leo Villareal set a high bar for competing light artists. He had both the ingenuity and the political clout to arrange a Bay Bridge light display. Subsequently, his work became both a locals and visitor favorite. This original and acious lighting masterpiece is a tour de force.
This undertaking will be seen historically as a parallel to lighting the Eiffel Tower in Paris at night. Villareal presents the world’s largest LED light sculpture, about 1.8 miles wide and 500 feet high. He has programmed individually about 25,000 LED lights. Initially, the light sculpture celebrated the 75th anniversary of the Bay Bridge birth (1936) with this never-repeating and dazzling display of light. The lights hang on the vertical strands of steel cable holding up the bridge. In short, the temporary installation became iconic, with calls for a perennial performance. The current expression is permanent.
Firefly, Golden Gate at Polk
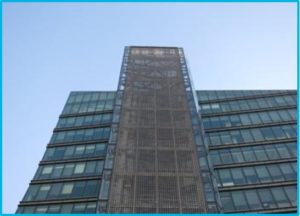
Ned Kahn’s “Firefly” is at 525 Golden Gate Avenue, where Golden Gate Avenue meets Polk Street, in the Civic Center area. Kahn is an environmental artist who won the commission to create this 12-story kinetic sculpture from the San Francisco Arts Commission.
His canvas is the front of the San Francisco Public Utilities Commission’s (PUC) headquarters. Kahn’s “Firefly” consists of thousands of five-inch-square, clear polycarbonate panels. He hinged the panels to move freely in the wind. Consequently, during the day, the effect appears to be as a wave. However, at night, the movement becomes a vibrant undulation of light. The panels connect to electric switches that trigger tiny LED lights.
The lights mimic fireflies, a threatened species that needs riparian environments for its survival. “Firefly” is a permanent installation. Stand immediately below the sculpture on the sidewalk and look up to get the full effect of twinkling fireflies at night.
Language of the Birds
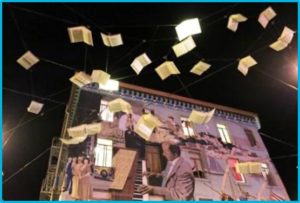
Brian Goggin and Dorka Keehn’s light sculpture, called “Language of the Birds,” is at the intersection of Broadway and Columbus Avenues in North Beach. This is a permanent installation, part of the Civic Art Collection, viewable 24 hours a day and featuring a night lighting aspect.
The San Francisco Arts Commission authorized the artwork. Funds came from a two-percent-for-art program charged to developers. This piece is part of a pedestrian walkway between Chinatown and North Beach. The installation presents books, as if in flight. As a result, the books resemble birds in motion. In other words, they could be pigeons in flight. Wings flutter in different positions. At night LED lights embedded in the books create changing visual patterns.
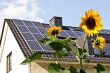
This sculpture is one of the first solar power-offset public artworks in California. To clarify, the sculpture pumps power into the City grid on sunny days.
Pedestrians walking here will notice words in the sidewalk below the books. The words seem to fall from pages of the books. Most importantly, the words are in English, Italian, and Chinese, reflecting nearby communities.
The efficiency of modern light creation sources greatly reduces the energy cost of light-as-art sculpture. In short, Ned Kahn “Firefly” sculpture is so efficient that it uses less energy than one old-fashioned 75-watt light bulb.
27 Current Permanent Light Art Installations in San Francisco
The tourism folks at SFTRAVEL.com keep track of the permanent light art installations in San Francisco. Here is the current list: https://www.fostertravel.com/light-art-sculptures-proliferate-in-san-francisco/
The Role of Light Arts
The medium of the past for art tended to be physical objects, such as sculpted stone and poured bronze. Moreover, another popular form was paint applied to a surface, such as canvas. However, in these modern light-as-art sculptures in San Francisco, new materials and strategies show their ingenuity. A computer or the wind might control the art. The light visible at night might itself be saved sunlight, gathered by the art object during the sunny part of the day.
More Light Sculpture Resources
Video Links
- The Light Sculpture Art of William Leslie https://www.youtube.com/
- Amazing Light Sculptures At Portland’s Winter Light Festival https://www.youtube.com/
- Crystal Chandelier – Kinetic Light Sculpture https://www.youtube.com/
- Illusion Fireworks The British Musical Fireworks Championship https://www.youtube.com/
- Lights moving to beat of music: https://www.youtube.com/
Internet Connections
- Light Art https://en.wikipedia.org/wiki/Light_art
- Light art sculptures proliferates in San Francisco: https://www.fostertravel.com/light-art-sculptures-proliferate-in-san-francisco/
- Light Sculpture Collector: https://sculpturecollector.wordpress.com/2011/02/07/what-is-light-sculpture/
Design Challenge
Teams design a light sculpture (a form of sculpture where lights are the primary medium of expression). Create a light show applying what they learn from basic circuitry, breadboarding and microcontrollers and simulate in Tinkercad Circuits and Use CAD (Tinkercad or other package) to design the sculpture for housing or covering the electronics that will enhance the light show.
Criteria
- Minimum of 4 LEDs in design
- Design sculpture in CAD
- Used Mixed Media for final light sculpture prototype
- Optional: 3D print one element of the sculpture (if have access)
Together with the Students: Wiring and Coding
HIGH TECH OPTION
Task 1: Get 4 LEDS to blink on and off then complete the following steps
- Divide the class into groups of two students each.
- Have students refer to Figure 1 (if needed) to guide them through the wiring. Make sure that if they intend to connect two wires that they insert the wires in the same row. Have each student group complete the following:
- Start by first running a wire from the GND pin on the Arduino to the (-) power rail on the left side of the breadboard. Doing this ensures that anything further that is plugged into the (-) power rail will also be connected to GND.
- Add four LEDs, starting from the top. Remember that each LED has a long leg and a short leg. Plug the longer leg into the first row and the shorter leg into the second row.
- Next, use a 330-ohm resistor to connect the second row (and the short leg of the LED) to GND.
- Finally, connect pin 13 to the long leg of the LED using a short jumper wire to the first row. Repeat this for the remaining three LEDs.

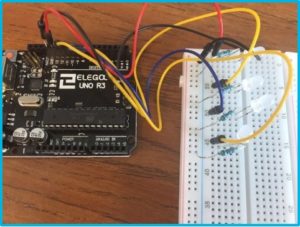
Fig. 1 - Have students create a new code in Arduino software to make the 4 LEDs Blink. If needed, have them copy the code shown in Figure 2. This is a quick and simple code example to get all four LEDs blinking. (Remember: The code uses special punctuation marks and is case-sensitive.)
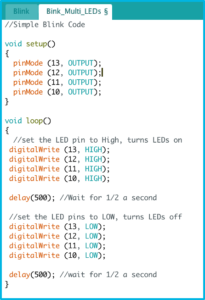
Fig. 2 - Have students upload the code by clicking Run on Arduino. If any syntax errors appear, suggest that students double-check their typing. Once students get a message that says “Done uploading,” have them take a look at their circuits—all four LEDs should be blinking (see Figure 3).
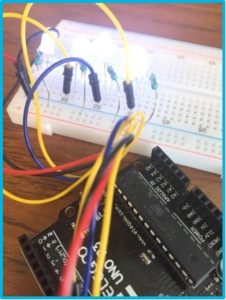
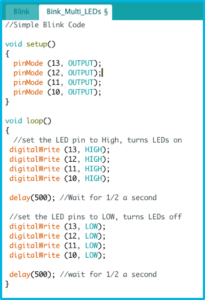
Fig. 3 - Review with students what the code is doing by explaining each section of the code (see Figure 4)
Every Arduino program needs these two functions to work: void setup () {…} This makes the program start and runs all the code within the {curly brackets} once.
void loop() {…} This is the main function and will loop continuously.See Robotics Backend video for a deeper explanation on void setup and void loop.digitalWrite (13, HIGH) command sets the voltage on pin 13 to a HIGH voltage (5V). Turns LEDs on.digitalWrite (13, LOW) command sets the voltage on pin 13 to a LOW voltage (0V ground). Turns LEDs off.
delay(500) command pauses the program for 500 millisecond (1/2 a second) before going to the next instruction.See Arudino Language Page for more help: https://www.arduino.cc/reference/en/
Also see SparkFun Arduino tutorial for more help: https://learn.sparkfun.com/tutorials/digital-sandbox-arduino-companion/0-setup-and-loopFig. 4 Task 2: Students play with different patterns
- LED Chaser: Modify the code so that the LEDs turn on one at a time, one after another from left to right, with at least 1/10 of a second before the next LED turns on, and then all turn off. Bonus: Now, modify it so that the LEDs also turn off one at a time. See sample here: https://create.arduino.cc/projecthub/msr048/led-chaser-f6ec89
- Scrolling LED: Modify the code so that just one LED turns on and moves from left to right and then back—so it looks like the LED is bouncing back and forth. Bonus: Now modify the code so that it speeds up and slows down gradually. https://www.makerspaces.com/15-simple-arduino-uno-breadboard-projects/ (See #6 Scrolling LED)
Task 3: Students create a unique “Light Show”
Design Phase of electronics
After playing with different patterns, now students will create their own unique light show for their Light Sculpture challenge. Teams will design their own pattern and then develop code for it. They need to plan out a sequence of LEDs that does something unique. They can consider adding music – choreograph blinking LED to 15 seconds of music.
Document
Have teams make a video recording to capture their creation to be shared.
Testing Phase of electronics: Simulate and Test Virtually in TinkerCad Circuits:
Have students try to prototype their light show in TinkerCad Circuits before they build it. Test and redesign there (Figure 5). Once they have a working prototype, have them build it.
Students create the Light Sculpture
Have students design and then prototype the light sculptures in CAD and then 3D print part (or all) of the sculpture. Students can use other materials like cardboard, cardstock, cellophane or any other found materials for a mixed-media sculpture.Teacher Note: Challenge students to think about how they might re-position the LEDs and modify their code to create a cool effect. Use extension wires to move the LEDs from the breadboard. After students construct their sculptures, direct them back to programming them. Suggest that they create a minimum of two different “modes” or programs that run on their sculptures with a two- or three-second “off” period between the two modes. For example, make the first mode a simple, soft, slow changing pattern, and the second a disco/dance party light.
LOW TECH OPTION
- Have students design and prototype their light show in TinkerCad Circuits. If possible, have them try to physically replicate their show with flashlights. Each person becomes an LED in the design and replicates its pattern.
- Next, have students design and then prototype the light sculptures in Tinkercad CAD and then 3D print part (or all) of the sculpture. Students can use other materials like cardboard, cardstock, cellophane or any other found materials for a mixed-media sculpture. Make sure they consider providing access for the flashlights.
- Putting them together. Test out the light sculptures by replicating the light show through the sculpture.
Time Modification
The lesson can be done in as little as 1 class period for older students. However, to help students from feeling rushed and to ensure student success (especially for younger students), split the lesson into two periods giving students more time to brainstorm, test ideas and finalize their design. Conduct the testing and debrief in the next class period.
Advanced Arduino Applications?
Beyond Flashing Lights
If you have completed the Arduino Blink Challenge, there are many other applications for using an Arduino board that you can try on your own, as a team, in the classroom, or on your own time. You can also find advanced tutorials at http://arduino.cc/en/Tutorial/HomePage to show you how to read a switch, read a potentiometer, use a pushbutton to control an LED, play tones on multiple speakers, make an LED bar graph, send a text string, or even output the values from a barometric pressure sensor as a web page.
The following are some sample ideas so you can see how versatile your new computing skills are!
Control Sensors
Try controlling an external sensor with your Arduino. You can sample air for pollution, identify how bright an area is, set up a flood alarm with a water sensor, or attach a motion detector. Or, consider using the Arduino to control sensors that measure electromagnetic Fields, sample air for humidity levels, take the temperature, identify if a gas is present in the air, or gather data from an anemometer that measures wind speed. You can even attach a barcode scanner (which simulates a keyboard) or a keyboard to the Arduino.
Visual and Audio Applications
Your arduino can be set up to manage a camera system, and control photography settings. This can be done with most equipment, including Nikon, Canon, Sony, Minolta, Olympus and Pentax cameras. You can even attach a barcode scanner (which simulates a keyboard) or a keyboard to the Arduino.
Motors and Robotics
Arduino is a great tool for controlling motors and robotics. Try connecting DC motors or stepper motors. You can control a highly accurate stepper motor using a potentiometer with an Arduino.
Community of Developers
There is a growing community of Arduino application developers who share code, ideas, and examples. Additional documentation has been created by the Arduino community on the publicly-editable playground wiki at http://playground.arduino.cc.
What is Arduino?
Open Source Computing
Arduino is an open-source physical computing platform based on a simple microcontroller board, and a development environment for writing software for the board. Arduino can be used to develop interactive objects, taking inputs from a variety of switches or sensors, and controlling a variety of lights, motors, and other physical outputs. Arduino projects can be simple – – such as turning on and off a light — or very complex. The boards can be assembled by hand or purchased preassembled; the open-source software can be downloaded for free. The Arduino software runs on Windows, Macintosh OSX, and Linux operating systems.
Computer Programming
Computer programming (often shortened to programming or coding) is the process of designing, writing, testing, debugging, and maintaining source code of computer programs. The code can be written in many different programming languages. Programming is basically a set of instructions that a computer or other device uses to perform a task — it might be turning on a light, opening a door, or writing a document.
Arduino Development Environment
The Arduino development environment or software contains a text editor for writing code, a message area, a text console, a toolbar with buttons for common functions, and a series of menus. It connects to the Arduino hardware to upload programs and communicate with them. Software written using Arduino is called a “sketch.” These sketches are written in the text editor. Sketches are saved with the file extension .ino. There are features for cutting/pasting and for searching/replacing text. The message area gives feedback while saving and exporting and also displays errors. The console displays text output by the Arduino environment including complete error messages and other information. The bottom right hand corner of the window displays the current board and serial port.
Arduino Tutorials for more information and help.
Note: Some content and images on this page are derived from Arduino.cc via their recommended Arduino getting started guide (http://arduino.cc/en/Guide/HomePage). The text of the Arduino getting started guide is licensed under a Creative Commons Attribution-ShareAlike 3.0 License. Code samples in the guide are released into the public domain.
From TryEngineering Arduino Blink Lesson
- Engineers: Inventors and problem solvers of the world. Twenty five major specialties are recognized in the field of engineering.
- Engineering Design Process: Process engineers use to solve problems.
- Criteria: conditions that the design must satisfy like its overall size, etc.
- Constraints: limitations with material, time, size of team, etc.
- Prototype: A working model of your solution to be tested.
- Iteration: Test & redesign is one iteration. Repeat (multiple iterations)
- Light Art: Art form which uses light as a medium of expression.
Consider the development of smart fabrics and how electronics are being incorporated into “wearables.”
- Visit the following website: VTT: Lighting you can bend into any shape https://www.vttresearch.com/en/news-and-ideas/lighting-you-can-bend-any-shape
- Do you think sensors could also be embedded in the light fabric? Which types and to do what?
- Can you think of any health situations which might benefit from someone wearing this Flexbright fabric, or having a display of lights embedded into fabrics?
- What about art applications for this fabric? What would the benefits be of the LEDs being embedded in a fabric?
Internet Links:
- VTT: Lighting you can bend into any shape https://www.vttresearch.com/en/news-and-ideas/lighting-you-can-bend-any-shape
- Flexbright LedFoil: http://flexbright.fi/index.php/products
Note: Lesson plans in this series are aligned to one or more of the following sets of standards:
- U.S. Science Education Standards (http://www.nap.edu/catalog.php?record_id=4962)
- U.S. Next Generation Science Standards (http://www.nextgenscience.org/)
- International Technology Education Association’s Standards for Technological Literacy (http://www.iteea.org/TAA/PDFs/xstnd.pdf)
- U.S. National Council of Teachers of Mathematics’ Principles and Standards for School Mathematics (http://www.nctm.org/standards/content.aspx?id=16909)
- U.S. Common Core State Standards for Mathematics (http://www.corestandards.org/Math)
- Computer Science Teachers Association K-12 Computer Science Standards (http://csta.acm.org/Curriculum/sub/K12Standards.html)
National Science Education Standards Grades 5-8 (ages 10-14)
CONTENT STANDARD A: Science as Inquiry
As a result of activities, all students should develop
- Abilities necessary to do scientific inquiry
CONTENT STANDARD B: Physical Science
As a result of their activities, all students should develop an understanding of
- Properties and changes of properties in matter
- Transfer of Energy
CONTENT STANDARD E: Science and Technology
As a result of activities in grades 5-8, all students should develop
- Abilities of technological design
- Understandings about science and technology
CONTENT STANDARD F: Science in Personal and Social Perspectives
As a result of activities, all students should develop understanding of
- Risks and benefits
- Science and technology in society
National Science Education Standards Grades 9-12 (ages 14-18)
CONTENT STANDARD A: Science as Inquiry
As a result of activities, all students should develop
- Abilities necessary to do scientific inquiry
CONTENT STANDARD B: Physical Science
As a result of their activities, all students should develop understanding of
- Interactions of energy and matter
CONTENT STANDARD F: Science in Personal and Social Perspectives
As a result of their activities, all students should develop understanding of
- Science and technology in local, national, and global challenges
CONTENT STANDARD E: Science and Technology
As a result of activities, all students should develop
- Abilities of technological design
- Understandings about science and technology
National Science Education Standards Grades 9-12 (ages 14-18)
CONTENT STANDARD G: History and Nature of Science
As a result of activities, all students should develop understanding of
- Science as a human endeavor
- Historical perspectives
Next Generation Science Standards Grades 6-8 (Ages 11-14)
Engineering Design
Students who demonstrate understanding can:
- MS-ETS1-1 Define the criteria and constraints of a design problem with sufficient precision to ensure a successful solution, taking into account relevant scientific principles and potential impacts on people and the natural environment that may limit possible solutions.
CSTA K-12 Computer Science Standards Grades 6-9 (ages 11-14)
Computational Thinking:
- 13. Understand the notion of hierarchy and abstraction in computing including high level languages, translation, instruction set, and logic circuits.
Collaboration:
- 1. Apply productivity/multimedia tools and peripherals to group collaboration and support learning throughout the curriculum.
- 3. Collaborate with peers, experts, and others using collaborative practices such as pair programming, working in project teams, and participating in group active learning activities.
- 4. Exhibit dispositions necessary for collaboration: providing useful feedback, integrating feedback, understanding and accepting multiple perspectives, socialization.
CSTA K-12 Computer Science Standards Grades 6-9 (ages 11-14)
Computing Practice & Programming:
- 1. Select appropriate tools and technology resources to accomplish a variety of tasks and solve problems.
- 2. Use a variety of multimedia tools and peripherals to support personal productivity and learning throughout the curriculum.
- 5. Implement problem solutions using a programming language, including: looping behavior, conditional statements, logic, expressions, variables, and functions.
- 8. Demonstrate dispositions amenable to open ended problem solving and programming (e.g., comfort with complexity, persistence, brainstorming, adaptability, patience, propensity to tinker, creativity, accepting challenge).
- 9. Collect and analyze data that is output from multiple runs of a computer program.
Computers & Communications Devices:
- 1. Recognize that computers are devices that execute programs.
- 3. Demonstrate an understanding of the relationship between hardware and software.
CSTA K-12 Computer Science Standards Grades 9-10 (ages 14-16)
Computational Thinking:
- 2. Describe a software development process used to solve software problems (e.g., design, coding, testing, verification).
Collaboration:
- 1. Work in a team to design and develop a software artifact.
- 4. Identify how collaboration influences the design and development of software products.
Computing Practice & Programming:
- 3. Use various debugging and testing methods to ensure program correctness (e.g., test cases, unit testing, white box, black box, integration testing)
- 4. Apply analysis, design, and implementation techniques to solve problems (e.g., use one or more software lifecycle models).
- 8. Explain the program execution process.
Computers & Communications Devices:
- 4. Compare various forms of input and output.
CSTA K-12 Computer Science Standards Grades 10-12 (ages 16-18)
Collaboration:
- 3. Evaluate programs written by others for readability and usability.
Standards for Technological Literacy – All Ages
The Nature of Technology
- Standard 3: Students will develop an understanding of the relationships among technologies and the connections between technology and other fields of study.
Technology and Society
- Standard 4: Students will develop an understanding of the cultural, social, economic, and political effects of technology.
- Standard 6: Students will develop an understanding of the role of society in the development and use of technology.
- Standard 7: Students will develop an understanding of the influence of technology on history.
Design
- Standard 8: Students will develop an understanding of the attributes of design.
- Standard 9: Students will develop an understanding of engineering design.
- Standard 10: Students will develop an understanding of the role of troubleshooting, research and development, invention and innovation, and experimentation in problem solving.
Abilities for a Technological World
- Standard 11: Students will develop abilities to apply the design process.
- Standard 12: Students will develop abilities to use and maintain technological products and systems.
- Standard 13: Students will develop abilities to assess the impact of products and systems.
The Designed World
- Standard 17: Students will develop an understanding of and be able to select and use information and communication technologies.

 Industrial Engineering
 Computer Engineering
You and your teammates will tap into your creative side to design a light sculpture that expresses the personality of the team! You will design, program and present a light show , breadboarding and microcontrollers using Tinkercad. And you’ll also design a creative display for your light sculpture using everyday items and presents to the group.
Design Challenge Criteria:
- Minimum of 4 LEDs in design
- Design sculpture in CAD
- Used Mixed Media for final light sculpture prototype
LIGHT SHOW
Planning Stage: The Light Show Prep
- Get 4 LED to blink on and off. Wire up bread board and Arduino as shown in Figure 1. Complete the following:
- Start by first running a wire from the GND pin on the Arduino to the (-) power rail on the left side of the breadboard. Doing this ensures that anything further that is plugged into the (-) power rail will also be connected to GND.
- Add four LEDs, starting from the top. Remember that each LED has a long leg and a short leg. Plug the longer leg into the first row and the shorter leg into the second row.
- Next, use a 330-ohm resistor to connect the second row (and the short leg of the LED) to GND.
- Finally, connect pin 13 to the long leg of the LED using a short jumper wire to the first row. Repeat this for the remaining three LEDs.
Figure 1. Placement and wiring of the four LEDs.
- Create a new sketch in Arduino software and to look like the code shown in Figure 2. This is a quick and simple code example to get all four LEDs blinking. Remember: The code uses special punctuation marks and is case-sensitive.
- Next upload the code by clicking Run on Arduino. If any syntax errors appear, double-check your typing. Once you get a message that says “Done uploading,” take a look at your circuits—all four LEDs should be blinking!
- What the code is doing? – see explanations for each section of the code in Figure 3).
Every Arduino program needs these two functions to work:
void setup () {…} This makes the program start and runs all the code within the {curly brackets} once.
void loop() {…} This is the main function and will loop continuously.
See Robotics Backend video for a deeper explanation on void setup and void loop.
digitalWrite (13, HIGH) command sets the voltage on pin 13 to a HIGH voltage (5V). Turns LEDs on.
digitalWrite (13, LOW) command sets the voltage on pin 13 to a LOW voltage (0V ground). Turns LEDs off.
delay(500) command pauses the program for 500 millisecond (1/2 a second) before going to the next instruction.
See Arudino Language Page for more help: https://www.arduino.cc/reference/en/
Also see SparkFun Arduino tutorial for more help: https://learn.sparkfun.com/tutorials/digital-sandbox-arduino-companion/0-setup-and-loop
- Now have fun playing with different light patterns
- LED Chaser: Modify the code so that the LEDs turn on one at a time, one after another from left to right, with at least 1/10 of a second before the next LED turns on, and then all turn off. Bonus: Now, modify it so that the LEDs also turn off one at a time. See sample here: https://create.arduino.cc/projecthub/msr048/led-chaser-f6ec89
- Scrolling LED: Modify the code so that just one LED turns on and moves from left to right and then back—so it looks like the LED is bouncing back and forth. Bonus: Now modify the code so that it speeds up and slows down gradually. https://www.makerspaces.com/15-simple-arduino-uno-breadboard-projects/ (See #6 Scrolling LED)
Design Phase: Unique Light Show
- After playing with different patterns, now create your own unique light show for your Light Sculpture challenge. Design your own pattern.
- Plan out a sequence of LEDs that does something unique. Suggestion: consider choreographing blinking LEDs to 15 seconds of music.
Testing Phase: CAD Simulation
- Simulate and test your light show ideas in TinkerCad Circuits before you choose your best design and build it (see Figure 4). Test and redesign there. Once you have a working prototype build it.
LIGHT SCULPTURE
Design Stage: Light Sculpture- CAD Design
- Design your sculpture (the housing for your electronics). Brainstorm and sketch out ideas. What story do you want your sculpture to tell? What shape best reflects the message of your light show?
- Using all you learned with our CAD introduction, choose your CAD package to design your sculpture. We recommend using mixed media to construct you sculpture. However, one criteria: You must 3D print at least one element in your sculpture.
Construction Phase: Light Sculpture- Mixed Media
- 3D Print your one element (or more)
- Using other materials like cardboard, cardstock, cellophane or any other found materials to create your mixed-media sculpture
Testing Phase: CAD Simulation
- Combine your electronics and your housing and test it. Redesign as necessary.
Documentation Phase: Video
- Make a video recording to capture your creation.
- Criteria: Post to Collabratec
Lesson Plan Translation
Downloadable Student Certificate of Completion