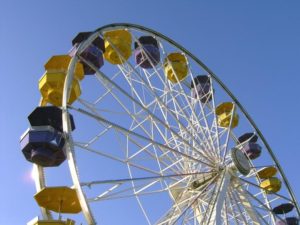
Build a Big Wheel
This lesson focuses on the engineering behind big wheels (sometimes called Ferris wheels). Teams of students explore the engineering behind the “London Eye,” explore the history of big wheels and construct a working wheel model.
- Learn about engineering design.
- Learn about motion, load, and construction.
- Learn about teamwork and working in groups.
Age Levels: 8-18
Build Materials (For each team)
Required Materials
- Pasta (several bags in various shapes)
- String
- Glue
Optional Materials (Trading/Table of Possibilities)
- Paperclips
- Paper
- Cardboard
- Cardboard Tubes (paper towels/toilet paper)
Testing Materials for Optional Weight Challenge
- 4-8 Teabags
Materials for Optional Weight Challenge
- 4-8 Teabags
Process
Test each design by having the student team demonstrate how their wheel turns. As an added challenge, you can have the teams attach teabags to their design to act as seats.
Design Challenge
You are a team of engineers working together to design and build a big wheel (aka Ferris wheel).
Criteria
- Wheel must turn
Constraints
- Must use only the materials provided.
- May trade unlimited materials with other teams.
- Break class into teams of 2-4.
- Hand out the Build Your Own Wheel and Evaluation worksheets, as well as some sheets of paper for sketching designs.
- Discuss the topics in the Background Concepts Section. Read and discuss how how the London Eye works https://adventure.howstuffworks.com/london-eye.htm
- Review the Engineering Design Process, Design Challenge, Criteria, Constraints and Materials.
- Instruct students to start brainstorming and sketching their designs.
- Provide each team with their materials.
- Explain that students must develop a turning big wheel. They will need to figure out how many pieces of each shape of pasta they’ll need and how much string they need.
An optional step: Require that tea bag “weights” be tied onto the wheel to serve as seats. - Announce the amount of time they have to design and build (1 hour recommended). The glue on the wheels may need to dry overnight before the design is completed.
- Use a timer or an on-line stopwatch (count down feature) to ensure you keep on time. (www.online-stopwatch.com/full-screen-stopwatch). Give students regular “time checks” so they stay on task. If they are struggling, ask questions that will lead them to a solution quicker.
- Students meet and develop a plan for their big wheel. They agree on materials they will need, write/draw their plan, and present their plan to the class. Teams may trade unlimited materials with other teams to develop their ideal parts list.
- Teams build their designs.
- Test the big wheel designs by having each team demonstrate how their wheel turns. For an added challenge, have each team attach teabags to their wheel to act as seats.
- As a class, discuss the student reflection questions.
- For more content on the topic, see the “Digging Deeper” section.
Student Reflection (engineering notebook)
- Did you succeed in creating a “big wheel” that could turn? If not, why did it fail?
- Did you need to request additional or different shapes of pasta while building the wheel? If so, what happened between the design (drawing) and the actual construction that changed your material needs?
- Do you think that engineers have to adapt their original plans during the manufacturing process? Why might they?
- If you had to do it all over again, how would your planned design change? Why?
- What designs or methods did you see other teams try that you thought worked well?
- Did you find that there were many designs in your classroom that met the project goal? What does this tell you about engineering plans?
- Do you think you would have been able to complete this project easier if you were working alone? Explain…
- How do you think the engineering designs for “big wheels” have changed over time? What impact has the development of new materials had on the engineering plans for “big wheels?”
- How have these engineering improvements changed the experience of those riding on the “big wheels?”
- What engineering considerations are needed in big wheel design to accommodate riders in wheelchairs?
- Do you think that the expectations of riders have impacted the designs of “bigwheels.” How have “big wheels” changed to meet these expectations?
Time Modification
The lesson can be done in as little as 1 class period for older students. However, to help students from feeling rushed and to ensure student success (especially for younger students), split the lesson into two periods giving students more time to brainstorm, test ideas and finalize their design. Conduct the testing and debrief in the next class period.
The History of Big Wheels
Big Wheels Through Time
The earliest example of the Big Wheel is the Ups-and-Downs, a crude, hand-turned device, which dates back at least to the 17th century and is still in use in some parts of the world. The “Ferris” wheel was named after George Washington Gale Ferris, Jr., who designed an 80 meter (264 foot) wheel for the World’s Columbian Exposition in Chicago, Illinois, USA in 1893. This first wheel weighed 2000 tonnes (2200 tons) and could carry 2,160 persons at a time; The Ferris wheel was the largest attraction at the Columbian Exposition standing over 250′ tall and powered by two 1000 HP steam engines. There were 36 cars each the size of a school bus that accommodated 60 people each (40 seated, 20 standing). It took 20 minutes for the wheel to make two revolutions – the first to make six stops to allow passengers to exit and enter; the 2nd a single non-stop revolution – and for that, the ticket holder paid 50 cents. The wheel was moved twice after the 1893 Fair and was eventually destroyed (by controlled demolition) in 1904 after it was used at the St. Louis exposition of that year. At 70 tons, its axle was the largest steel forging of the time. It was 26 stories tall, only a quarter of the Eiffel Tower’s height.

London Eye
It took seven years and the skills of hundreds of people from five countries to make the British Airways London Eye a reality. The design is similar to an enormous bicycle wheel, with a central hub and spindle connected to outer and inner rims by cable spokes. It is over 200 times larger than the average bike wheel. The 80 spokes laid together would stretch for six kilometers. The spindle which holds the wheel structure is 23m long – the height of nine classic London red telephone boxes. The hub and spindle weigh in at 330 tonnes – equivalent to 49 double-decker buses, and 20 times heavier than Big Ben. Some 1,700 tonnes of steel were used in the construction of the London Eye. It was shipped up the River Thames by barge in sections and assembled at the South Bank. It took a week to lift it from a horizontal position to the fully vertical one. The technology employed had previously been used to erect North Sea oil rigs. The London Eye is often mistakenly called a Ferris wheel. This is not the case: first, the passenger capsules are completely enclosed and are climate controlled; secondly, the capsules are positioned on the outside of the wheel structure and are fully motorized; and third, the entire structure is supported by an A-frame on one side only.
But, how does it work? The London Eye uses two types of cable, wheel cables and backstay cables. Wheel cables include 16 rim rotation cables, and 64 spoke cables, these are similar to bicycle spokes and stretch across the wheel. There are six backstay cables, which are located in the compression foundation. The compression foundation is situated underneath the A – frame legs; it required 2,200 tonnes of concrete and 44 concrete piles – each being 33 metres deep. The tension foundation, holding the backstay cables, used 1,200 tonnes of concrete. The main elements of the hub and spindle were manufactured in cast steel. The spindle was too large to cast as a single piece so instead was produced in eight smaller sections. Two further castings, in the form of great rings, form the main structural element of the hub. The hub is a rolled steel tube forming the spacer that holds them apart. All the casting was carried out by Skoda Steel.

Singapore Flyer
When it is completed in 2008, the Singapore Flyer will be one of the world’s largest manmade moving land objects at a height of 178 metres – equivalent to a 45-story building. It will comprise a giant observation wheel 150- metres in diameter sitting astride a 20-metre high, three storey terminal building. Once aboard, passengers will be enthralled by sweeping, epic views – from the historic Singapore River and modern skyline, to the grand vista of ships on the horizon, and on a clear day, right out to Malaysia and Indonesia. From each of the 28 air-conditioned, UVprotected capsules, visitors can enjoy the fascinating sensation of flight, while afloat in the sky during the 37-minute ride. The artist’s impression on the right shows what the Singapore Flyer will look like. Find out more at www.singaporeflyer.com.sg.
- Big wheel: An amusement-park or fairground ride consisting of a giant vertical revolving wheel with passenger cars suspended on its outer edge (also known as a Ferris Wheel)
- Central hub: Middle of wheel connecting the spindle and spokes.
- Constraints: Limitations with material, time, size of team, etc.
- Criteria: Conditions that the design must satisfy like its overall size, etc.
- Engineers: Inventors and problem-solvers of the world. Twenty-five major specialties are recognized in engineering (see infographic).
- Engineering Design Process: Process engineers use to solve problems.
- Engineering Habits of Mind (EHM): Six unique ways that engineers think.
- Iteration: Test & redesign is one iteration. Repeat (multiple iterations).
- Prototype: A working model of the solution to be tested.
- Spindle: A slender rounded rod with tapered ends where the spokes attach.
- Spokes: Each of the bars or wire rods connecting the center of a wheel to its outer edge
Internet Connections
Recommended Reading
- The 50 Biggest Ferris Wheels Ever Built (ISBN: 978-1517634704)
- Ferris Wheels: An Illustrated History (ISBN: 978-0879725327)
- The Fantastic Ferris Wheel: The Story of Inventor George Ferris (ISBN: 978-1627790727)
Writing Activity
Write an essay or a paragraph about the engineering challenges faced during the construction of either the London Eye or the Singapore Flyer.
Alignment to Curriculum Frameworks
Note: All lesson plans in this series are aligned to the National Science Education Standards which were produced by the National Research Council and endorsed by the National Science Teachers Association, and if applicable, also to the International Technology Education Association’s Standards for Technological Literacy or the National Council of Teachers of Mathematics’ Principles and Standards for School Mathematics.
National Science Education Standards Grades K-4 (ages 4 – 9)
CONTENT STANDARD B: Physical Science
As a result of the activities, all students should develop an understanding of
- Properties of objects and materials
- Position and motion of objects
CONTENT STANDARD E: Science and Technology
As a result of activities, all students should develop
- Abilities of technological design
CONTENT STANDARD F: Science in Personal and Social Perspectives
As a result of activities, all students should develop understanding of
- Science and technology in local challenges
National Science Education Standards Grades 5-8 (ages 10 – 14)
CONTENT STANDARD B: Physical Science
As a result of their activities, all students should develop an understanding of
- Properties and changes of properties in matter
- Motions and forces
- Transfer of energy
CONTENT STANDARD E: Science and Technology
As a result of activities in grades 5-8, all students should develop
- Abilities of technological design
- Understandings about science and technology
CONTENT STANDARD F: Science in Personal and Social Perspectives
As a result of activities, all students should develop understanding of
- Science and technology in society
National Science Education Standards Grades 9-12 (ages 14-18)
CONTENT STANDARD B: Physical Science
As a result of their activities, all students should develop understanding of
- Structure and properties of matter
- Motions and forces
CONTENT STANDARD E: Science and Technology
As a result of activities, all students should develop
- Abilities of technological design
- Understandings about science and technology
CONTENT STANDARD G: History and Nature of Science
As a result of activities, all students should develop understanding of
- Historical perspectives
Standards for Technological Literacy – All Ages
The Nature of Technology
- Standard 1: Students will develop an understanding of the characteristics and scope of technology.
- Standard 2: Students will develop an understanding of the core concepts of technology.
Technology and Society
- Standard 4: Students will develop an understanding of the cultural, social, economic, and political effects of technology.
- Standard 5: Students will develop an understanding of the effects of technology on the environment.
- Standard 6: Students will develop an understanding of the role of society in the development and use of technology.
- Standard 7: Students will develop an understanding of the influence of technology on history.
Design
- Standard 8: Students will develop an understanding of the attributes of design.
- Standard 9: Students will develop an understanding of engineering design.
- Standard 10: Students will develop an understanding of the role of troubleshooting, research and development, invention and innovation, and experimentation in problem solving.
Abilities for a Technological World
- Standard 11: Students will develop abilities to apply the design process.
The Designed World
- Standard 18: Students will develop an understanding of and be able to select and use transportation technologies.

 Industrial Engineering
 Computer Engineering
You are a team of engineers who have been given the challenge of building a “big wheel.”
Research/Preparation Phase
Review the various Student Reference Sheets.
Planning as a Team
Your team has been provided with some “building materials” by your teacher. You have dried pasta, glue, paper, cardboard, string, paperclips, and other resources.
Start by meeting with your team and devising a plan to build your structure. You’ll need to figure out how many pieces of each shape of pasta you’ll require, how much string you require, and develop a sketch of your plan for review by your teacher. You should consider the stages or steps that will be needed in construction to make sure the wheel stays together.
Write or draw your plan in the box below, including your projection for the materials you’ll require to complete the construction. Present your design to the class, and explain your choice of glue. You may choose to revise your teams’ plan after you receive feedback from class.
| Materials Needed:
|
Construction Phase
Build your big wheel! You may need to let glue dry overnight before the wheel is completed. You may also need to build and connect certain parts before others. Consider how the London Eye was constructed in stages https://adventure.howstuffworks.com/london-eye.htm
Evaluate your teams’ results, complete the evaluation worksheet, and present your findings to the class.
Use this worksheet to evaluate your team’s results in the Build a Big Wheel lesson:
1. Did you succeed in creating a “big wheel” that could turn? If not, why did it fail?
2. Did you need to request additional or different shapes of pasta while building the wheel? If so, what happened between the design (drawing) and the actual construction that changed your material needs?
3. Do you think that engineers have to adapt their original plans during the manufacturing process? Why might they?
4. If you had to do it all over again, how would your planned design change? Why?
5. What designs or methods did you see other teams try that you thought worked well?
6. Did you find that there were many designs in your classroom that met the project goal? What does this tell you about engineering plans?
7. Do you think you would have been able to complete this project easier if you were working alone? Explain…
8. How do you think the engineering designs for “big wheels” have changed over time? What impact has the development of new materials had on the engineering plans for “big wheels?”
9. How have these engineering improvements changed the experience of those riding on the “big wheels?”
10. What engineering considerations are needed in big wheel design to accommodate riders in wheelchairs?
11. Do you think that the expectations of riders have impacted the designs of “big wheels.” How have “big wheels” changed to meet these expectations?
Downloadable Student Certificate of Completion