3D Printing by Hand
In this lesson, students will explore how 3D printers work.Then, working in pairs, they will use the same methods used by 3D printers to create a 3D model of an object.
Introduce students to:
- 3D printers, additive manufacturing, and how 3D printing works
- CAD and STL files used in 3D printing
Age Levels: 8-14
Build Materials (For each team)
Required Materials
- Foam board or thick corrugated cardboard
- Rulers
- Pipe cleaners or easily bendable wire
- Pencils
- Glue
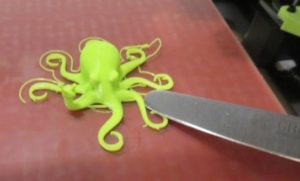
- A variety of small objects with relatively simple shapes for students to choose from.
- Balls
- Vases
- Bowls
- Bottles
- Cups
Teacher Materials
Short video from PBS LearningMedia for a visual introduction to 3D printing https://ny.pbslearningmedia.org/resource/b9194612-d6e7-4307-b08c-9c2857956713/will-3d-printing-change-the-world/
Design Challenge
You are part of a team of engineers working together to create a “3D-printed” model of an object using everyday materials.
3D printing software maps the shape of an object, then “slices” it into layers. 3D printers then print objects by adding layer upon layer of material together to create the object. This process is called “additive manufacturing.”
The thickness of your layers will be the same as the thickness of your building material (foam board or cardboard). In order to measure your layers, you will wrap pipe cleaners around your object at each layer/height marker (if your foamboard is ¼” thick, you will measure your object with a pipe cleaner at ¼” high, ½” high, ¾” high, and so on). The pipe cleaner will give you the size and shape of thelayer. Tracing the pipe cleaner shape onto your building material, you will cut out each layer of your model. Adding one layer on top of the other and attaching them with glue, you will create your three-dimensional model.
Criteria
- Object for modeling must be selected by team
- Use ruler and pipe cleaners to measure the object at each height marker
Constraints
- Use only the materials provided
- Break class into teams of 2
- Hand out the 3D Printing by Hand worksheet, as well as some sheets of paper for sketching designs.
- Discuss the topics in the Background Concepts Section. You may want to show this short video from PBS LearningMedia for a visual introduction to 3D printing https://ny.pbslearningmedia.org/resource/b9194612-d6e7-4307-b08c-9c2857956713/will-3d-printing-change-the-world/
- Review the Engineering Design Process, Design Challenge, Criteria, Constraints and Materials.
- Instruct students to start brainstorming and sketching their designs.
- Provide each team with their materials.
- Explain that students will be creating a three-dimensional model of one of the objects you’ve made available. Discuss how 3D printers build objects using layers, which is why it is sometimes referred to as “additive manufacturing.” The computer files used with 3D printers contain the information needed for each layer of the object being printed. CAD software describes the three-dimensional structure of an object. .STL files describe the external structure of an object by dividing it into triangles. Slicing software then divides the three-dimensional structure into horizontal layers for the 3D printer. Using methods similar to a 3D printer, students will work with the foam board or corrugated cardboard provided to “3D print” a model of the object they choose. As they construct their model out of layers of foam board, they will be using a kind of additive manufacturing. Provide students with the thickness of the foam board or corrugated cardboard being used. This thickness will become the height of each layer of their models. Dividing the object into layers using this height marker, students will wrap the pipe cleaners or wires around their object to determine its shape at each height marker. Students will trace the wire onto the cardboard or foam board and then cut out each layer. Students will then stack and glue the layers together to create their model using a kind of additive manufacturing method.
- Announce the amount of time they have to design and build (1 hour recommended).
- Use a timer or an on-line stopwatch (count down feature) to ensure you keep on time. (www.online-stopwatch.com/full-screen-stopwatch). Give students regular “time checks” so they stay on task. If they are struggling, ask questions that will lead them to a solution quicker.
- Students meet and develop a plan for their 3D model. They agree on materials they will need, write/draw their plan, and present their plan to the class. Teams may trade unlimited materials with other teams to develop their ideal parts list.
- Teams build their designs.
- As a class, share the designs and discuss the student reflection questions.
- For more content on the topic, see the “Digging Deeper” section.
Student Reflection (engineering notebook)
- How does the model you created compare to the object you based it on?
- What changes to the process or materials do you think would lead to a more detailed and accurate reproduction of the original object?
- In what ways are the process you used to create your 3D model similar to the actual process used by a 3D printer??
- How do you think the thickness of the layers you created here compare to the layers created for a 3D printer?
- What challenges did you run into in creating your 3D model? What other tools or materials might have helped you make your measurements and construct your layers?
Time Modification
The lesson can be done in as little as 1 class period for older students. However, to help students from feeling rushed and to ensure student success (especially for younger students), split the lesson into two periods giving students more time to brainstorm, test ideas and finalize their design. Conduct the testing and debrief in the next class period.

What is 3D Printing?
3D printers are printers that print three-dimensional objects by adding layer upon layer of the printing material being used. This process is called additive manufacturing. 3D printers have created objects using a wide variety of printing materials, including plastic, sugar, and even human cells.
3D printers have the potential to revolutionize how everyday objects are manufactured. In traditional manufacturing, producing small batches of a product, or making a custom product, is very costly. 3D printers can allow for small numbers of customized products to be affordably created. This means creating prototypes can become much less expensive and products can be manufactured to order, rather than having to be pre-manufactured in large numbers.
3D printers also have the potential to make products available in remote areas where they might otherwise be difficult or impossible to access. This can mean 3D printing custom fitted medical implants in a remote village or 3D printing tools in space. In 2014, a 3D printer was sent into space and delivered to the International Space Station. NASA was then able to email the astronauts CAD (computer aided design) drawings for a socket wrench, and the astronauts successfully printed the socket wrench onboard the space station.
3D printers could be used to create all kinds of three-dimensional objects out of a variety of materials. They’ve already been used to print custom-designed household products, foods like pancakes and sugar sculptures, musical instruments, and custom-fitted medical prosthetics. Researchers are also working to print with live cells, which could allow them to create live tissues and organs through a process called bioprinting. 3D printers also have the potential to accurately and cheaply manufacture complex medications.
To design an object to be 3D printed, a computer-generated 3D model has to be created. 3D models can be created using CAD software, a digital camera paired with special software, or a 3D scanner. The 3D model then needs to be converted into a .STL file, which converts the 3D object’s shape into a series of triangles, or a .OBJ file, which can also include color and texture information. So the 3D printer software can read it. This file is then processed by a “slicer.” This is a piece of software that converts the 3D model into a series of layers, giving the 3D printer its printing instructions.
3D printers are becoming less expensive and more widely available. Many public libraries, makerspaces, and schools now have 3D printers available for public use.
- 3D: The quality of being three dimensional.
- Additive manufacturing: Creation of lighter, more complex designs.
- Constraints: Limitations with material, time, size of team, etc.
- Criteria: Conditions that the design must satisfy like its overall size, etc.
- Engineers: Inventors and problem-solvers of the world. Twenty-five major specialties are recognized in engineering (see infographic).
- Engineering Design Process: Process engineers use to solve problems.
- Engineering Habits of Mind (EHM): Six unique ways that engineers think.
- Iteration: Test & redesign is one iteration. Repeat (multiple iterations).
- Layers: A sheet, quantity, or thickness of material.
- Model: A three-dimensional representation of a person or thing or of a proposed structure, typically on a smaller scale than the original.
- Prototype: A working model of the solution to be tested.
Internet Connections
- PBS LearningMedia: Will 3D Printing Change the World?
Recommended Reading
- 3D Printers: A Beginner’s Guide by Oliver Bothmann (ISBN: 978-1565238718)
- Make: Getting Started with 3D Printing: A Hands-On Guide to the Hardware, Software, and Services Behind the New Manufacturing Revolution by Liza Wallach Kloski and Nick Kloski (ISBN: 978-1680450200)
Writing Activity
Write an essay or paragraph about the ways 3D printing can be helpful to society and the potential dangers, pitfalls, or moral issues that it may raise.
Alignment to Curriculum Frameworks
Note: Lesson plans in this series are aligned to one or more of the following sets of standards:
- U.S. Science Education Standards (http://www.nap.edu/catalog.php?record_id=4962)
- U.S. Next Generation Science Standards (http://www.nextgenscience.org/)
- International Technology Education Association’s Standards for Technological Literacy (http://www.iteea.org/TAA/PDFs/xstnd.pdf)
- U.S. National Council of Teachers of Mathematics’ Principles and Standards for School Mathematics (http://www.nctm.org/standards/content.aspx?id=16909)
- U.S. Common Core State Standards for Mathematics (http://www.corestandards.org/Math)
- Computer Science Teachers Association K-12 Computer Science Standards (http://csta.acm.org/Curriculum/sub/K12Standards.html)
National Science Education Standards Grades 5-8 (ages 10 – 14)
CONTENT STANDARD A: Science as Inquiry
As a result of activities, all students should develop
- Understandings about scientific inquiry
CONTENT STANDARD E: Science and Technology
As a result of activities in grades 5-8, all students should develop
- Abilities of technological design
- Understandings about science and technology
CONTENT STANDARD F: Science in Personal and Social Perspectives
As a result of activities, all students should develop understanding of
- Personal health
- Risks and benefits
- Science and technology in society
CONTENT STANDARD G: History and Nature of Science
As a result of activities, all students should develop understanding of
- History of science
National Science Education Standards Grades 9-12 (ages 14-18)
CONTENT STANDARD A: Science as Inquiry
As a result of activities, all students should develop
- Understandings about scientific inquiry
CONTENT STANDARD E: Science and Technology
As a result of activities, all students should develop
- Abilities of technological design
- Understandings about science and technology
CONTENT STANDARD F: Science in Personal and Social Perspectives
As a result of activities, all students should develop understanding of
- Science and technology in local, national, and global challenges
CONTENT STANDARD G: History and Nature of Science
As a result of activities, all students should develop understanding of
- Historical perspectives
Next Generation Science Standards Grades 3-5 (Ages 8-11)
Engineering Design
Students who demonstrate understanding can:
- 3-5-ETS1-1.Define a simple design problem reflecting a need or a want that includes specified criteria for success and constraints on materials, time, or cost.
- 3-5-ETS1-2.Generate and compare multiple possible solutions to a problem based on how well each is likely to meet the criteria and constraints of the problem.
- 3-5-ETS1-3.Plan and carry out fair tests in which variables are controlled and failure points are considered to identify aspects of a model or prototype that can be improved.
Next Generation Science Standards Grades 6-8 (Ages 11-14)
Engineering Design
Students who demonstrate understanding can:
- MS-ETS1-2 Evaluate competing design solutions using a systematic process to determine how well they meet the criteria and constraints of the problem.
Next Generation Science Standards Grades 9-12 (Ages 14-18)
Engineering Design
Students who demonstrate understanding can:
- HS-ETS1-2. Design a solution to a complex real-world problem by breaking it down into smaller, more manageable problems that can be solved through engineering.
Standards for Technological Literacy – All Ages
The Nature of Technology
- Standard 3: Students will develop an understanding of the relationships among technologies and the connections between technology and other fields of study.
Design
- Standard 8: Students will develop an understanding of the attributes of design.
- Standard 9: Students will develop an understanding of engineering design.
- Standard 10: Students will develop an understanding of the role of troubleshooting, research and development, invention and innovation, and experimentation in problem solving.
Abilities for a Technological World
- Standard 11: Students will develop abilities to apply the design process.
- Standard 13: Students will develop abilities to assess the impact of products and systems.

 Industrial Engineering
 Computer Engineering
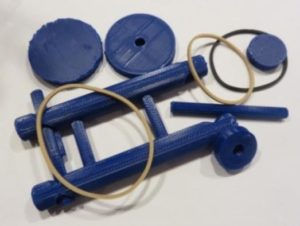
In pairs, you will work with your partner to create a “3D-printed” model of an object. 3D printing software maps the shape of an object, then “slices” it into layers. 3D printers then print objects by adding layer upon layer of material together to create the object. This process is called “additive manufacturing.” The thickness of your layers will be the same as the thickness of your building material (foam board or cardboard). In order to measure your layers, you will wrap pipe cleaners around your object at each layer/height marker (if your foamboard is 1⁄4” thick, you will measure your object with a pipe cleaner at 1⁄4” high, 1⁄2” high, 3⁄4” high, and so on). The pipe cleaner will give you the size and shape of the layer. Tracing the pipe cleaner shape onto your building material, you will cut out each layer of your model. Adding one layer on top of the other and attaching them with glue, you will create your three-dimensional model.

Reflection
1. How does the model you created compare to the object you based it on?
2. What changes to the process or materials do you think would lead to a more detailed and accurate reproduction of the original object?

3. In what ways are the process you used to create your 3D model similar to the actual process used by a 3D printer?

4. How do you think the thickness of the layers you created here compare to the layers created for a 3D printer?

5. What challenges did you run into in creating your 3D model? What other tools or materials might have helped you make your measurements and construct your layers?

Lesson Plan Translation
Downloadable Student Certificate of Completion