Shake it up with Seismographs!
This lesson focuses on exploring how the development of seismographs has helped save lives around the world. Students work in teams to design their own seismograph out of everyday materials and test its ability to record a simulated classroom earthquake.
- Learn about seismograph technology.
- Learn about engineering design.
- Learn about teamwork and problem solving.
Age Levels: 8-18
Build Materials (For each team)
Optional Materials (Trading/Table of Possibilities)
- String
- Wire
- Paper
- Pencil/pen/marker
- Paperclips
- Cardboard
- Posterboard
- Foil
- Rubber bands
- Modeling clay
Testing Materials
- Table/Desk
- Pan/tray
- Rubber Ball
- Tennis Ball
- Ladder or stool (from which to drop ball to simulate earthquake)
- String cut to .5 meter, 1 meter, and 1.5 meters pieces
Materials
- Table/Desk
- Pan/tray
- Rubber Ball
- Tennis Ball
- Ladder or stool (from which to drop ball to simulate earthquake)
- String cut to .5 meter, 1 meter, and 1.5 meters pieces
Process
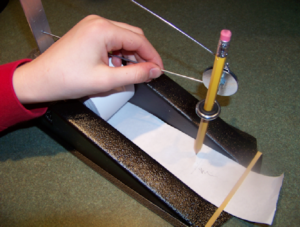
Test each team’s seismograph by placing the design on top of a small table. Simulate an earthquake by dropping a small rubber ball on the table from three different heights (.5 meter, 1 meter, and 1.5 meters). We recommend standing on a secure ladder and measuring with lengths of string the point from which the ball will drop to ensure a consistent and fair test. (Note: you may wish to consider using different size balls as well — tennis ball for example.)
Teams should record the following observations for each drop height:
Measurement of quake in your scale:
- .5 meter
- 1 meter
- 1.5 meter
Physical observations (what did you notice about your design during the test…what worked, what didn’t?)
- .5 meter
- 1 meter
- 1.5 meter
Design Challenge
You are a team of engineers who have been given the challenge of designing a reliable seismograph to record earthquake activity in your classroom. Your machine must be able to record motion visually on a scale of your own design. The design needs to record the intensity of a simulated classroom earthquake which will be created by dropping a ball from three heights: .5 meter, 1 meter, and 1.5 meters.
Criteria
- Must be able to record motion visually on a scale of your own design
- Needs to record the intensity of a simulated classroom earthquake which will be created by dropping a ball from three heights: .5 meter, 1 meter, and 1.5 meters.
Constraints
- Use only the materials provided
- Teams may trade unlimited materials
- Break class into teams of 2-4.
- Hand out the Build Your Own Seismograph worksheet, as well as some sheets of paper for sketching designs.
- Discuss the topics in the Background Concepts Section.
- Review the Engineering Design Process, Design Challenge, Criteria, Constraints and Materials.
- Instruct students to start brainstorming and sketching their designs.
- Provide each team with their materials. Teams may trade materials.
- Explain that students must build their own seismograph that will allow them to record the intensity of a simulated classroom earthquake. The best design will record the smallest disturbance.
- Before the students get started building, consider discussing what a seismograph is. Also consider discussing the Richter Scale. (Refer to the Background Concepts section of the lesson plan.)
- Announce the amount of time they have to design and build (1 hour recommended).
- Use a timer or an on-line stopwatch (count down feature) to ensure you keep on time. (www.online-stopwatch.com/full-screen-stopwatch). Give students regular “time checks” so they stay on task. If they are struggling, ask questions that will lead them to a solution quicker.
- Students meet and develop a plan for their seismograph. They agree on materials they will need, write/draw their plan, and present their plan to the class. Teams may trade unlimited materials with other teams to develop their ideal parts list.
- Teams build their designs.
- Test each team’s seismograph by placing the design on top of a small table. Simulate an earthquake by dropping a small rubber ball on the table from three different heights (.5 meter, 1 meter, and 1.5 meters). We recommend standing on a secure ladder and measuring with lengths of string the point from which the ball will drop to ensure a consistent and fair test. (Note: you may wish to consider using different size balls as well — tennis ball for example.)
- Teams should record the following observations for each drop height:Measurement of quake in your scale:
– .5 meter
– 1 meter
– 1.5 meter
Physical observations (what did you notice about your design during the test…what worked, what didn’t?)
– .5 meter
– 1 meter
– 1.5 meter - As a class, discuss the student reflection questions.
- For more content on the topic, see the “Digging Deeper” section.
Student Reflection (engineering notebook)
- Did you succeed in creating a seismograph that could record on a scale the earthquake simulation for all three quakes?
- Did you need to request additional materials while building your seismograph?
- Do you think that engineers have to adapt their original plans during the manufacturing process of products? Why might they?
- If you were to adapt your classroom seismograph to one that would actually record a real earthquake, what modifications would you need to make?
- If you had to do it all over again, how would your planned design change? Why?
- What designs or methods did you see other teams try that you thought worked well?
- Do you think you would have been able to complete this project easier if you were working alone? Explain…
Time Modification
The lesson can be done in as little as 1 class period for older students. However, to help students from feeling rushed and to ensure student success (especially for younger students), split the lesson into two periods giving students more time to brainstorm, test ideas and finalize their design. Conduct the testing and debrief in the next class period.
What is a Seismograph?

Seismographs are instruments that measure and record motions of the ground, including those of seismic waves generated by earthquakes, nuclear explosions, and other seismic sources. Records of seismic waves allow seismologists to map the interior of the Earth, and locate and measure the strength of these different sources. The word derives from the Greek σεισμός, seismós, a shaking or quake, from the verb σείω, seíō, to shake; and μέτρον, métron, measure.
A seismograph, or seismometer, is an instrument used to detect and record earthquakes. Generally, it consists of a mass attached to a fixed base. During an earthquake, the base moves and the mass does not. The motion of the base with respect to the mass is commonly transformed into an electrical voltage. The electrical voltage is recorded on paper, magnetic tape, or another recording medium. This record is proportional to the motion of the seismometer mass relative to the earth, but it can be mathematically converted to a record of the absolute motion of the ground. Seismograph generally refers to the seismometer and its recording device as a single unit.
Chang Heng’s Seismoscope
In 132 CE, Chang Heng of China’s Han dynasty invented the first seismoscope, which was called Houfeng Didong Yi. It was a large bronze vessel, about 2 meters in diameter; at eight points around the top were dragon’s heads holding bronze balls. When there was an earthquake, one of the mouths would open and drop its ball into a bronze toad at the base, making a sound, and indicating the direction of the earthquake. On at least one occasion, probably at the time of a large earthquake in Gansu in 143 CE, the seismoscope indicated an earthquake even though one was not felt. The available text says that inside the vessel was a central column that could move along eight tracks; this is thought to refer to a pendulum, though it is not known exactly how this was linked to a mechanism that would open only one dragon’s mouth. The first ever earthquake recorded by this seismograph was supposedly somewhere in the east. Days later, a rider from the east reported this earthquake.
Earthquake Tracking
The Richter Scale

The Richter magnitude scale was developed in 1935 by Charles F. Richter of the California Institute of Technology as a mathematical device to compare the strength of earthquakes. At first, the Richter Scale could be applied only to the records from instruments of identical manufacture. Now, instruments are carefully calibrated with respect to each other. Thus, magnitude can be computed from the record of any calibrated seismograph. The scale indicates the strength of earth movement on a scale from 1.0 to 10.0. The weakest earthquakes are 1.0, or less. Each level of the Richter scale increases by powers of 10. So an increase of 1 point means the strength of a quake is 10 times greater than the level before it. A 2.0 earthquake is 10 times stronger than a 1.0 quake. A 6.0 earthquake is 10 X 10 or 100 times stronger than a quake registering a 4.0.
The Biggest Earthquake

The largest earthquake ever recorded took place May 22, 1960 in Chile. Approximately 1,655 people were killed and 3,000 injured. Over 2,000,000 ended up homeless, and there was about $550 million in resulting damage. This quake registered 9.5 on the Richter Scale!
Pendulum Seismographs and Current Technology
The Power of Pendulums
Before electronics allowed recordings of large earthquakes, scientists built large spring pendulum seismometers in an attempt to record the long-period motion produced by such quakes. The largest one weighed about 15 tons. There is a medium-sized one three stories high in Mexico City that is still in operation. Another example is an inverted pendulum “seismometer”, designed by James Forbes (Forbes, 1844). It consisted of a vertical metal rod that was supported on a vertical cylindrical steel wire. By adjusting the stiffness of the wire, or the height of the ball that hung from it, the swing of the pendulum could be changed. A pencil hung from the rod would “write” a line on paper that showed the movement of the earth.
Current Technology

The Advanced National Seismic System (ANSS) is a United States Geological Survey initiative to upgrade and expand seismic monitoring capabilities in the United States. Major elements of the ANSS include national, regional, urban and structural monitoring systems. The ANSS will eventually be anationwide network of at least 7000 shaking measurement systems, both on the ground and in buildings that will make it possible to provide emergency response personnel with real-time earthquake information, provide engineers with information about building and site response, and provide scientists with high-quality data to understand earthquake processes and solid earth structure and dynamics. The USGS Global Seismographic Network (https://earthquake.usgs.gov/monitoring/) is a permanent digital network of state-of-the-art seismological and geophysical sensors connected by a telecommunications network, serving as a multi-use scientific facility and societal resource for monitoring, research, and education. The GSN provides near-uniform, worldwide monitoring of the Earth, with over 150 modern seismic stations distributed globally. In addition, both 2-D and 3-D land and marine seismic data processing is used showing motion in both depth and time. Norway’s Spectrum ASA focuses on this 2-D and 3-D data processing and maintains a library of multi-client data and reports cover all the major oil producing regions of the world.
- Criteria: Conditions that the design must satisfy like its overall size, etc.
- Earthquake: a sudden and violent shaking of the ground, as a result of movements within the earth’s crust or volcanic action
- Engineers: Inventors and problem-solvers of the world. Twenty-five major specialties are recognized in engineering (see infographic).
- Engineering Design Process: Process engineers use to solve problems.
- Engineering Habits of Mind (EHM): Six unique ways that engineers think.
- Intensity: Strength of earthquake movement.
- Iteration: Test & redesign is one iteration. Repeat (multiple iterations).
- Prototype: A working model of the solution to be tested.
- Richter Scale: Magnitude scale was developed in 1935 by Charles F. Richter of the California Institute of Technology as a mathematical device to compare the strength of earthquakes.
- Seismic waves: Allow seismologists to map the interior of the Earth, and locate and measure the strength of these earthquakes.
- Seismograph: Instruments that measure and record motions of the ground, including those of seismic waves generated by earthquakes, nuclear explosions, and other seismic sources.
Internet Connections
Recommended Reading
- An Introduction to Seismology, Earthquakes and Earth Structure by Seth Stein and Michael Wysession (ISBN: 0865420785)
- Earthquakes by Bruce Bolt (ISBN: 0716775484)
- Introduction to Seismology by Peter M. Shearer (ISBN: 0521708427)
Writing Activity
- Write an essay or a paragraph exploring why civil engineers might need to evaluate the seismic activity of a particular building site?
- Write an essay or a paragraph on how existing seismologic technology might have reduced death rates from the 1960 earthquake in Chile.
Alignment to Curriculum Frameworks
Note: Lesson plans in this series are aligned to one or more of the following sets of standards:
- U.S. Science Education Standards (http://www.nap.edu/catalog.php?record_id=4962)
- U.S. Next Generation Science Standards (http://www.nextgenscience.org/)
- International Technology Education Association’s Standards for Technological Literacy (http://www.iteea.org/TAA/PDFs/xstnd.pdf)
- U.S. National Council of Teachers of Mathematics’ Principles and Standards for School Mathematics (http://www.nctm.org/standards/content.aspx?id=16909)
- U.S. Common Core State Standards for Mathematics (http://www.corestandards.org/Math)
- Computer Science Teachers Association K-12 Computer Science Standards (http://csta.acm.org/Curriculum/sub/K12Standards.html)
National Science Education Standards Grades K-4 (ages 4-9)
CONTENT STANDARD A: Science as Inquiry
As a result of activities, all students should develop
- Abilities necessary to do scientific inquiry
- Understanding about scientific inquiry
CONTENT STANDARD B: Physical Science
As a result of the activities, all students should develop an understanding of
- Position and motion of objects
CONTENT STANDARD D: Earth and Space Science
As a result of their activities, all students should develop an understanding of
- Changes in earth and sky
CONTENT STANDARD E: Science and Technology
As a result of activities, all students should develop
- Abilities of technological design
- Understanding about science and technology
CONTENT STANDARD F: Science in Personal and Social Perspectives
As a result of activities, all students should develop understanding of
- Changes in environments
- Science and technology in local challenges
CONTENT STANDARD G: History and Nature of Science
As a result of activities, all students should develop understanding of
- Science as a human endeavor
National Science Education Standards Grades 5-8 (ages 10-14)
CONTENT STANDARD B: Physical Science
As a result of their activities, all students should develop an understanding of
- Motions and forces
- Transfer of energy
CONTENT STANDARD E: Science and Technology
As a result of activities in grades 5-8, all students should develop
- Abilities of technological design
CONTENT STANDARD F: Science in Personal and Social Perspectives
As a result of activities, all students should develop understanding of
- Populations, resources, and environments
- Natural hazards
- Science and technology in society
National Science Education Standards Grades 5-8 (ages 10-14)
CONTENT STANDARD G: History and Nature of Science
As a result of activities, all students should develop understanding of
- History of science
National Science Education Standards Grades 9-12 (ages 14-18)
CONTENT STANDARD A: Science as Inquiry
As a result of activities, all students should develop
- Abilities necessary to do scientific inquiry
- Understandings about scientific inquiry
CONTENT STANDARD B: Physical Science
As a result of their activities, all students should develop understanding of
- Motions and forces
- Interactions of energy and matter
CONTENT STANDARD D: Earth and Space Science
As a result of their activities, all students should develop understanding of
- Energy in the earth system
CONTENT STANDARD E: Science and Technology
As a result of activities, all students should develop
- Abilities of technological design
- Understandings about science and technology
CONTENT STANDARD F: Science in Personal and Social Perspectives
As a result of activities, all students should develop understanding of
- Natural and human-induced hazards
- Science and technology in local, national, and global challenges
CONTENT STANDARD G: History and Nature of Science
As a result of activities, all students should develop understanding of
- Historical perspectives
Next Generation Science Standards – (Ages 8-11)
Earth and Human Activity
Students who demonstrate understanding can:
- 4-ESS3-2. Generate and compare multiple solutions to reduce the impacts of natural Earth processes on humans.
Engineering Design
Students who demonstrate understanding can:
- 3-5-ETS1-1.Define a simple design problem reflecting a need or a want that includes specified criteria for success and constraints on materials, time, or cost.
- 3-5-ETS1-2.Generate and compare multiple possible solutions to a problem based on how well each is likely to meet the criteria and constraints of the problem.
- 3-5-ETS1-3.Plan and carry out fair tests in which variables are controlled and failure points are considered to identify aspects of a model or prototype that can be improved.
Next Generation Science Standards (Ages 11-14)
Engineering Design
Students who demonstrate understanding can:
- MS-ETS1-1 Define the criteria and constraints of a design problem with sufficient precision to ensure a successful solution, taking into account relevant scientific principles and potential impacts on people and the natural environment that may limit possible solutions.
- MS-ETS1-2 Evaluate competing design solutions using a systematic process to determine how well they meet the criteria and constraints of the problem.
Next Generation Science Standards (Ages 14-18)
Engineering Design
Students who demonstrate understanding can:
- HS-ETS1-2.Design a solution to a complex real-world problem by breaking it down into smaller, more manageable problems that can be solved through engineering.
Standards for Technological Literacy – All Ages
The Nature of Technology
- Standard 3: Students will develop an understanding of the relationships among technologies and the connections between technology and other fields of study.
Technology and Society
- Standard 5: Students will develop an understanding of the effects of technology on the environment.
- Standard 6: Students will develop an understanding of the role of society in the development and use of technology.
- Standard 7: Students will develop an understanding of the influence of technology on history.
Design
- Standard 8: Students will develop an understanding of the attributes of design.
- Standard 9: Students will develop an understanding of engineering design.
- Standard 10: Students will develop an understanding of the role of troubleshooting, research and development, invention and innovation, and experimentation in problem solving.
Abilities for a Technological World
- Standard 11: Students will develop abilities to apply the design process.
The Designed World
- Standard 17: Students will develop an understanding of and be able to select and use information and communication technologies.

 Industrial Engineering
 Computer Engineering
You are a team of engineers who have been given the challenge of designing a reliable seismograph to record earthquake activity in your classroom. Your machine must be able to record motion visually on a scale of your own design. The machine which is able to record the smallest disturbance will be considered the best design.
Research/Preparation Phase
1) Review the various Student Reference Sheets.
Planning as a Team
2) Your team has been provided with some “building materials” by your teacher. You may ask for additional materials.
3) Meet as a team and devising a design and materials list you would need to build your seismograph. Remember that your seismograph needs to record the intensity of a simulated classroom earthquake which will be created by dropping a ball from three heights: .5 meter, 1 meter, and 1.5 meters.
4) Draw your plan for the seismograph in the box below or on another sheet. Include a list of materials you plan to use to build your instrument. Present your design to the class. You may choose to revise your teams’ plan after you receive feedback from class.
|
|
| Materials Needed:
|
| Describe Your Scale:
|
Construction Phase
5) Build your seismograph and keep track of whether you needed additional materials as you were in the construction phase.
Testing
6) Your team’s seismograph will be placed on top of a stable, small table. Your teacher will created three simulated earthquakes by dropping a rubber ball onto the table from three heights: .5 meter, 1 meter, and 1.5 meters. Your machine will need to record each of these earthquakes. The most sensitive machines will be considered the best ones. These will be able to record the least severe of the quakes. Record your observations in the box below:
| Quake | .5 meter | 1 meter | 1.5 meter |
| Measurement of quake in your scale |
|||
| Physical observations (what did you notice about your machine during the test…what worked, what didn’t?) |
Presentation
7) Present your findings and the results of your seismograph test to the class. Pay attention to differences in designs and results of the various seismographs created in your classroom.
Evaluation Phase
8) Compare and evaluate your teams’ results and measurement methods with those of other teams.
9) Complete the evaluation worksheet.
Reflection
Use this worksheet to evaluate your experience with the “Shake it Up with Seismographs!” lesson:
1) Did you succeed in creating a seismograph that could record on a scale the earthquake simulation for all three quakes?
2) Did you need to request additional materials while building your seismograph?
3) Do you think that engineers have to adapt their original plans during the manufacturing process of products? Why might they?
4) If you were to adapt your classroom seismograph to one that would actually record a real earthquake, what modifications would you need to make?
5) If you had to do it all over again, how would your planned design change? Why?
6) What designs or methods did you see other teams try that you thought worked well?
7) Do you think you would have been able to complete this project easier if you were working alone? Explain…
Downloadable Student Certificate of Completion