Popsicle Bridge
This lesson focuses on how bridges are engineered to withstand weight, while being durable, and in some cases aesthetically pleasing. Students work in teams to design and build their own bridge out of up to 200 popsicle sticks and glue.
- Learn about civil engineering.
- Learn about engineering design.
- Learn about planning and construction.
- Learn about teamwork and working in groups.
Age Levels: 8 – 18
Build Materials (For each team)
Required Materials
- 200 popsicle sticks
- Wood or craft glue
Testing Materials
- 5 pound weight (for younger students) and 20 pound weight (for older students)
- (bags of sugar or flour, 16 oz. cans of food, 72 oz. bottle of laundry detergent, exercise weight, or another weight)
- 2 chairs, desks or small tables (tall enough to allow for designs to be suspended 1 foot above the floor)
Materials
- 5 pound weight (for younger students) and 20 pound weight (for older students)
- (bags of sugar or flour, 16 oz. cans of food, 72 oz. bottle of laundry detergent, exercise weight, or another weight)
- 2 chairs, desks or small tables (tall enough to allow for designs to be suspended 1 foot above the floor)
Process
- Place 2 chairs or desks (flat surface) a minimum of 14” apart from each other
- Suspend or tape a bridge 1 foot above the floor on top of the chairs/desks
- Place the predetermined weight on the bridge for one full minute
- Depending on the type of weight selected, it can be placed on top of the design or hung from below.
- The goal to test the designs to meet the minimum load. However, it’s fun to keep adding weight to the structure to meet the critical load resulting in a crumbling bridge!
Judging the Designs
- As a class, discuss what makes a bridge aesthetically pleasing
- Develop a list of attributes in preparation for the judging
- Next, judge each bridge design for its aesthetic value
- Use a scale of 1-5, with 1 being “not at all appealing,” and 5 being “very appealing.”
- Give 1 positive comment and 1 suggestion for improvement for each design.
Langkawi Sky Pedestrian Bridge – Malaysia
- 125 meters long, and 1.8 meters wide
- Designed as a curved walkway to maximize the viewing experience.
- Formed of steel and concrete panels set on top of an inverted triangular truss.
- Suspended by 8 cables from an 81.5m high single pylon, and hangs at about 100m above ground.
- Designed to carry a maximum capacity of 250 people.
Source: Wikipedia
Florida Int’l University Pedestrian Bridge Collapse
A poor design led to the collapse of a pedestrian bridge under construction at FIU in 2018. Engineers incorrectly calculated the amount of stress the structure could take.
Source: USA Today
Design Challenge
You’re a team of engineers working to design a bridge using glue and 200 popsicle sticks or less.
Criteria
- Bridges must be able to hold a pre-determined weight 5 pounds or 20 pounds Structure must span a minimum of 14 inches in length.
Constraints
Can use no more than 200 popsicle sticks.
- Break class into teams of 2-4.
- Hand out the Design Your Own Bridge worksheet, as well as some sheets of paper for sketching designs.
- Discuss the topics in the Background Concepts Section.
- Review the Engineering Design Process, Design Challenge, Criteria, Constraints and Materials. If time allows, review “Real World Applications” prior to conducting the design challenge.
-
Before instructing students to start brainstorming and sketching their designs, ask them to consider the following:
● Different types of bridges
● Which shapes are stronger than others?
● Amount of weight your design must hold 14” span criteria
● Aesthetics – be creative
● Efficiency – try not to use all of the popsicle sticks -
Provide each team with their materials.
-
Explain that students must develop a popsicle bridge from 200 popsicle sticks and glue. The bridge must be able to hold a pre-determined weight 5 pounds or 20 pounds Structure must span a minimum of 14 inches in length.
- Announce the amount of time they have to design and build (1 hour recommended).
- Use a timer or an on-line stopwatch (count down feature) to ensure you keep on time. (www.online-stopwatch.com/full-screen-stopwatch). Give students regular “time checks” so they stay on task. If they are struggling, ask questions that will lead them to a solution quicker.
- Students meet and develop a plan for their bridge. They agree on materials they will need, write/draw their plan, and present their plan to the class.
- Teams build their designs.
- Test the bridge designs by suspending or taping the bridge 1 foot above the floor on top of the chairs/desks. Place the predetermined weight on the bridge for one full minute.
- Teams should document the amount of weight their bridge could hold and the number of popsicle sticks used.
- As a class, discuss the student reflection questions.
- For more content on the topic, see the “Real World Applications” and “Digging Deeper” sections.
Variation for Older Students
- Design and build a bridge out of popsicle sticks and glue that can hold the weight of:
- Two students
- Three students
- Remember to keep safety in mind, if you try this variation
Student Reflection (engineering notebook)
- Did you succeed in creating a bridge that held the required weight for a full minute? If not, why did it fail?
- Did you decide to revise your original design while in the construction phase? Why?
- How many popsicle sticks did you end up using? Did this number differ from your plan? If so, what changed?
- What was the average aesthetic score for your bridge? How did this compare to the rest of the class? What design elements of other bridges did you like the best?
- Do you think that engineers have to adapt their original plans during the construction of systems or products? Why might they?
- If you had to do it all over again, how would your planned design change? Why?
- What designs or methods did you see other teams try that you thought worked well?
- Do you think you would have been able to complete this project easier if you were working alone? Explain…
- What sort of trade-offs do you think engineers make between functionality, safety, and aesthetics when building a real bridge?
Time Modification
The lesson can be done in as little as 1 class period for older students. However, to help students from feeling rushed and to ensure student success (especially for younger students), split the lesson into two periods giving students more time to brainstorm, test ideas and finalize their design. Conduct the testing and debrief in the next class period.
Types of Bridges
There are six main types of bridges: arch, beam, cable-stayed, cantilever, suspension, and truss.
Arch
Arch bridges are arch-shaped and have abutments at each end. The earliest known arch bridges were built by the Greeks and include the Arkadiko Bridge. The weight of the bridge is thrusted into the abutments at either side.
Beam
Beam bridges are horizontal beams supported at each end by piers. The earliest beam bridges were simple logs that sat across streams and similar simple structures. In modern times, beam bridges are large box steel girder bridges. Weight on top of the beam pushes straight down on the piers at either end of the bridge.
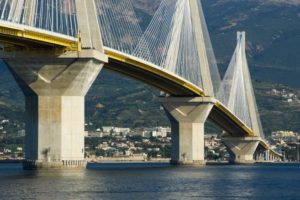
Cable-stayed

Like suspension bridges, cable-stayed bridges are held up by cables. However, in a cable-stayed bridge, less cable is required and the towers holding the cables are proportionately shorter.
Cantilever
Cantilever bridges are built using cantilevers — horizontal beams that are supported on only one end. Most cantilever bridges use two cantilever arms extending from opposite sides of the obstacle to be crossed, meeting at the center.
Suspension

Suspension bridges are suspended from cables. The earliest suspension bridges were made of ropes or vines covered with pieces of bamboo. In modern bridges, the cables hang from towers that are attached to caissons or cofferdams which are embedded deep in the floor of a lake or river.
Truss
Truss bridges are composed of connected elements. They have a solid deck and a lattice of pin-jointed girders for the sides. Early truss bridges were made of wood, but modern truss bridges are made of metals such as wrought iron and steel.
Famous Bridges
Firth of Forth Bridge, Scotland
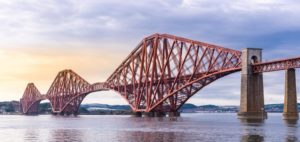
The Forth Bridge is a cantilever, railway bridge over the Firth of Forth in the east of Scotland. The bridge is, even today, regarded as an engineering marvel. It is 2.5 km (1.5 miles) in length, and the double track is elevated 46 m (approx. 150 ft) above high tide. It consists of two main spans of 1,710 ft (520 m), two side spans of 675 ft, 15 approach spans of 168 ft (51 m), and five of 25 ft (7.6 m). Each main span comprises two 680 ft (210 m) cantilever arms supporting a central 350 ft (110 m) span girder bridge. The three great four-tower cantilever structures are 340 ft (104 m) tall, each 70 ft (21 m) diameter foot resting on a separate foundation. The southern group of foundations had to be constructed as caissons under compressed air, to a depth of 90 ft (27 m). At its peak, approximately 4,600 workers were employed in its construction.
Sydney Harbour Bridge, Australia
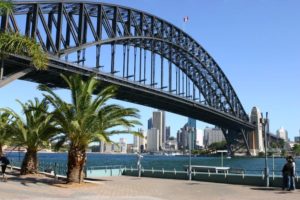
The Sydney Harbour Bridge is a steel arch bridge across Sydney Harbour that carries trains, vehicles, and pedestrian traffic between the Sydney central business district and the North Shore area. The dramatic view of the bridge, the harbour, and the nearby Sydney Opera House is an iconic image of both Sydney and Australia. The bridge was designed and built by Dorman Long and Co Ltd, from Middlesbrough, Teesside, U.K., and was the city’s tallest structure until 1967. According to Guinness World Records, it is the world’s widest long-span bridge and its tallest steel arch bridge, measuring 134 metres (429.6 ft) from top to water level. It is also the fourth-longest spanning-arch bridge in the world. The arch is composed of two 28-panel arch trusses. Their heights vary from 18 m (55.8 ft) at the center of the arch to 57 m (176.7 ft) (beside the pylons).
- Abutment: Part of a structure that receives pressure
- Aesthetic: Appreciation of a beautiful appearance
- Arch: A curved shape. An arch bridge is shaped as an arch and is naturally strong
- Beam: A long piece of heavy often squared wood or steel for use in construction. Beam bridges are horizontal beams supported at each end by piers.
- Cable: A strong wire rope or metal chain. A cable-stayed bridge is held up by cables.
- Cantilever: Horizontal beams that are supported on only one end. Cantilever bridges are built using cantilevers.
- Constraints: Limitations with material, time, size of team, etc.
- Criteria: Conditions that the design must satisfy like its overall size, etc.
- Critical Load: Weight at which a building or structure fails
- Engineers: Inventors and problem-solvers of the world. Twenty-five major specialties are recognized in engineering (see infographic).
- Engineering Design Process: Process engineers use to solve problems.
- Engineering Habits of Mind (EHM): Six unique ways that engineers think.
- Iteration: Test & redesign is one iteration. Repeat (multiple iterations).
- Load: A weight or source of pressure put on an object
- Prototype: A working model of the solution to be tested.
- Span: The spread or extent between supports
- Suspension: Hung in mid air. Suspension bridges are suspended from cables and tend to be long.
- Stress: Pressure or tension exerted on a material object
Internet Connections
Recommended Reading
- Bridges of the World: Their Design and Construction (ISBN: 0486429954)
- Bridges: Amazing Structures to Design, Build & Test (ISBN: 1885593309)
Writing Activity
Write an essay or a paragraph about how new engineered materials have impacted the design of bridges over the past century.
Alignment to Curriculum Frameworks
Note: Lesson plans in this series are aligned to one or more of the following sets of standards:
- U.S. Science Education Standards (http://www.nap.edu/catalog.php?record_id=4962)
- U.S. Next Generation Science Standards (http://www.nextgenscience.org/)
- International Technology Education Association’s Standards for Technological Literacy (http://www.iteea.org/TAA/PDFs/xstnd.pdf)
- U.S. National Council of Teachers of Mathematics’ Principles and Standards for School Mathematics (http://www.nctm.org/standards/content.aspx?id=16909)
- U.S. Common Core State Standards for Mathematics (http://www.corestandards.org/Math)
- Computer Science Teachers Association K-12 Computer Science Standards (http://csta.acm.org/Curriculum/sub/K12Standards.html)
National Science Education Standards Grades K-4 (ages 4 – 9)
CONTENT STANDARD A: Science as Inquiry
As a result of activities, all students should develop
- Abilities necessary to do scientific inquiry
CONTENT STANDARD B: Physical Science
As a result of the activities, all students should develop an understanding of
- Properties of objects and materials
CONTENT STANDARD E: Science and Technology
As a result of activities, all students should develop
- Abilities of technological design
- Understanding about science and technology
CONTENT STANDARD G: History and Nature of Science
As a result of activities, all students should develop understanding of
- Science as a human endeavor
National Science Education Standards Grades 5-8 (ages 10 – 14)
CONTENT STANDARD A: Science as Inquiry
As a result of activities, all students should develop
- Abilities necessary to do scientific inquiry
CONTENT STANDARD B: Physical Science
As a result of their activities, all students should develop an understanding of
- Motions and forces
CONTENT STANDARD E: Science and Technology
As a result of activities in grades 5-8, all students should develop
- Abilities of technological design
- Understandings about science and technology
CONTENT STANDARD F: Science in Personal and Social Perspectives
As a result of activities, all students should develop understanding of
- Risks and benefits
- Science and technology in society
CONTENT STANDARD G: History and Nature of Science
As a result of activities, all students should develop understanding of
- History of science
National Science Education Standards Grades 9-12 (ages 14-18)
CONTENT STANDARD A: Science as Inquiry
As a result of activities, all students should develop
- Abilities necessary to do scientific inquiry
CONTENT STANDARD B: Physical Science
As a result of their activities, all students should develop understanding of
- Motions and forces
CONTENT STANDARD E: Science and Technology
As a result of activities, all students should develop
- Abilities of technological design
- Understandings about science and technology
CONTENT STANDARD F: Science in Personal and Social Perspectives
As a result of activities, all students should develop understanding of
- Science and technology in local, national, and global challenges
CONTENT STANDARD G: History and Nature of Science
As a result of activities, all students should develop understanding of
- Historical perspectives
Next Generation Science Standards Grades 3-5 (Ages 8-11)
Motion and Stability: Forces and Interactions
Students who demonstrate understanding can:
- 3-PS2-1. Plan and conduct an investigation to provide evidence of the effects of balanced and unbalanced forces on the motion of an object.
Engineering Design
Students who demonstrate understanding can:
- 3-5-ETS1-1.Define a simple design problem reflecting a need or a want that includes specified criteria for success and constraints on materials, time, or cost.
- 3-5-ETS1-2.Generate and compare multiple possible solutions to a problem based on how well each is likely to meet the criteria and constraints of the problem.
- 3-5-ETS1-3.Plan and carry out fair tests in which variables are controlled and failure points are considered to identify aspects of a model or prototype that can be improved.
Next Generation Science Standards Grades 6-8 (Ages 11-14)
Engineering Design
Students who demonstrate understanding can:
- MS-ETS1-1 Define the criteria and constraints of a design problem with sufficient precision to ensure a successful solution, taking into account relevant scientific principles and potential impacts on people and the natural environment that may limit possible solutions.
- MS-ETS1-2 Evaluate competing design solutions using a systematic process to determine how well they meet the criteria and constraints of the problem.
Standards for Technological Literacy – All Ages
The Nature of Technology
- Standard 1: Students will develop an understanding of the characteristics and scope of technology.
Technology and Society
- Standard 4: Students will develop an understanding of the cultural, social, economic, and political effects of technology.
- Standard 5: Students will develop an understanding of the effects of technology on the environment.
- Standard 6: Students will develop an understanding of the role of society in the development and use of technology.
- Standard 7: Students will develop an understanding of the influence of technology on history.
Design
- Standard 8: Students will develop an understanding of the attributes of design.
- Standard 9: Students will develop an understanding of engineering design.
- Standard 10: Students will develop an understanding of the role of troubleshooting, research and development, invention and innovation, and experimentation in problem solving.
Abilities for a Technological World
- Standard 11: Students will develop abilities to apply the design process.
The Designed World
- Standard 20: Students will develop an understanding of and be able to select and use construction technologies.


 Industrial Engineering
You are part of a team of engineers who have been given the challenge to design a bridge out of up to 200 popsicle sticks and glue. Bridges must be able to hold a specific weight (your teacher will decide what the weight goal will be for your team). The bridge must span at least 14 inches in length. But, it must be longer than 14 inches because when it has been constructed, it will be placed between two chairs so it is at least one foot above the floor for a weight bearing test. In addition to meeting the structural and weight bearing requirements, the bridge will be judged on its aesthetics as well, so be creative! And, you are encouraged to use the fewest number of popsicles possible to achieve your goal.
Planning Stage
Meet as a team and discuss the problem you need to solve. Then develop and agree on a design for your bridge. You’ll need to determine how many popsicle sticks you will use (up to 200) — and the steps you will take in the manufacturing process. Think about what patterns might be the strongest….but you are also being judged on the aesthetics of your bridge! Draw your design in the box below, and be sure to indicate the number of sticks you anticipate using. Present your design to the class. You may choose to revise your teams’ plan after you receive feedback from class.
|
Number of popsicle sticks you anticipate using:
|
Construction Phase

Build your bridge. During construction you may decide you need additional sticks (up to 200) or that your design needs to change. This is ok — just make a new sketch and revise your materials list.
Aesthetic Vote
Each student will cast a vote about the look of each bridge. The scale is 1 – 5 — (1: not at all appealing; 2: not appealing; 3: neutral/average; 4: somewhat appealing; 5: very appealing). This number is averaged to generate a score for each bridge. This score is not based on how well the bridge might hold weight, but on how it looks.
Testing Phase
Each team will test their bridge to see if it can withstand the required weight for at least one full minute. Be sure to watch the tests of the other teams and observe how their different designs worked.
Evaluation Phase
Evaluate your teams’ results, complete the evaluation worksheet, and present your findings to the class.
Use this worksheet to evaluate your team’s results:
1) Did you succeed in creating a bridge that held the required weight for a full minute? If not, why did it fail?
2) Did you decide to revise your original design while in the construction phase? Why?
3) How many popsicle sticks did you end up using? Did this number differ from your plan? If so, what changed?
4) What was the average aesthetic score for your bridge?How did this compare to the rest of the class? What design elements of other bridges did you like the best?
5) Do you think that engineers have to adapt their original plans during the construction of systems or products? Why might they?
6) If you had to do it all over again, how would your planned design change? Why?
7) What designs or methods did you see other teams try that you thought worked well?
8) Do you think you would have been able to complete this project easier if you were working alone?Explain…
9) What sort of trade-offs do you think engineers make between functionality, safety, and aesthetics when building a real bridge?
Downloadable Student Certificate of Completion