Laser Creations: Designing and Producing a Custom ID Tag
Using vector-based graphic design software and an Epilog Laser cutter/engraver, students will learn to design and produce their very own custom backpack/luggage tag.
Introduce students to:
- How CO2 laser cutters/engravers work.
- Recognizing laser compatible materials.
- Basic graphic design concepts necessary to successfully design for laser engraving and cutting.
This lesson was developed by Epilog Laser, in partnership with TryEngineering.
Age Levels: 9-14
Build Materials (For each team)
Required Materials
- Epilog Laser Cutter/Engraver
- Windows vector-based graphic design software. For the purpose of this lesson plan we will be using CorelDRAW. (Free trial version can be downloaded at: https://www.coreldraw.com/en/pages/free-download/)
- Wood strips. For the purpose of this project, we will be using 14” x 4.5” sheet of alder that are approximately 1/8” thick.
Design Challenge
You are a team of engineers given the challenge of using a laser printer/cutter to design and produce your own custom backpack/luggage tag.
Criteria
- Use CorelDRAW to design and cut.
Constraints
- Use only the materials provided.
- Break class into teams of 2-4.
- Before the lesson, gauge how many students have ever used a laser cutter before, and which ones have any experience with graphic design software.
- Hand out the Laser Creations student worksheet.
- Discuss the topics in the Background Concepts Section. Using the resources in the “Background Concepts” Section, educate students on how a laser cutter works and what materials it is capable of engraving and cutting. Prior to executing the activity, discuss with students how the laser recognizes raster and vector lines within design software.
- The best way to describe how CO2 laser cutter/engravers work is to compare the system to your printer. Using similar technology, a laser cutter/engraver takes the images you typically print to paper, but instead of ink, a CO2 laser beam is fired, and that beam actually burns the image you select to etch/engrave, or cut.The laser recognizes images, graphics, text, and lines, and through your graphic design software and print driver, you instruct the laser on which items to engrave, and which ones you want to cut.The laser works in three different modes: raster, vector, and combined.
Raster Mode: We use raster mode when we want to engrave or etch. Most users engrave clipart, scanned images, photos, text, and graphic images.
Vector Mode: Use vector mode when you are cutting lines. In vector mode, a line is recognized as a line to be cut based on the line width (or stroke). To make things easy, set any cut lines to a line width of 0.001” (.0254 mm), or hairline width in CorelDRAW. Vector lines that you want to engrave rather than cut should be set 0.006” (0.152 mm) or greater line thickness.
Combined Mode: Use this setting when you engrave and cut in the same job. The laser will always engrave first, and then follow with the vector cutting path. - Review the Engineering Design Process, Design Challenge, Criteria, Constraints and Materials.
- Explain that students will start with a simple activity – a wooden identification tag you can attach to their backpack or luggage. They should use the student worksheet to walk them through the steps of designing the custom tag and using the laser to engrave and cut it!
- They should take the following steps:
1. Open a new file in CorelDRAW. Under “page size”, enter the size of the wood plank you will be working with. For the purposes of this tutorial, we used 14” x 4.5”, but your page size may be different.
2. Using the Rectangle Tool, draw your luggage tag – we suggest a size of 2” x 4” or 3” x 5”, depending on the size of your wood plank.
3. Make sure your tag is set to a line weight of “hairline.”
4. We need to add a circle cut-out that will allow you to place a ring or string to attach the tag to your bag. Use the Ellipse Tool to create a small hole – about ¼” in diameter. Remember to change the outline to “hairline” so it will cut out.
5. After you’ve drawn your square tag and cut-out hole, use the text tool to enter the contact information you want to include, such as your name and email address.
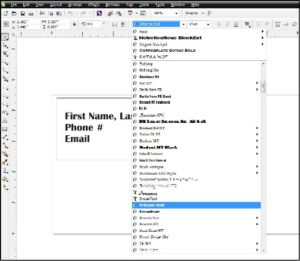
6. Select your font and size to best fit on the tag.
7. When you’re ready to engrave and cut your tag, hit “CTRL P” and send your job to the laser. When the print driver pops up, change the piece size to match what you entered in CorelDRAW. Change your raster engraving settings and vector cutting settings (refer to user manual for recommended settings for your wattage laser). Lastly, make sure you have “combined mode” selected in the print driver, since you want to both engrave and cut.
8. When the job reaches the laser, press the green “GO” button and your tag will be made. After you’ve created your own tag with the instructions above, experiment with different shapes, text, and fonts to create a new tag for a friend or family member!
Time Modification
The lesson can be done in as little as 1 class period for older students. However, to help students from feeling rushed and to ensure student success (especially for younger students), split the lesson into two periods giving students more time to brainstorm, test ideas and finalize their design. Conduct the testing and debrief in the next class period.
How a laser works & compatible materials:
Epilog’s CO2 lasers are types of gas lasers. In CO2 cutting/engraving systems, electricity is run through a gas-filled tube, which is located at the back of the machine. Generally, the gases in the tube include a mixture of carbon dioxide, nitrogen, hydrogen, and helium. When electricity is run through this tube, a light is produced. The light that is created is powerful enough to cut through many materials, including wood, acrylic, fabrics/textiles, rubber, paper/cardstock, and much more. The light from a CO2 laser cutter/engraver canalso etch/engrave – but not cut – harder materials such as slate, glass, stone, and coated metals.
Laser cutters are computer controlled, meaning the user tells the laser what to do by manipulating artwork, and providing specific engraving or cutting instructions through the print driver. Laser applications are generally broken into two categories: raster engraving and vector cutting. The student project provided below incorporates both engraving and cutting applications.
Raster Engraving
Raster engraving can best be described as very high resolution dot matrix “printing” with a laser. Raster engraving is used to create highly detailed graphic images. The laser head scans back and forth, left to right, engraving a series of dots one line at a time. As the laser head moves down line by line, the dot pattern forms the image that was printed from your computer. You can raster engrave scanned images, text, clipart, photographs, or line drawings.
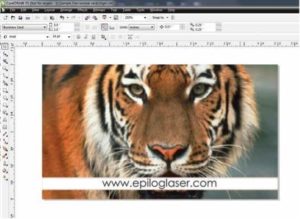
This artwork is a good representation of a raster file. The photograph of the tiger will raster engrave, as will the text that has been placed on the page.
Vector Cutting:
When you are vector cutting, the laser is following a continuous path that follows the outline, or profile, of an image or text. Vector cutting is normally used to cut completely through materials such as wood, acrylic, paper, etc. It can also be used for quick marking of characters and geometric patterns. You can vector cut with the laser by setting objects and text to be unfilled and drawn with a 0.001” (0.025 mm) outline. The thin outline will produce a vector cut.

The graphic above shows a vector image made up of lines. You can tell it is a vector image because you can individually select any of the lines and manipulate that part of the Graphic.
The laser determines which lines to engrave or cut based on the width (stroke) of each line. If you’re using CorelDRAW, any line set to hairline width will cut. But if you are using different software, the table below outlines what weights will engrave and cut at different widths and resolutions.
Line Width 150 DPI 200 DPI 300 DPI 400 DPI 600 DPI 1200 DPI
| .001” (.025 | Cut | Cut | Cut | Cut | Cut | Cut |
| mm) .002 (.058 | Cut | Cut | Cut | Cut | Cut | Cut |
| mm) .003 (.076 | Cut | Cut | Cut | Cut | Cut | Cut |
| mm) .004 (.101 | Cut | Cut | Cut | Cut | Cut | Cut |
| mm) .005 (.127 | Cut | Cut | Cut | Engrave | Engrave | Engrave |
| mm) .006 (.152 | Cut | Cut | Cut | Engrave | Engrave | Engrave |
| mm) .007 (.177 | Cut | Cut | Engrave | Engrave | Engrave | Engrave |
Internet Connections
Recommended Reading
- Epilog Laser User Manual https://www.epiloglaser.com/tech-support/laser-manuals.htm
Writing Activity
- Now that you understand how laser cutter/engravers work, how many everyday items around you do you see that could have been engraved or cut with a laser?
- After performing this project, what other types of projects do you think could be completed with a laser?
Alignment to Curriculum Frameworks
Note: All lesson plans in this series are aligned to the Computer Science Teachers Association K-12 Computer Science Standards, the U.S. Common Core State Standards for Mathematics, and if applicable also to the National Council of Teachers of Mathematics’ Principles and Standards for School Mathematics, the International Technology Education Association’s Standards for Technological Literacy, and the U.S. National Science Education Standards which were produced by the National Research Council.
Next Generation Science Standards & Practices Grades 6-8 (ages 11-14) Practice 5: Using Mathematics and Computational Thinking
Describe, measure, estimate, and/or graph quantities such as area, volume, weight, and time to address scientific and engineering questions and problems.
Next Generation Science Standards & Practices Grades 6-8 (ages 11-14) Practice 5: Using Mathematics and Computational Thinking
Use mathematical representations to describe and/or support scientific conclusions and design solutions.
Common Core State Practices & Standards for School Mathematics (all ages)
CCSS.MATH.PRACTICE.MP1 Make sense of problems and persevere in solving them.
CCSS.MATH.PRACTICE.MP5 Use appropriate tools strategically.
Standards for Technological Literacy – All Ages Nature of Technology
- Standard 2: Students will develop an understanding of the core concepts of technology
The Designed World
- Standard 17: Students will develop an understanding of and be able to select and use information and communication technologies
CSTA K-12 Computer Science Standards Grades 6-9 (ages 11-14)
5.2 Level 2: Computer Science and Community (L2)
Computing Practice & Programming (CPP)
- Use a variety of multimedia tools and peripherals to support personal productivity and learning throughout the curriculum.
CSTA K-12 Computer Science Standards Grades 9-12 (ages 14-18)
5.3 Level 3: Applying Concepts and Creating Real-World Solutions (L3)
5.3.B Computer Science Concepts and Practices (CP)
Computing Practice and Programming (CPP)
- Use advanced tools to create digital artifacts (e.g., web design, animation, video, multimedia).
Open a new file in CorelDRAW.
Under “page size”, enter the size of the wood plank you will be working with. For the purposes of this tutorial, we used 14” x 4.5”, but your page size may be different.

Using the Rectangle Tool, draw your luggage tag – we suggest a size of 2” x 4” or 3” x 5”, depending on the size of your wood plank.

Make sure your tag is set to a line weight of “hairline.”

We need to add a circle cut-out that will allow you to place a ring or string to attach the tag to your bag. Use the Ellipse Tool to create a small hole – about ¼” in diameter. Remember to change the outline to “hairline” so it will cut out.
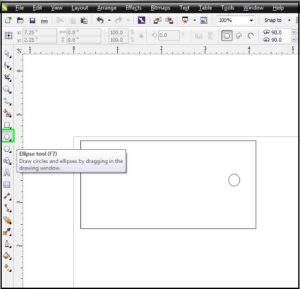
After you’ve drawn your square tag and cut-out hole, use the text tool to enter the contact information you want to include, such as your name and email address.
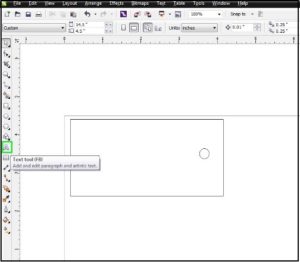
Select your font and size to best fit on the tag.
When you’re ready to engrave and cut your tag, hit “CTRL P” and send your job to the laser. When the print driver pops up, change the piece size to match what you entered in CorelDRAW. Change your raster engraving settings and vector cutting settings (refer to user manual for recommended settings for your wattage laser). Lastly, make sure you have “combined mode” selected in the print driver, since you want to both engrave and cut.
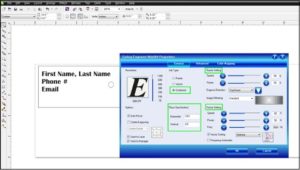
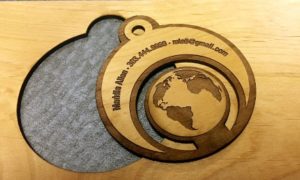
When the job reaches the laser, press the green “GO” button and your tag will be made. nAfter you’ve created your own tag with the instructions above, experiment with different shapes, text, and fonts to create a new tag for a friend or family member!

Lesson Plan Translation


 Industrial Engineering
 Computer Engineering


