Designing Drones
This lesson explores how helicopter flight is possible and how drones (or quadcopters) have impacted our world. Students explore the forces that make helicopter flight possible, and learn about how material choice and shape can also have an impact on flight. Students work in teams to design, build and fly a simple rotor using basic materials that drops the slowest from a height of ten feet.
- Learn about the forces that impact flight.
- Learn about engineering design, testing, and troubleshooting.
- Learn how engineering can help solve society’s challenges.
- Learn about teamwork and problem solving.
Age Levels: 8-12
Build Materials (For each team)
Required Materials
- Sample templates (included in the Student Worksheet)
- Paperclips
- Paper
- Index Card Paper
- Construction Paper
- Cardboard in a range of thicknesses
- Foam sheets
Testing Materials
- Chair or step stool
Materials
- Chair or step stool
- Measuring tape
- Stopwatch
Process
Test the rotors by standing on a chair or step stool and dropping each rotor from a height of ten feet. Teams should record the amount of time it takes for their rotor design to reach the floor. Each team may test their rotor three times and the slowest flight of the three should be used when comparing results to other teams.
Design Challenge
You are a team of engineers given the challenge of creating a rotor out of simple materials that falls as slowly as possible. You may use any materials provided to you and will first work as a team to review a sample template and develop your own design for a rotor.
Criteria
- Design rotor to drop the slowest from a height of 10 feet
Constraints
- Use only the materials provided.
- Teams may trade unlimited materials.
- Break class into teams of 2-3.
- Hand out the Designing Drones worksheet, as well as some sheets of paper for sketching designs.
- Discuss the topics in the Background Concepts Section. If time allows or given as homework the night before — Ask students to investigate the many different ways helicopters are used around the world. Have them read the NASA resource on helicopters at www.nasa.gov/audience/forstudents/5-8/features/nasa-knows/what-is-a-helicopter-58.html.
- Review the Engineering Design Process, Design Challenge, Criteria, Constraints and Materials.
- Instruct students to start brainstorming and sketching their designs. Before they begin brainstorming, ask students to consider how a helicopter flies. Discuss how wing shape and length, center of gravity, and the overall weight might impact flight.
- Provide each team with their materials.
- Explain that students must design and build a simple rotor that can drop the slowest from a height of ten feet. The slower the descent, the longer the flight, and the more controlled the flight will be.
- Announce the amount of time they have to design and build (1 hour recommended).
- Use a timer or an on-line stopwatch (count down feature) to ensure you keep on time. (www.online-stopwatch.com/full-screen-stopwatch). Give students regular “time checks” so they stay on task. If they are struggling, ask questions that will lead them to a solution quicker.
- Students meet and develop a plan for their rotor. They agree on materials they will need, write/draw their plan, and present their plan to the class. Teams may trade unlimited materials with other teams to develop their ideal parts list.
- Teams build their designs.
- Test the rotors by standing on a chair or step stool and dropping each rotor from a height of ten feet. Teams should record the amount of time it takes for their rotor design to reach the floor. Each team may test their rotor three times and the slowest flight of the three should be used when comparing results to other teams.
- Teams should document the flight time and flight path for each of their tests on the Student Worksheet.
- As a class, discuss the student reflection questions.
- For more content on the topic, see the “Digging Deeper” section.
Optional Multi design or Redesign Phase
If time permits, allow teams to build two designs or have the opportunity to revise or fine-tune their design based on how their initial design scored during testing. Redesign is a typical part of all engineering design processes, so this step is important for students to experience if time allows.
Student Reflection (engineering notebook)
- What aspect(s) of the design led to the success of the rotor that flew for the longest time?
- Describe one part of your design that you think worked the best.
- If you had a chance to do this project again, what would your team have chosen to do differently?
- If you could have selected some building materials which were not made available to you, what would you have selected? Why?
- Do you think this project worked better because you were part of a team, or do you think you could have done a better job working alone?
- Do you think that engineers work alone, or in a team when they are developing new materials, processes, or products?
- If your rotor design was scaled up in size to be the size needed for a helicopter, do you think it would work?
- What materials would you make a full scale helicopter rotor out of? Why?
Optional Kit
If budgets allow, and as an extension idea, there are several kits to allow teams of students to build and even program a drone. The costs for these kits are continuing to drop at the basic level. At the moment you can get a basic but good drone kit for between $30-50. When using drone kits, be sure to arrange for a large open space where no people could possibly be in the way of the flying drone. A large school field is recommended and be sure to get approval from school administration.
- Sky Viper s1750 Stunt 2017 Edition Drone ($50)
- Syma X11 R/C Quadcopter ($30)
- Holy Stone HS170 Predator Mini RC Helicopter Drone ($40)
Time Modification
The lesson can be done in as little as 1 class period for older students. However, to help students from feeling rushed and to ensure student success (especially for younger students), split the lesson into two periods giving students more time to brainstorm, test ideas and finalize their design. Conduct the testing and debrief in the next class period.
What Forces Impact Flight?

There are four forces that impact flight: Weight, Lift, Drag, and Thrust. All four forces have to be taken into consideration when designing and building a glider or airplane. In flight, each force has an opposite force that works against it.
Everything has weight, which is a result of gravitational forces. The materials selected for a glider design will have a weight that will need to be offset by “Lift” in order to fly.
Lift is an aerodynamic force that helps to counteract weight. The heavier an object is, the harder it is for lift to work against it and achieve flight. But, the forward motion (velocity) or thrust of an aircraft through the air along with the shape of the aircraft and its parts, especially its wings, all impact how strong the force of lift will be! Many wings have a curved shape on top and are flatter on the bottom so air moves faster over the top. When air moves faster, the pressure of the air decreases. If the pressure on the top of the wing is lower than the pressure on the bottom of the wing, the difference in pressure helps lift the wing up into the air.
The last of the four forces impacting flight is drag….and this force works to slow a glider or plane. Drag is a force that acts opposite to the relative motion of any object moving with respect to surrounding air (or water!). For example, drag acts opposite to the direction of movement of an object such as a car, bicycle, airplane, glider, or boat hull. It is impacted by the shape and material selection of a plane or boat, as well as other factors, including the humidity of the air. It is also impacted by the thrust or speed of the aircraft…the greater the thrust, the greater the drag.
In the case of the glider to be built as part of this lesson…the thrust is generated by the person who will push your plane through the air during testing! For a motorized plane, it is the motor that provides propulsion and the power to move through the air. A plane may have several motors to generate thrust, and the design of the motor also impacts how the surrounding air is moved, which in turn impacts thrust and drag.
All the forces impacting flight are interrelated. How a plane flies depends on the strength and direction of all four forces! If all are in balance, a plane will move along at a constant velocity. If there are any imbalances, the plane will move in the direction of that force…for example if weight overpowers lift, the plane will move down.
A plane goes up if the forces of lift and thrust are stronger than gravity and drag. If gravity and drag are stronger than lift and thrust, the plane goes down.
Helicopters History
How Does a Helicopter Fly?
A helicopter is a type of air vehicle in which the forces of “lift” and “thrust” are supplied by rotors. A helicopter can take off and land vertically, hover, and to fly in any direction. The word “helicopter” is derived from the French word “hélicoptère.” The earliest references for vertical flight came from China. From as far back as 400 BC, children in China have played with bamboo flying toys which have a stick attached to a rotor that flies.
Leonardo and Early Development
In the 1480’s, Leonardo da Vinci created a design for a machine that could be described as an “aerial screw.” He reportedly started out making small flying models.
In 1878 Italian Enrico Forlanini’s displayed an unmanned vehicle, powered by a steam engine, that rose to a height of 12 meters (40 ft), where it hovered for some 20 seconds after a vertical take-off. Ján Bahýľ, a Slovak inventor, adapted the internal combustion engine to power his helicopter model that reached a height of 0.5 meters (1.6 ft) in 1901. Many people from around the world engineered helicopter designs…and all the contributions led to the helicopters we know today!
Early rotor winged flight suffered failures primarily associated with the unbalanced rolling movement generated when attempting take-off, due to asymmetry of lift between the advancing and retreating blades. This major difficulty was resolved by Juan de la Cierva’s introduction of the flapping hinge. In 1923, de la Cierva’s first successful autogyro was flown in Spain. As de la Cierva’s autogyros achieved success and acceptance, others began to follow and with them came further innovation.
Commercial Success
Igor Sikorsky was a Russian-American aviation pioneer in both helicopters and fixed-wing aircraft. In 1939, Sikorsky designed and flew the Vought-Sikorsky VS-300, the first viable American helicopter, which pioneered the dual rotor configuration used by most helicopters today. Sikorsky modified the design into the Sikorsky R-4, which became the world’s first mass-produced helicopter in 1942.
The Torque Effect
The torque effect is an example of Isaac Newton’s third law of motion that “for every action there is an equal and opposite reaction.” With a single main rotor helicopter, the body of the helicopter has a tendency to turn in the opposite direction of the rotor movement. This would make for an unpleasant journey! So most helicopters have a smaller rotor at the tail that provides a counter motion and keeps the helicopter body stable. This is an example of a torque effect. A drone usually has four rotors to provide balance.
Helicopters and Drones
How Does a Helicopter Fly?
In order to fly, an object must have “lift.” Airplanes get lift from their wings, and the material and shape make a difference. A helicopter uses blades or rotors (which are really spinning wings), that help the helicopter to lift off the ground. And, if the engine stops on a helicopter, the rotor should continue to spin, allowing the pilot to land slowly, usually without crashing.
Helicopter Usages
Helicopters can provide access to places that cannot be easily reached in an airplane. Because they can move straight up and down they do not require a runway. Also helicopters can fly backwards and sideways, and hover in one spot without moving. Because of this flying flexibility, a helicopter can serve as a flying ambulance to quickly rescue people or animals from areas that are tough to reach in any other way. Helicopters are also often used to report on traffic and weather. They can lift many heavy objects and carry water or other materials to help with a remote fire. Some helicopters that carry extremely heavy loads have two large rotors instead of one large rotor and a small one.
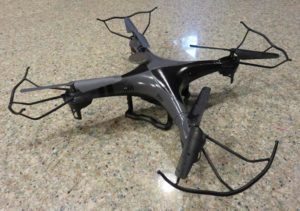
What is an Unmanned Aerial Vehicle or a Drone?
An unmanned aerial vehicle (UAV), or a drone, is an aircraft that has no human pilot aboard. They have a system to communicate with a ground controller or in some cases an onboard computer. UAVs originated with military applications, but they are now also used for policing, surveillance, aerial photography, and for fun! Recently Amazon began delivering small packages via drones! See the first delivery (December 2016) at www.youtube.com/watch?v=vNySOrI2Ny8.
Engineering Changes
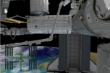
Engineers often seek to improve designs and will test many many options to see what works. NASA recently was seeking a way to make helicopters more quiet and tested a new system in a wind tunnel.
Drone Regulations
Owners of UAS should be aware of local and international regulations and guidelines. The U.S. Federal Aviation Administration (FAA) classifies UASs or drones into three types: public operations (governmental), civil (non-governmental), and model aircraft (hobby). Some of the regulations include keeping drones at least five miles away from airports and never flying above 400 feet. In the US, drone registration is now mandatory. FAA drone facts and regulations are available at www.faa.gov/uas.
- Aerodynamic: The qualities of an object that affect how easily it is able to move through the air.
- Criteria: Conditions that the design must satisfy like its overall size, etc.
- Drag: A force that acts opposite to the relative motion of any object moving with respect to surrounding air (or water).
- Engineers: Inventors and problem-solvers of the world. Twenty-five major specialties are recognized in engineering (see infographic).
- Engineering Design Process: Process engineers use to solve problems.
- Engineering Habits of Mind (EHM): Six unique ways that engineers think.
- Lift: An aerodynamic force that helps to counteract weight. The heavier an object is, the harder it is for lift to work against it and achieve flight.
- Iteration: Test & redesign is one iteration. Repeat (multiple iterations).
- Prototype: A working model of the solution to be tested.
- Thrust: The forward motion (velocity) or thrust of an aircraft through the air along with the shape of the aircraft and its parts.
- Weight: Everything has weight, which is a result of gravitational forces. The materials selected for a glider design will have a weight that will need to be offset by “lift” in order to fly.
Internet Connections
Recommended Reading
- “How Do Helicopters Work?” by Jennifer Boothroyd (ISBN: 978-1467707848)
- “How Does a Helicopter Work?” by Sarah Eason (ISBN: 978-1433934650)
- “Flight” by Philip Wilkinson (ISBN: 978-0195219968)
- “Drones: An Illustrated Guide to the Unmanned Aircraft that are Filling Our Skies” by Martin J. Dougherty (ISBN: 978-1782742555)
Writing Activity
Write an essay or a paragraph describing a situation where a helicopter or drone would be a more efficient flight vehicle than a plane. Or, write an essay about how drones are used in agriculture or by real estate salespeople.
Alignment to Curriculum Standards
All lesson plans in this series are aligned to the Next Generation Science Standards, and if applicable also to the Computer Science Teachers Association K-12 Computer Science Standards, the U.S. Common Core State Standards for Mathematics, and the International Technology Education Association’s Standards for Technological Literacy.
Next Generation Science Standards (grades 3-5)
Students who demonstrate understanding can:
- 3-PS2-1. Plan and conduct an investigation to provide evidence of the effects of balanced and unbalanced forces on the motion of an object.
- 3-PS2-2. Make observations and/or measurements of an object’s motion to provide evidence that a pattern can be used to predict future motion.
- 3-5-ETS1-1. Define a simple design problem reflecting a need or a want that includes specified criteria for success and constraints on materials, time, or cost.
- 3-5-ETS1-2. Generate and compare multiple possible solutions to a problem based on how well each is likely to meet the criteria and constraints of the problem.
- 3-5-ETS1-3. Plan and carry out fair tests in which variables are controlled and failure points are considered to identify aspects of a model or prototype that can be improved.
- 5-PS2-1. Support an argument that the gravitational force exerted by Earth on objects is directed down.
U.S. Common Core State Standards for Mathematics (grades 3-5)
- Grade Three: Represent and Interpret Data (CCSS.MATH.CONTENT.3.MD.B.4)
- Grade Four: Represent and Interpret Data (CCSS.MATH.CONTENT.4.MD.B.4)
- Grade Five: Represent and Interpret Data (CCSS.MATH.CONTENT.5.MD.B.2)
International Technology Education Association’s Standards for Technological Literacy (grades 3-5)
Chapter 8 – The Attributes of Design
- Definitions of Design
- Requirements of Design
Chapter 9 – Engineering Design
- Engineering Design Process
- Creativity and Considering all ideas
- Models
Chapter 10 – The Role of Troubleshooting, Research and Development, Invention, and Experimentation in Problem Solving
- Troubleshooting
- Invention and innovation
- Experimentation
Chapter 11 – Apply the Design Process
- Collect information
- Visualize a solution
- Test and evaluate solutions
- Improve a design

 Industrial Engineering
 Computer Engineering
Engineering Teamwork and Planning
You are a team of engineers given the challenge of creating a rotor out of simple materials that falls as slowly as possible. You may use any materials provided to you and will first work as a team to review a sample template and develop your own design for a rotor.
Planning and Design Phase
Be sure to read the summary sheet about the forces that impact flight.
Your team has been provided with a set of materials and a basic template for a rotor. You may build your rotor using this template or try out variations.
Since your rotor has no motor, it has only one source of lift so can only fly down when it is dropped from a height. But your design can impact how slowly it falls…your challenge is to build a rotor that takes the longest to hit the ground.
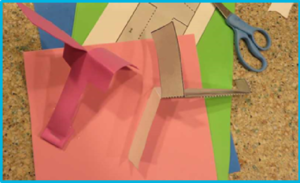
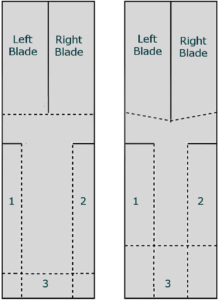
To try the basic template, cut along the solid lines and fold along the dotted ones. Make sure your wing blades are folded in opposite directions. Weighting or folding the bottom will help provide structural support and lower the center of gravity of your copter. You can investigate other modifications!
Your teacher will provide a range of weights and types of materials from paper to cardboard to foam sheets. You can add other items provided as well.
As a group decide on the design of your rotor and draw a simple plan in the box below. Also include a list of materials you have selected for construction. Then draw a full size template of your parts which can be used to cut and build your actual rotor.
|
|
| Materials Required for Building:
|
Construction Phase
Gather your materials, review your plan, and build your rotor. Your team can change its design in the building stage, if necessary, to improve the final result. Then, answer the questions below:
1) How similar was your final rotor to your original design template?
2) If you found you needed to make changes during the construction phase, describe why your team decided to make revisions.
3) Why do you think the spinning rotor motor slows down the fall of the paper and produces lift?
4) Did you find you needed to add additional materials during construction? What did you add, and why?
5) Do you think that engineers often change their original plans during the manufacturing phase of development? How do you think this might impact a planned design or manufacturing budget?
6) How did you decide on the shape of the parts of your rotor? What was it about the shape of each part that you thought might help your rotor fly longer?
Flight Test Phase
Your teacher will test each rotor three times to maintain consistency in measuring the time it takes to reach the floor. For comparison, crumple up a piece of paper of the same thickness you used for construction and see how long it takes to drop! For your rotor, indicate the amount of time it took for each test to reach the floor.
| Example:
Flight Time: 4 seconds start Flight Path: Our rotor curved
end
|
|
|
Test One: Flight Time: Flight Path:
Test Two: Distance Flown: Flight Path:
Test Three: Distance Flown: Flight Path:
|
|
Class Best (slowest) Flight Time:
|
Evaluation
Complete the evaluation questions below:
1) What aspect(s) of the design led to the success of the rotor that flew for the longest time?
2) Describe one part of your design that you think worked the best.
3) If you had a chance to do this project again, what would your team have chosen to do differently?
4) If you could have selected some building materials which were not made available to you, what would you have selected? Why?
5) Do you think this project worked better because you were part of a team, or do you think you could have done a better job working alone?
6) Do you think that engineers work alone, or in a team when they are developing new materials, processes, or products?
7) If your rotor design was scaled up in size to be the size needed for a helicopter, do you think it would work?
8) What materials would you make a full scale helicopter rotor out of? Why?
Downloadable Student Certificate of Completion